July 31, 2022

Serialization in Java With Examples

Serialization in Java is the process of converting state of the object into a byte stream and the reverse process of deserialization converts that byte stream (serialized form of object) back into a copy of the object.

Once the object is converted into byte stream you can save it. Because of this ability to persist an object, provided by serialization in Java, objects we create could exist beyond the lifetime of the JVM.

Following image shows the process of serialization and deserialization in Java and what can you do with serialized object.

What is required for serialization

A Java object can be serialized if its class or any of its superclasses implements either the java.io.Serializable interface or its subinterface, java.io.Externalizable. Note that Serializable is a marker interface and does not have any field or method.

ObjectOutputStream and ObjectInputStream classes

For serializing an object writeObject() method of the ObjectOutputStream class is used.

final void writeObject(Object obj) throws IOException

For deserializing an object readObject() method of the ObjectInputStream class is used.

final Object readObject() throws IOException, ClassNotFoundException

Java object serialization example

For the example we’ll use the following Employee class that implements Serializable interface. Getters and Setters not included in the code here.

import java.io.Serializable;

public class Employee implements Serializable{
  private String name;
  private String dept;
  private int salary;
  private transient int ssn;
  Employee(String name, String dept, int salary, int ssn){
    this.name = name;
    this.dept = dept;
    this.salary = salary;
    this.ssn = ssn;
  }
}

As you can see class implements Serializable interface, which is a must requirement for serialization. Trying to serialize an object where class in not implementing Serializable interface results in java.io.NotSerializableException.

By default all the non-static object fields are serialized. If you don’t want any specific field to be serialized then the field should be marked transient. In the class SSN field is marked as transient.

Serialization process
public class SerializationDemo {
  public static void main(String[] args) {
    Employee emp = new Employee("Ryan", "IT", 7500, 11111);
    final String fileName = "F:\\knpcode\\emp.ser";
    serialzeObject(emp, fileName);
  }

  // Method to serialize object
  public static void serialzeObject(Object obj, String fileName){
    try(ObjectOutputStream outStream = new ObjectOutputStream(new FileOutputStream(fileName))){
      outStream.writeObject(obj);	   
    } catch (IOException e) {
      // TODO Auto-generated catch block
      e.printStackTrace();
    }
  }
}

On executing this program a file called emp.ser is created that stores the serialized information of the Employee object.

Deserialization process

Following program deserializes the Employee object serialized in the above example.

public class SerializationDemo {

  public static void main(String[] args) {
    //Employee emp = new Employee("Ryan", "IT", 7500, 11111);
    final String fileName = "F:\\knpcode\\emp.ser";
    //serialzeObject(emp, fileName);
    /// Do null check here
    Employee e = (Employee)deSerializeObject(fileName);
    System.out.println("Name- " + e.getName());
    System.out.println("Dept- " + e.getDept());
    System.out.println("Salary- " + e.getSalary());
    System.out.println("SSN- " + e.getSsn());
  }

  // Method to deserialize object
  public static Object deSerializeObject(String fileName){
    Object obj = null;
    try(ObjectInputStream inStream = new ObjectInputStream(new FileInputStream(fileName))){
      obj = inStream.readObject();	 			
    } catch (IOException e) {
      // TODO Auto-generated catch block
      e.printStackTrace();
    } catch (ClassNotFoundException e) {
      System.out.println("No class found for serialization");
      e.printStackTrace();
    }
    return obj;
  }
}
Output
Name- Ryan
Dept- IT
Salary- 7500
SSN- 0

In the deserialization program, file storing the serialized object is passed to the ObjectInputStream. From that object is read using readObject() method.

Since SSN is marked as transient so SSN field was not serialized while serializing the object. That is why there is not data to read for SSN field so the default int value 0 is displayed.

Points about Serialization

  1. The object to be persisted must implement the Serializable interface or inherit that implementation from its parent class. Though the reverse is not true if child class implements Serializable then parent class doesn’t become Serializable.
  2. All nonserializable fields should be marked transient.
  3. If a class that implements Serializable references another object then that object should also be implementing Serializable in order to be serialized. If all the referenced objects also implement Serializable interface then the whole object graph is serialized.
  4. In deserialization process object is reconstituted from the serialized bytes so no constructor is called during the process of deserialization.

Implementing writeObject() and readObject() methods

Most of the time default implementation of writeObject() and readObject() methods work for serializing and deserializing an object but you can also implement these methods to have more control over the process.

One such scenario is when parent class doesn’t implement Serializable interface where as the child class do. While serializing the object if you want to serialize fields inherited from parent class then you can do that by implementing writeObject() and readObject() methods. Let’s understand it with an example, parent class is ClassA extended by ClassB.

public class A {
  int a;
  public int getA() {
    return a;
  }
  public void setA(int a) {
    this.a = a;
  } 	
}
import java.io.Serializable;

public class B extends A implements Serializable{
  int b;
  String test;
  public int getB() {
    return b;
  }
  public void setB(int b) {
    this.b = b;
  }
  public String getTest() {
    return test;
  }
  public void setTest(String test) {
    this.test = test;
  }
	
  public static void main(String[] args) {
    B obj = new B();
    obj.setA(1);
    obj.setB(2);
    obj.setTest("Test");
    final String fileName = "F:\\knpcode\\test.ser";	
    SerializationDemo.serialzeObject(obj, fileName);
    
    B retObj = (B)SerializationDemo.deSerializeObject(fileName);
    System.out.println("A " + retObj.getA());
    System.out.println("B " + retObj.getB());
    System.out.println("Test " + retObj.getTest());
  }
}
Output
A 0
B 2
Test Test

As you can see value for field A is 0. Field A is not serialized because ClassA doesn’t implement Serializable. You can implement writeObject() and readObject() methods and provide logic to explicitly serialize and deserialize fields inherited from parent class in this scenario.

import java.io.IOException;
import java.io.ObjectInputStream;
import java.io.ObjectOutputStream;
import java.io.Serializable;

public class B extends A implements Serializable{
  int b;
  String test;
  public int getB() {
    return b;
  }
  public void setB(int b) {
    this.b = b;
  }
  public String getTest() {
    return test;
  }
  public void setTest(String test) {
    this.test = test;
  }

  public static void main(String[] args) {
    B obj = new B();
    obj.setA(1);
    obj.setB(2);
    obj.setTest("Test");
    final String fileName = "F:\\knpcode\\test.ser";	
    SerializationDemo.serialzeObject(obj, fileName);
    
    B retObj = (B)SerializationDemo.deSerializeObject(fileName);
    System.out.println("A " + retObj.getA());
    System.out.println("B " + retObj.getB());
    System.out.println("Test " + retObj.getTest());
  }
	
  private void writeObject(ObjectOutputStream outStream) throws IOException{
    // default functionality for classB
    outStream.defaultWriteObject();
    // Explicitly writing ClassA fields
    outStream.writeInt(getA());
  }

  private void readObject(ObjectInputStream inputStream) throws IOException, ClassNotFoundException{
    // default functionality for classB
    inputStream.defaultReadObject();
    // Explicitly reading ClassA fields and setting them
    setA(inputStream.readInt());
  }
}

Using writeObject() and readObject() to stop serialization

You may also have a scenario where you want to ensure that your class is never serialized.

Let's say you create a class whose superclass is serializable but you do not want that new class to be serializable? Since the parent class is serializable so child class is automatically serializable.

To ensure that child class is not serializable you can implement writeObject() and readObject() methods and throw NotSerializableException from the methods.

In the example ClassA is the parent class which implements Serializable.

public class A implements Serializable{
  int a;
  public int getA() {
    return a;
  }
  public void setA(int a) {
    this.a = a;
  } 	
}

ClassB is the child class with writeObject() and readObject() methods implemented to throw NotSerializableException.

import java.io.IOException;
import java.io.NotSerializableException;
import java.io.ObjectInputStream;
import java.io.ObjectOutputStream;
import java.io.Serializable;

public class B extends A{
  int b;
  String test;
  public int getB() {
    return b;
  }
  public void setB(int b) {
    this.b = b;
  }
  public String getTest() {
    return test;
  }
  public void setTest(String test) {
    this.test = test;
  }
	
  public static void main(String[] args) {
    B obj = new B();
    obj.setA(1);
    obj.setB(2);
    obj.setTest("Test");
    final String fileName = "F:\\knpcode\\test.ser";	
    SerializationDemo.serialzeObject(obj, fileName);
    
    B retObj = (B)SerializationDemo.deSerializeObject(fileName);
    System.out.println("A " + retObj.getA());
    System.out.println("B " + retObj.getB());
    System.out.println("Test " + retObj.getTest());
  }

  private void writeObject(ObjectOutputStream outStream) throws IOException{
    throw new NotSerializableException("Class is not serializable");
  }
   
  private void readObject(ObjectInputStream inputStream) throws IOException, ClassNotFoundException{
    throw new NotSerializableException("Class is not serializable");
  }
}
Output
java.io.NotSerializableException: Class is not serializable
	at com.knpcode.proj.Programs.B.writeObject(B.java:40)

That's all for the topic Serialization in Java With Examples. If something is missing or you have something to share about the topic please write a comment.


You may also like

July 30, 2022

Java Externalizable Interface Example

When your class implements Serializable interface, object serialization is automatic where you just need to call writeObject() and readObject() methods for serialization and deserialization. If you want to customize the serialization process with you having more control then you can use Externalizable interface in Java.

Externalizable interface in Java

java.io.Externalizable interface extends Serializable interface and adds two methods of its own-

  • writeExternal(ObjectOutput out)- To write object into a stream by calling writexxx methods for primitive types and writeObject method for objects. This flexibility to call write() methods for individual fields gives you control over the serialization process.
  • readExternal(ObjectInput in)- To read object from stream by calling readxxx methods for primitive types and readObject method for objects.

Any class where you want to have control over its object serialization should implement writeExternal and readExternal methods of the Externalizable interface.

Externalizable Java example

In the example we have an Employee class that implements Externalizable interface. There are four fields in the Employee class, in the writeExternal() method you can control which of these fields are to be written to the stream. In this example salary field is omitted.

import java.io.Externalizable;
import java.io.IOException;
import java.io.ObjectInput;
import java.io.ObjectOutput;

public class Employee implements Externalizable{
  private String name;
  private String dept;
  private int salary;
  private int age;
  // no arg constructor required
  public Employee(){}
  Employee(String name, String dept, int salary, int age){
    this.name = name;
    this.dept = dept;
    this.salary = salary;
    this.age = age;
  }

  public int getAge() {
    return age;
  }

  public void setAge(int age) {
    this.age = age;
  }

  public String getName() {
    return name;
  }
  public void setName(String name) {
    this.name = name;
  }
  public String getDept() {
    return dept;
  }
  public void setDept(String dept) {
    this.dept = dept;
  }
  public int getSalary() {
    return salary;
  }
  public void setSalary(int salary) {
    this.salary = salary;
  }

  @Override
  public void writeExternal(ObjectOutput out) throws IOException {
    System.out.println("In writeExternal method");
    out.writeObject(name);
    out.writeObject(dept);
    out.writeInt(age);		
  }

  @Override
  public void readExternal(ObjectInput in) throws IOException, ClassNotFoundException {
    System.out.println("In readExternal method");
    name = (String)in.readObject();
    dept = (String)in.readObject();
    age = in.readInt();
  }
}

Here is a class that does the serialization and deserialization of an Employee class object.

import java.io.FileInputStream;
import java.io.FileOutputStream;
import java.io.IOException;
import java.io.ObjectInputStream;
import java.io.ObjectOutputStream;

public class ExternalizableDemo {
  public static void main(String[] args) {
    Employee emp = new Employee("Ryan", "IT", 7500, 34);
    final String fileName = "F:\\knpcode\\emp.ser";
    ObjectOutputStream outStream;
    try {
      // Serializing object
      outStream = new ObjectOutputStream(new FileOutputStream(fileName));
      outStream.writeObject(emp);
      outStream.close();
        
      // Deserializing object
      ObjectInputStream inputStream = new ObjectInputStream(new FileInputStream(fileName));
      emp = (Employee)inputStream.readObject();
      inputStream.close();
      System.out.println("Name: " + emp.getName() + " Dept: " 
        + emp.getDept() + " Salary: " + emp.getSalary() + " Age: " + emp.getAge());
    } catch (IOException | ClassNotFoundException e) {
      // TODO Auto-generated catch block
      e.printStackTrace();
    }
  }
}
Output
In writeExternal method
In readExternal method
Name: Ryan Dept: IT Salary: 0 Age: 34

Some important points about Externalizable-

  • When an Externalizable object is reconstructed during the deserialization process, object instance is created first using the public no-argument constructor, then the readExternal method is called. So, ensure that the class implementing Externalizable has a public no-arg constructor.
  • In readExternal() method fields should be read in the same order they were written in the writeExternal() method otherwise an exception is thrown.

Serialization order in Java

Externalizable takes precedence over Serialization. Each object that is serialized is tested for the Externalizable interface. If the object supports Externalizable, the writeExternal method is called. If the object does not support Externalizable and does implement Serializable, the object is saved using ObjectOutputStream.

When an Externalizable object is reconstructed, an instance is created using the public no-arg constructor, then the readExternal method called. Serializable objects are restored by reading them from an ObjectInputStream.

That's all for the topic Java Externalizable Interface Example. If something is missing or you have something to share about the topic please write a comment.


You may also like

July 29, 2022

Java Reflection – Class Constructors

Using Java Reflection you can get information about the constructors of the class and create a new class instance too. In Java Reflection API there is a class java.lang.reflect.Constructor that has methods for finding constructors, retrieving constructor modifiers and creating new instance.

Getting Constructor instance

First thing is to get the instance of java.lang.reflect.Constructor class for that you will have to use methods of the java.lang.Class as that class is the entry point for all reflection operations. There are 5 methods for getting Constructor instance-

  • getConstructor(Class<?>... parameterTypes)- This method returns a Constructor object where the passed parameter types match the parameters of the constructor in the class.
  • getConstructors()- Returns an array containing Constructor objects reflecting all the public constructors of the class represented by this Class object.
  • getDeclaredConstructor(Class<?>... parameterTypes)- This method returns a Constructor object where the passed parameter types match the parameters of the constructor in the class. How this method differs from getCOnstructor() is that this method can also match a private or protected constructor.
  • getDeclaredConstructors()- Returns an array of Constructor objects reflecting all the constructors declared by the class represented by this Class object.
  • getEnclosingConstructor()- If this Class object represents a local or anonymous class within a constructor, returns a Constructor object representing the immediately enclosing constructor of the underlying class.

Getting information about class constructors – Java example

This example shows how to get information like parameter types, modifiers of individual/all constructors of a class.

Following is the class used for the example.

public class Message {
  String msg;
  public Message(String msg){
    this.msg = msg;
  }

  private Message() {
    
  }
  public void displayMessage(){
    System.out.println(msg);
  }
}
import java.lang.reflect.Constructor;
import java.lang.reflect.Modifier;
import java.util.Arrays;

public class ReflectionDemo {
  public static void main(String[] args) {
    try {
      Message message = new Message("Java Reflection example");
      // get instance of Class
      Class<?> c = message.getClass();
      System.out.println("--- getConstructor() ---");
      Constructor<?> constructor = c.getConstructor(new Class[]{String.class});
      System.out.println("Constructor Name- " + constructor.getName());
      System.out.println("Constructor Parameters- " + Arrays.toString(constructor.getParameterTypes()));
      System.out.println("Constructor Modifier- " + Modifier.toString(constructor.getModifiers()));
      
      System.out.println("--- getDeclaredConstructor() ---");
      constructor = c.getDeclaredConstructor();
      System.out.println("Constructor Name- " + constructor.getName());
      System.out.println("Constructor Parameters- " + Arrays.toString(constructor.getParameterTypes()));
      System.out.println("Constructor Modifier- " + Modifier.toString(constructor.getModifiers()));
      
      System.out.println("--- getConstructors() ---");
      Constructor<?>[] cons = c.getConstructors();
      System.out.println("Constructor Name- " + Arrays.toString(cons));
      
      System.out.println("--- getDeclaredConstructors() ---");
      cons = c.getDeclaredConstructors();
      for(Constructor<?> ct : cons) {
        System.out.println("Constructor Name- " + ct.getName());
        System.out.println("Constructor Parameters- " + Arrays.toString(ct.getParameterTypes()));
        System.out.println("Constructor Modifier- " + Modifier.toString(ct.getModifiers()));
      }                       
    } catch (NoSuchMethodException | IllegalArgumentException e) {
      // TODO Auto-generated catch block
      e.printStackTrace();
    }
  }
}
Output
--- getConstructor() ---
Constructor Name- com.knpcode.programs.Message
Constructor Parameters- [class java.lang.String]
Constructor Modifier- public
--- getDeclaredConstructor() ---
Constructor Name- com.knpcode.programs.Message
Constructor Parameters- []
Constructor Modifier- private
--- getConstructors() ---
Constructor Name- [public com.knpcode.programs.Message(java.lang.String)]
--- getDeclaredConstructors() ---
Constructor Name- com.knpcode.programs.Message
Constructor Parameters- [class java.lang.String]
Constructor Modifier- public
Constructor Name- com.knpcode.programs.Message
Constructor Parameters- []
Constructor Modifier- private

Get new class instance using Java Reflection

In Java there are two reflective methods for creating instances of classes: java.lang.reflect.Constructor.newInstance() and Class.newInstance(). Here we’ll see an example of creating class instance using Constructor class of the Java Reflection API, which is also the preferred way as per Java docs- https://docs.oracle.com/javase/tutorial/reflect/member/ctorInstance.html

newInstance(Object... initargs)- Uses the constructor represented by this Constructor object to create and initialize a new instance of the constructor's declaring class, with the specified initialization parameters.

import java.lang.reflect.Constructor;
import java.lang.reflect.InvocationTargetException;

public class ReflectionDemo {
  public static void main(String[] args) {
    try {
      Message message = new Message("Java Reflection example");
      // get instance of Class
      Class<?> c = message.getClass();
      Constructor<?> constructor = c.getConstructor(new Class[]{String.class});
      Message m = (Message)constructor.newInstance("Hello");
      m.displayMessage();              
    } catch (NoSuchMethodException | IllegalArgumentException | InstantiationException | IllegalAccessException | InvocationTargetException e) {
      // TODO Auto-generated catch block
      e.printStackTrace();
    }
  }
}

Get new class instance using private constructor

You can get a new class instance by using the private constructor of the class too.

Once you have the Constructor object you have to set the access for it as true using the setAccessible() method which is inherited from class java.lang.reflect.AccessibleObject.

import java.lang.reflect.Constructor;
import java.lang.reflect.InvocationTargetException;

public class ReflectionDemo {
  public static void main(String[] args) {
    try {
      Message message = new Message("Java Reflection example");
      // get instance of Class
      Class<?> c = message.getClass();
      // Getting private constructor
      Constructor<?> constructor = c.getDeclaredConstructor();
      constructor.setAccessible(true);
      Message m = (Message)constructor.newInstance();
      m.displayMessage();                   
    } catch (NoSuchMethodException | IllegalArgumentException | InstantiationException | IllegalAccessException | InvocationTargetException e) {
      // TODO Auto-generated catch block
      e.printStackTrace();
    }
  }
}

That's all for the topic Java Reflection – Class Constructors. If something is missing or you have something to share about the topic please write a comment.


You may also like

July 28, 2022

JDBC DriverManager Class

java.sql.DriverManager class in JDBC API in Java is a utility class to manage a set of JDBC drivers. Before connection to DB and start any DB operation you will have to register the driver for that specific DB with the DriverManager class.

Java DriverManager class methods

Main task of the DriverManager class is to register JDBC driver and to establish a connection with the DB for these tasks following methods are provided in the DriverManager class-

  • registerDriver(Driver driver)- Registers the given driver with the DriverManager.
  • registerDriver(Driver driver, DriverAction da)- Registers the given driver with the DriverManager. Using DriverAction you can specify an implementation that has to be called when deregisterDriver() method of DriverManager is called.
  • deregisterDriver(Driver driver)- Removes the specified driver from the DriverManager's list of registered drivers.
  • getDriver(String url) -Attempts to locate a driver that understands the given URL.
  • getDrivers()- Returns an Enumeration with all of the currently loaded JDBC drivers.
  • getLoginTimeout()- Gets the maximum time in seconds that a driver can wait when attempting to log in to a database.
  • getConnection(String url)- Attempts to establish a connection to the given database URL.
  • getConnection(String url, String user, String password)- Attempts to establish a connection to the given database URL, passing the DB credentials; user and password as other arguments.
  • getConnection(String url, Properties info)- Attempts to establish a connection to the given database URL, passing a list of arbitrary string tag/value pairs as connection arguments.

That's all for the topic JDBC DriverManager Class . If something is missing or you have something to share about the topic please write a comment.


You may also like

July 27, 2022

Why main Method static in Java

When you write any Java program it’s starting execution point is the main method which has a form as following.

Public static void main(String[] args)

Given this signature of main method in Java the question arises why main method is public, void and static in Java. It is asked quite frequently in interviews too.

Why Java main method is marked public

Having an access modifier as public means method can be accessed from classes in the same package and from other packages too.

Main method in Java is public so that JVM can easily access it, as JVM needs to load the class and call the main method of the class.

Why Java main method is void

Any Java method which doesn’t return a value has to be marked as void. Since main method in Java doesn’t return any value so it is void.

Why Java main method is static

The point why main method is static in Java needs some explanation.

When any method is marked as static in Java, it is associated with the class not with any object of the class. Any static method can be called without creating any object of the class.

For example-
Class Test{
  static void methodA(){
    ..
    ..
  }
  ...
}

You can call methodA using the class itself– Test.methodA(); as it is a static method. You don’t need to do this-

Test test = new Test();
test.methodA();

As we know main method in Java is the starting point for the execution of the program and marking the main method as static means JVM can call main method with out creating any instance of the class.

You may think what if the instance is created and main method is called using that instance of the class, answer is that will cause ambiguity if there are constructors with arguments in your class.

For example consider this class-

public class Test {
  private int i;
  Test (int i){
     this.i = i;
  }
  public static void main(String args[]){
    Test test = new Test(7);
  }
}

If JVM has to create an instance of this class and then call the methods, then constructor of the class has to be invoked. In that case what value has to be passed for i, if JVM has to create an instance itself.

It has to execute this statement- Test test = new Test(7); to create an instance of the class initialized with the passed value. To call this statement, method has to be called with out creating any object of the class, so we are back to the fact that the method has to be static. That is why main method is static in Java.

Important points

  1. If you don’t declare main method as public void static, there won’t be a compile time error but run time error will be thrown. If main method is not static
    Error: Main method is not static in class com.knpcode.Test, please define the main method as:
       public static void main(String[] args)
    
    If main method is not public static
    Error: Main method not found in class com.knpcode.Test, please define the main method as:
       public static void main(String[] args)
    or a JavaFX application class must extend javafx.application.Application
    
  2. With varargs, Java 5 onward main method signature can also be as follows-
    public static void main(String ... args).
    
  3. Having main method as static in Java is required so that the main method which is the starting point for the Java program can be executed with out creating instance of the class.

That's all for the topic Why main Method static in Java. If something is missing or you have something to share about the topic please write a comment.


You may also like

July 26, 2022

JDBC Driver Interface

java.sql.Driver interface in JDBC API is one interface that every Driver class has to implement compulsorily. Each driver should supply a class that implements the Driver interface.

When you load/register a driver by any of the following ways, Driver class implementation is loaded. After the class is loaded it creates an instance of itself and registers it with the DriverManager.

Class.forName(“JDBC Driver Class”);

DriverManager.registerDriver(Driver class instance);

DriverManager will try to load as many drivers as it can find and then for any given connection request, it will ask each driver in turn to try to connect to the target URL.

Methods in java.sql.Driver

Some of the main methods defined in this interface are as follows-

  • connect(String url, Properties info)- Attempts to make a database connection to the given URL. The Properties argument can be used to pass arbitrary string tag/value pairs as connection arguments.
  • getMajorVersion()- Retrieves the driver's major version number.
  • getMinorVersion()- Gets the driver's minor version number.

That's all for the topic JDBC Driver Interface. If something is missing or you have something to share about the topic please write a comment.


You may also like

July 25, 2022

JDBC Connection Interface

Using Java Connection interface you can create a session with a specific database. SQL statements are executed and results are returned within the context of a connection. Connection interface in JDBC API resides in java.sql package.

How to get Connection instance

You can create Connection object using DriverManager.getConnection() method.

Connection connection = DriverManager.getConnection("jdbc:oracle:thin:@myhost:1521:emp", "dbuser", "dbpwd");

Once you have a Connection object you can-

  1. Get a Statement object.
  2. Using Connection object you can also get metadata about the DB it is connecting to like DB version, driver info, tables in DB and so on.
  3. Manage transaction by using commit() and rollback() methods of Connection object and also set transaction isolation level.

Methods in Connection interface

We’ll go through some of the commonly used methods of the Connection interface categorized by functionality.

For getting Statement instance

Connection has methods to get a Statement, PreparedStatement and a CallableStatement.

  • createStatement()- Creates a Statement object for sending SQL statements to the database.
  • prepareStatement(String sql)- Creates a PreparedStatement object for sending parameterized SQL statements to the database. Read more about PreparedStatement Interface in this post JDBC PreparedStatement Interface.
  • prepareCall(String sql)- Creates a CallableStatement object for calling database stored procedures. Read more about CallableStatement Interface in this post JDBC CallableStatement Interface.

There methods are overloaded to pass ResultSet type and concurrency level too. See the whole list of methods here- https://docs.oracle.com/en/java/javase/14/docs/api/java.sql/java/sql/Connection.html

For managing transaction

Connection interface in JDBC also provides methods to manage transaction. By default (in auto-commit mode) all the SQL statements will be executed and committed as individual transactions. If you want to group statements in a transaction and manage the transaction then there are following methods-

  • setAutoCommit(boolean autoCommit)- To set this connection's commit mode to true or false. true to enable auto-commit mode; false to disable it. By default, new connections are in auto-commit mode.
  • Commit()- To commit the transaction explicitly. Makes all changes made since the previous commit/rollback permanent. This method should be used only when auto-commit mode has been disabled.
  • rollback()- Undoes all changes made in the current transaction and releases any database locks currently held by this Connection object.
  • setTransactionIsolation(int level)- To change the transaction isolation level for this Connection object to the specified level.

Possible transaction isolation levels are defined as constants in the Connection interface.

  • TRANSACTION_NONE- A constant indicating that transactions are not supported.
  • TRANSACTION_READ_COMMITTED- A constant indicating that dirty reads are prevented; non-repeatable reads and phantom reads can occur.
  • TRANSACTION_READ_UNCOMMITTED- A constant indicating that dirty reads, non-repeatable reads and phantom reads can occur.
  • TRANSACTION_REPEATABLE_READ- A constant indicating that dirty reads and non-repeatable reads are prevented; phantom reads can occur.
  • TRANSACTION_SERIALIZABLE- A constant indicating that dirty reads, non-repeatable reads and phantom reads are prevented.

For getting DB Metadata

  • getMetaData()- Returns a DatabaseMetaData object that contains metadata about the connected database.

That's all for the topic JDBC Connection Interface. If something is missing or you have something to share about the topic please write a comment.


You may also like

July 23, 2022

Constructor Chaining in Java

Constructor chaining in Java is the process of calling one constructor from another constructor with in the same class or calling the parent class constructor from the child class.

So constructor chaining in Java can be done in two ways-

  1. When calling one constructor from another with in the same class. In this case this Keyword can be used to call constructors in chain.
  2. In case of inheritance when calling the parent class’ constructor from the child class. In this case super keyword can be used to call constructors.

How does constructor chaining help

Constructor chaining in Java helps with reducing the code redundancy by doing the task of initialization in one of the constructor. All the other constructors merely call that constructor in a chain for initialization.

Consider the scenario where you have 3 fields in your class and you want to give option to initialize all of them or two of them or only a single one or none. If you keep the initialization in all of the constructors then the code will look like as shown below.

Code without constructor chaining
public class ConstrChaining {
  int a;
  double b;
  String name;
  ConstrChaining(){

  }
  ConstrChaining(int a){
    this.a = a;
  }
  ConstrChaining(int a, double b){
    this.a = a;
    this.b = b;
  }
  ConstrChaining(int a, double b, String name){
    this.a = a;
    this.b = b;
    this.name = name;
  }
  ..
  ..
}

As you can see there is redundancy of initialization code with in the constructors. By using constructor chaining where one constructor calls another same code can be written as following.

Code with constructor chaining
public class ConstrChaining {
  int a;
  double b;
  String name;
  ConstrChaining(){
    this(0);
  }
  ConstrChaining(int a){
    this(a, 0.0);
  }
  ConstrChaining(int a, double b){
    this(a, b, null);
  }
  ConstrChaining(int a, double b, String name){
    this.a = a;
    this.b = b;
    this.name = name;
  }
  public static void main(String[] args) {
    ConstrChaining cc = new ConstrChaining();
    System.out.println("a- " + cc.a + " b- " + cc.b + " name- " + cc.name);
    
    ConstrChaining cc1 = new ConstrChaining(5, 7.8);
    System.out.println("a- " + cc1.a + " b- " + cc1.b + " name- " + cc1.name);
    
    ConstrChaining cc2 = new ConstrChaining(18, 13.45, "knpCode");
    System.out.println("a- " + cc2.a + " b- " + cc2.b + " name- " + cc2.name);
  }
}
Output
a- 0 b- 0.0 name- null
a- 5 b- 7.8 name- null
a- 18 b- 13.45 name- knpCode

As you see now the initialization is done by the single constructor in the class, all the other constructors just call that constructor in a chain rather than doing the initialization themselves.

Constructor chaining in Java with inheritance

Constructor chaining in the case of inheritance is the process of calling the parent class constructor from the child class. Rather than initializing the fields of the parent class again, in the constructor of the child class you can call the constructor of the parent class using super keyword. This helps in reducing code duplication.

public class Area {
  int length;
  int width;
  Area(int length, int width){
    this.length = length;
    this.width = width;
  }
  public static void main(String[] args) {
    Volume volume = new Volume(5,6,7);
    System.out.println("length-" + volume.length + " width-" + 
      volume.width + " height-" + volume.height);
  }
}

class Volume extends Area{
  int height;
  Volume(int length, int width, int height){
    // Calling constructor of parent class
    super(length, width);
    this.height = height;
  }
}
Output
length-5 width-6 height-7

In this example you can see that the parent class constructor is called from the child class constructor using the super keyword to initialize the fields of the parent class.

Rules regarding constructor chaining with super

  1. If super() is used in a constructor to call the constructor of the parent class then it has to be the first statement in the constructor otherwise you will get compile time error "Constructor call must be the first statement in a constructor".
  2. If you don’t call the parent class constructor explicitly then the default no-arg constructor of each super class will be executed implicitly.
  3. In case of constructor chaining from child class to parent class (inheritance hierarchy) the order of calling the constructor is from parent class to child class.

Let’s see it with an example.

class A{
  A(){
    System.out.println("In the constructor of class A");
  }
}

class B extends A{
  int i;
  B(int i){
    this.i = i;
    System.out.println("In the constructor of class B");
  }
}
class C extends B{
  C(int i){
    super(i);
    System.out.println("In the constructor of class C");
  }
  public static void main(String[] args) {
    C c = new C(5);
  }
}

In this code A is the super class which is extended by class B which in turn is extended by class C.

When you create an object of class C, super class constructors will be called in chain starting from super class to child class giving the output as following.

In the constructor of class A
In the constructor of class B
In the constructor of class C

Also note that from the constructor of class B, constructor of class A is not called explicitly still it is called because the default no-arg constructor of the superclass will be executed implicitly.

That's all for the topic Constructor Chaining in Java. If something is missing or you have something to share about the topic please write a comment.


You may also like

Initializer Block in Java

When you create an instance of a class, constructor is called to initialize the instance variables. An alternative to using a constructor to initialize instance variable is to use initializer block in Java. Initializer block is always executed when an instance of the class is created.

General form of Initializer block in Java

{
  // whatever code is needed for initialization 
  // goes here
}

How to use initializer block in Java

The Java compiler copies initializer blocks into every constructor. Therefore, this approach can be used to share a block of code if you have overloaded constructors in your class. Putting the common code in an initializer block ensures that that piece of code is always executed irrespective of the constructor called.

Initializer block Java example

public class MainClass {
	
  //instance initializer block
  {
    System.out.println("Instance initializer block, this block is always executed");
  }
	
  MainClass(){
    System.out.println("In no-arg constructor");
  }
	
  MainClass(int i){
    System.out.println("In single argument constructor-" + i);
  }

  public static void main(String[] args) {
    MainClass obj1 = new MainClass();
    MainClass obj2 = new MainClass(10);    
  }
}
Output
Instance initializer block, this block is always executed
In no-arg constructor
Instance initializer block, this block is always executed
In single argument constructor-10

As you can see whether no-arg constructor is called or the constructor with single argument is called for initialization of the object, initializer block is always executed.

That's all for the topic Initializer Block in Java. If something is missing or you have something to share about the topic please write a comment.


You may also like

July 22, 2022

Constructor Overloading in Java

Constructor overloading in Java is the process similar to method overloading which means with in a class you can have more than one constructor where the constructors differ in the number of parameters.

What is the use of having overloaded constructor

Constructor overloading in Java brings the flexibility of initializing the object as per your need. For example in ArrayList class there is a no-arg constructor which initializes the ArrayList with the default capacity and there is another constructor where initial capacity can be passed as a parameter to initialize ArrayList with the required initial capacity.

Another scenario where constructor overloading in Java helps is to provide a no-arg constructor when there is already a parameterized constructor.

Java implicitly inserts a default no-arg constructor if no constructor is provided in the class. If you provide a constructor yourself then this default no-arg constructor is not provided automatically.

public class ConstructorDemo {
  int num;
  String name;
  // Parameterized constructor
  private ConstructorDemo(int num, String name){
    this.num = num;
    this.name = name;
  }

  public static void main(String[] args) {
    ConstructorDemo cd = new ConstructorDemo();// Compiler error
  }
}

In this class there is a parameterized constructor so default no-arg constructor is not provided automatically by Java. Thus the statement ConstructorDemo cd = new ConstructorDemo(); results in compile time error “The constructor ConstructorDemo() is undefined

In such scenario you can provide more than one constructor to make your object initialization flexible as per your requirement. Like in the above example you can also have a default no-arg constructor along with the parameterized constructor.

public class ConstructorDemo {
  int num;
  String name;
  // Parameterized constructor
  private ConstructorDemo(int num, String name){
    this.num = num;
    this.name = name;
  }
	
  // no-arg constructor
  private ConstructorDemo(){
    
  }

  public static void main(String[] args) {
    ConstructorDemo cd = new ConstructorDemo();
  }
}

Constructor overloading example

Here is an example of constructor overloading where we have an array of type Object. The array is created with the default capacity in the no-arg constructor if no initial capacity is passed. In case initial capacity is passed constructor with initial capacity as parameter is invoked to create an array with passed initial capacity.

public class MyList {
  Object[] elementArray;
  private static final int DEFAULT_CAPACITY = 10;

  public MyList(int initialCapacity) {
    this.elementArray = new Object[initialCapacity];
  }
  public MyList(){
    this.elementArray = new Object[DEFAULT_CAPACITY];
  }
  public static void main(String[] args) {
    MyList myList1 = new MyList();
    System.out.println("Array Length- " + myList1.elementArray.length);
    
    MyList myList2 = new MyList(20);
    System.out.println("Array Length- " + myList2.elementArray.length);
  }
}
Output
Array Length- 10
Array Length- 20

Constructor overloading in Java best practices

In case of having multiple constructors you should be doing the task of initialization in one of the constructor. All the other constructors should ultimately call that constructor for initialization using this keyword.

An example will help to clear it. Consider the scenario where you have 3 fields in your class and you want to give option to initialize all of them or two of them or only a single one or none.

public class ConstrChaining {
  int a;
  double b;
  String name;
  ConstrChaining(){
    this(0);
  }
  ConstrChaining(int a){
    this(a, 0.0);
  }
  ConstrChaining(int a, double b){
    this(a, b, null);
  }
  ConstrChaining(int a, double b, String name){
    this.a = a;
    this.b = b;
    this.name = name;
  }
  public static void main(String[] args) {
    ConstrChaining cc = new ConstrChaining();
    System.out.println("a- " + cc.a + " b- " + cc.b + " name- " + cc.name);
    
    ConstrChaining cc1 = new ConstrChaining(5, 7.8);
    System.out.println("a- " + cc1.a + " b- " + cc1.b + " name- " + cc1.name);
    
    ConstrChaining cc2 = new ConstrChaining(18, 13.45, "knpCode");
    System.out.println("a- " + cc2.a + " b- " + cc2.b + " name- " + cc2.name);
  }
}
Output
a- 0 b- 0.0 name- null
a- 5 b- 7.8 name- null
a- 18 b- 13.45 name- knpCode

In the example you can see that the initialization is done only by the following constructor-

ConstrChaining(int a, double b, String name){
  this.a = a;
  this.b = b;
  this.name = name;
}

All the other overloaded constructors are progressively calling this constructor to get the object initialization done.

That's all for the topic Constructor Overloading in Java. If something is missing or you have something to share about the topic please write a comment.


You may also like

July 21, 2022

Object in Java

Once you create a class in Java that defines a new data type which can be used for creating object of that data type (class). Thus object in Java is an instance of the class, which gets its state and behavior from the class.

Fields defined within a class are also known as instance variables because each instance of the class (object) gets its own copy of these variables. Thus the fields provide state to each object.

Methods with in the class define the behavior of its objects. Methods operate on an object's internal state and serve as the primary mechanism for object-to-object communication.

Creating an object in Java

Creation of an object in Java is comprised of three parts-

  1. Declaration- In this step you declare a variable of the class type. Suppose you have a class called MyClass then you can declare an object of type MyClass as-
    MyClass myObj;
    	
  2. Instantiation- You create an object using the new operator. The new operator returns a reference to the object it created which is assigned to the declared variable (Step 1). For example- myObj = new MyClass();
  3. Initialization- Creation of an object using the new operator is followed by a call to a constructor, which initializes the new object.

Generally in your code you will combine the above mentioned three steps into one statement for creating object of a class in Java.

MyClass myObj = new MyClass();

Java object creation example

Let us see the whole process of creating an object in Java with an example. The class used is as follows.

class MyClass {
  int num;
  String name;
  // Constructor
  MyClass(int num, String name){
    this.num = num;
    this.name = name;
  }
  public void displayValues() {
    System.out.println("Num- " + num + " Name- " + name);
  }
  ..
  ..
}

You will declare a variable of type MyClass as following-

MyClass myObj;

This notifies the compiler that you will use myObj to refer to data whose type is MyClass. Declaring a reference variable does not create an object at this stage it is just a reference variable which currently references no object. Following figure illustrates this stage of the object creation.

object in Java declaration

The following statement instantiates a class by allocating memory for a new object and returning a reference to that memory.

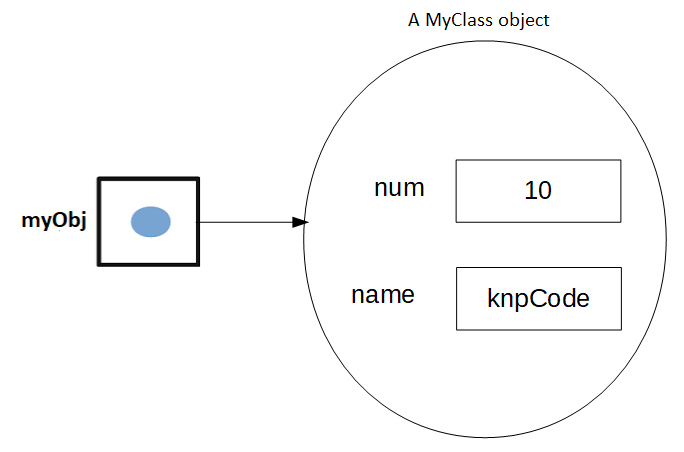
myObj = new MyClass(10, "knpCode"); 

The new operator also invokes the object constructor to initialize the created object. The result of executing this statement can be illustrated in the next figure:

object in Java instantiation

Bundling code into individual software objects provides a number of benefits, including:

  • Modularity: The source code for an object can be written and maintained independently of the source code for other objects. Once created, an object can be easily passed around inside the system.
  • Information-hiding: By interacting only with an object's methods not directly with its fields, the details of its internal implementation remain hidden from the outside world.
  • Code re-use: If an object already exists (perhaps written by another software developer), you can use that object in your program. This allows specialists to create properly coded and tested task-specific functionalities and package them as jars. Which you can then use in your own code by creating objects of those classes.
  • Pluggability and debugging ease: If a particular object turns out to be problematic, you can simply remove it from your application and plug in a different object as its replacement. This is analogous to fixing mechanical problems in the real world. If a bolt breaks, you replace it, not the entire machine.

Referencehttps://docs.oracle.com/javase/tutorial/java/concepts/object.html

That's all for the topic Object in Java. If something is missing or you have something to share about the topic please write a comment.


You may also like

July 20, 2022

Class in Java

A class is the foundation for object oriented programming in Java language. Any logic that has to be implemented in Java must be encapsulated with in the class.

Once a class is created in Java that defines a new data type which can be used for creating object of that data type. Thus, in the context of an object oriented language like Java, a class provides a template that is used to create objects.

Class declaration in Java

In general, class declarations in Java can include these components, in order-

  1. Modifiers- A class can have public or default (no modifier specified) access modifiers.
  2. Class name- The class name, with the initial letter capitalized by convention.
  3. Super class- If a class has a super class then the name of the class's parent (superclass) preceded by the keyword extends. A class can only extend (subclass) one parent.
  4. Interfaces- If class is implementing any interface(s) then specify the comma-separated list of interfaces preceded by the keyword implements. A class can implement more than one interface.
  5. The class body, surrounded by braces, {}.

The class body (the area between the braces) contains all the code that provides for the life cycle of the objects created from the class:

  1. Constructors- Constructors are used for initializing new objects,
  2. Field declarations- Declarations for the fields that provide the state of the class and its objects. Fields defined within a class are also known as instance variables because each instance of the class (object) gets its own copy of these variables.
  3. Methods- Any code is written with in the methods and that implementation defines the behavior of the class and its objects.

Generally the fields with in the class have restricted access, only the code written with in the methods of that class can access and manipulate the data that is why class is the foundation for encapsulation OOPS concept in Java.

Form of class in Java

On the basis of what we have read so far about the declaration of the class, general form of the class in Java is as follows-

class MyClass extends MySuperClass implements YourInterface {
  type instance_var 1;
  type instance_var 2;
  // Constructor
  MyClass(){
  }

  return_type method1(parameters){
    ..
  } 
  return_type method2(){
    ..
  }
}

Class example in Java

Here is a simple example of creating a class with fields, constructor and method.

public class MyClass {
  int num;
  String name;
  // Constructor
  MyClass(int num, String name){
    this.num = num;
    this.name = name;
  }

  public void displayValues() {
    System.out.println("Num- " + num + " Name- " + name);
  }
  public static void main(String[] args) {
    // Creating object of the class
    MyClass myObj = new MyClass(10, "knpCode");
    myObj.displayValues();
  }
}
Output
Num- 10 Name- knpCode

Class in Java- Access and non-access modifiers

Classes in Java can have public or default (package) access modifier.

  • A public class is visible to all classes everywhere.
  • A class with default access is visible within its own package.

A nested class (inner class) can have any access modifier private, protected, public or default.

Non-access modifiers that are permitted with a class in Java are-

  1. final
  2. abstract
  3. strictfp

A nested class can have static non-access modifier too.

Reference: https://docs.oracle.com/javase/tutorial/java/javaOO/classdecl.html

That's all for the topic Class in Java. If something is missing or you have something to share about the topic please write a comment.


You may also like

July 19, 2022

while Loop in Java With Examples

while loop in Java repeatedly executes a block of statement while the given condition is true. Syntax of the while loop in Java is as follows-

while (condition) {
  // body
}

Block of code that is executed with in a loop is enclosed in curly braces. If only a single statement is executed with in while loop then curly braces are optional.

Java while loop execution flow

Following image shows the execution flow of the while loop.

The while statement evaluates the condition which is a boolean expression and it must return a boolean value. If the boolean expression evaluates to true, then block of code in the while loop is executed.

The while statement continues testing the expression and executing its block until the expression evaluates to false. When condition controlling the while loop becomes false, loop is terminated and control passes to the next line of code immediately following the loop.

One thing to note about the while loop is that the conditional expression is evaluated at the top of the loop so the code with in the loop will not execute even once if the condition is evaluated to false in the beginning itself. That's how while loop differs from do-while loop.

Java while loop examples

1- First example uses while loop to print numbers from 1 to 10.

public class WhileDemo {
  public static void main(String[] args) {
    int i = 1;
    while(i <= 10){
      System.out.println("Value- " + i);
      i++;
    }
  }
}
Output
Value- 1
Value- 2
Value- 3
Value- 4
Value- 5
Value- 6
Value- 7
Value- 8
Value- 9
Value- 10

In the while loop condition (i <= 10) is evaluated in each iteration, it returns true till value of i is less than or equal to 10. Condition is evaluated to false when value of i becomes greater than 10 and the loop terminates.

Value of i is incremented with in the while loop body so that the condition eventually evaluates to false.

2- Second example uses while loop to print numbers in reverse order 10 to 1.

public class WhileDemo {
  public static void main(String[] args) {
    int i = 10;
    while(i > 0){
      System.out.println("Value- " + i);
      i--;
    }
  }
}
Output
Value- 10
Value- 9
Value- 8
Value- 7
Value- 6
Value- 5
Value- 4
Value- 3
Value- 2
Value- 1

3- A while loop is executed repeatedly till the condition is true so you can implement an infinite loop by using a while(true) loop. Here is an example of while(true) loop in Java. You will need to manually terminate the code to come out of the loop.

public class WhileDemo {
  public static void main(String[] args) {
    while(true){
      System.out.println("In while loop running infinitely ");
    }
  }
}

4- Since a condition controlling the while loop is a boolean expression so you can use a boolean flag to control the loop. Following example shows another way to display numbers 1 to 10 using while loop and a boolean flag.

public class WhileDemo {
  public static void main(String[] args) {
    int i = 0;
    boolean done = false;
    while(!done){
      System.out.println("value- " + ++i);
      if(i == 10)
        done = true;
    }
  }
}

That's all for the topic while Loop in Java With Examples. If something is missing or you have something to share about the topic please write a comment.


You may also like

do-while loop in Java With Examples

A do-while loop in Java repeatedly executes a block of statement while the given condition is true. Java do-while loop is similar to while loop except one difference that the condition in the do-while loop is evaluated at the bottom rather than at the top (as is the case with while loop). Since the condition in do while loop is evaluated after the loop body, statements within the do while block are always executed at least once.

Syntax of the do-while loop in Java is as follows-

do {
  //body
} while (expression);

Block of code that is executed with in a loop is enclosed with in curly braces.

Java do while loop execution flow

Following image shows the execution flow of the do while loop.

do while loop in Java

In each iteration of the do-while loop body of the loop is executed first and then the condition is evaluated. Condition must be a boolean expression, if the expression evaluates to true then the loop is repeated, if expression evaluates to false then the loop terminates.

Java do while loop examples

1- First example uses do while loop to print numbers from 1 to 10.

public class DoWhileDemo {
  public static void main(String[] args) {
    int i = 1;
    do {
      System.out.println("Value- " + i);
      i++;
    } while (i <= 10);
  }
}
Output
Value- 1
Value- 2
Value- 3
Value- 4
Value- 5
Value- 6
Value- 7
Value- 8
Value- 9
Value- 10

2- Second example uses do while loop to print numbers in reverse order 10 to 1.

public class DoWhileDemo {
  public static void main(String[] args) {
    int i = 10;
    do {
      System.out.println("Value- " + i);
      i--;
    } while (i > 0);
  }
}
Output
Value- 10
Value- 9
Value- 8
Value- 7
Value- 6
Value- 5
Value- 4
Value- 3
Value- 2
Value- 1

3- do-while loop works very well where you want to iterate for user’s choice until specific choice is made. Using do-while loop makes sense here because you want user’s input at lease once.

public class DoWhileDemo {
  public static void main(String[] args) throws IOException {
    Scanner sc = new Scanner(System.in);
    int i;
    do {
      System.out.print("Enter a number (0 to exit): ");
      i = sc.nextInt();
      System.out.print("Entered number: " + i);
      System.out.println();
    } while (i > 0);
    System.out.println("Out of loop");
  }
}
Output
Enter a number (0 to exit): 3
Entered number: 3
Enter a number (0 to exit): 20
Entered number: 20
Enter a number (0 to exit): 6
Entered number: 6
Enter a number (0 to exit): 0
Entered number: 0
Out of loop

That's all for the topic do-while loop in Java With Examples. If something is missing or you have something to share about the topic please write a comment.


You may also like

July 18, 2022

instanceof Operator in Java

instanceof operator in Java is used to test the type of an object during run time.

The syntax of Java instanceof operator is as follows.

objRef instanceof objType

Here objRef is a reference to an instance.

objType denotes a class type.

Using instanceof operator you can check if objRef is of the type objType or not. If yes the instanceof operator returns true otherwise false.

Using instanceof operator in Java

instanceof operator can help in preventing ClassCastException at run time.

For example a parent class reference can refer to child class but the opposite, child class referring to parent class, results in compile time error without type casting.

Child c = new Parent(); // Compile time error

// Ok with downcasting, may result in ClassCastException
Child c = (Child) new Parent();

This down casting (parent to child) will result in ClassCastException if there are more than one children and you are trying to cast with out knowing the actual type. This scenario is shown in the following Java example where we have two child classes Child and AnotherChild. In the method methodToCast you are trying to cast to Child even when the AnotherChild reference is passed resulting in ClassCastException.

public class Test {
  public static void main(String[] args) {
    Child c = new Child();
    Parent p = new Parent();
    AnotherChild ac = new AnotherChild();
    // ok, upcasting to parent reference
    p = c;
    methodToCast(c);
    methodToCast(ac);
  }
	
  private static void methodToCast(Parent p) {
    Child c = (Child)p;
  }	
}

class Parent {
  public void method1() {
    System.out.println("In method");
  }
}

class Child extends Parent {
  public void method1() {
    System.out.println("In child method");
  }
}

class AnotherChild extends Parent {
  public void method1() {
    System.out.println("In Anotherchild method");
  }
}
Output
Exception in thread "main" java.lang.ClassCastException: com.knpcode.programs.AnotherChild cannot be cast to com.knpcode.programs.Child
	at com.knpcode.programs.Test.methodToCast(Test.java:15)
	at com.knpcode.programs.Test.main(Test.java:11)

In such scenario you need to use instanceof operator to check the type of the reference.

private static void methodToCast(Parent p) {
  if(p instanceof Child) {
    Child c = (Child)p;
  }
}

Consider another scenario where you have multi-level inheritance.

public class Test {
  public static void main(String[] args) {
    Parent p = new Parent();
    Child c = new Child();
    AnotherChild ac = new AnotherChild();
    GrandChild gc = new GrandChild();
    methodToCast(c);
    methodToCast(gc);
    methodToCast(ac);
  }
	
  private static void methodToCast(Parent p) {
    Child c = (Child)p;
    c.method1();
  }
}

class Parent {
  public void method1() {
    System.out.println("In Parent method");
  }
}

class Child extends Parent {
  public void method1() {
    System.out.println("In Child method");
  }
}

class AnotherChild extends Parent {
  public void method1() {
    System.out.println("In Anotherchild method");
  }
}

class GrandChild extends Child {
  public void method1() {
    System.out.println("In GrandChild method");
  }
}
Output
In Child method
In GrandChild method
Exception in thread "main" java.lang.ClassCastException: com.knpcode.programs.AnotherChild cannot be cast to com.knpcode.programs.Child
	at com.knpcode.programs.Test.methodToCast(Test.java:15)
	at com.knpcode.programs.Test.main(Test.java:11)

As you can see casting works for Child and GrandChild (as it is also of type Child) but throws ClassCastException for AnotherChild which is of type Parent. In this scenario checking for the type using the instanceof operator ensures that the method is called only for Child types references.

private static void methodToCast(Parent p) {
  if(p instanceof Child) {
    Child c = (Child)p;
    c.method1();
  }
}

Points about instanceof operator in Java

1- If object reference is null instanceof operator returns false.

public class Test {
  public static void main(String[] args) {
    Test obj = null;
    if(obj instanceof Test) {
      System.out.println("instance of operator returns true");
    }else {
      System.out.println("instance of operator returns false");
    }
  }
}
Output
instance of operator returns false

2- Testing with instanceof operator with Object class always returns true as Object class is super class of all the classes in Java.

public class Test {
  public static void main(String[] args) {
    Test obj = new Test();
    Parent p = new Parent();
    if(obj instanceof Object) {
      System.out.println("instance of operator returns true");
    }else {
      System.out.println("instance of operator returns false");
    }
    
    if(p instanceof Object) {
      System.out.println("instance of operator returns true");
    }else {
      System.out.println("instance of operator returns false");
    }
  }
}

class Parent {
  public void method1() {
    System.out.println("In Parent method");
  }
}
Output
instance of operator returns true

That's all for the topic instanceof Operator in Java. If something is missing or you have something to share about the topic please write a comment.


You may also like