January 27, 2022

React App Flow - create-react-app Structure

If you are starting to learn Reactjs and just created your first Hello World React app, you may be wondering what is the flow of the React app. Moreover, if you have used create-react-app to set up your project structure, you get a readymade default app and if you execute command npm start you can also view the application by going to URL- http://localhost:3000.

create react project

Again, if you are wondering how you got this display and what all happened underneath to get to this display on your browser then this article will help you in understanding the React app flow.

React project structure (create-react-app)

Assuming you have executed the following command to create a Hello World React app.

npx create-react-app helloworld-app

You will get project structure created for you under a directory helloworld-app, which’ll look something like this-

React project structure

Let’s go through a brief introduction of the created folders and files.

node_modules

node_modules folder contains the external modules that your project depends upon. Once locally installed you can import these packages in your component when needed.

public

Two main files here are index.html and manifest.json. The index.html file is the template that actually gets displayed on the browser. We’ll get to it in a minute.

Another file manifest.json provides information about the icons, theme color, background color, names to be used in the app.

manifest.json
{
  "short_name": "React App",
  "name": "Create React App Sample",
  "icons": [
    {
      "src": "favicon.ico",
      "sizes": "64x64 32x32 24x24 16x16",
      "type": "image/x-icon"
    },
    {
      "src": "logo192.png",
      "type": "image/png",
      "sizes": "192x192"
    },
    {
      "src": "logo512.png",
      "type": "image/png",
      "sizes": "512x512"
    }
  ],
  "start_url": ".",
  "display": "standalone",
  "theme_color": "#000000",
  "background_color": "#ffffff"
}
src

This is the folder where you’ll write your own code for the app.

package.json

This file lists the packages your project depends on and which versions of a package your project can use.

React app flow

When you have an understanding of the project structure now let’s try to understand how the content is projected on the browser.

As already mentioned, index.html is the file that is actually rendered on the browser and it looks like this.

<!DOCTYPE html>
<html lang="en">
  <head>
    <meta charset="utf-8" />
    <link rel="icon" href="%PUBLIC_URL%/favicon.ico" />
    <meta name="viewport" content="width=device-width, initial-scale=1" />
    <meta name="theme-color" content="#000000" />
    <meta
      name="description"
      content="Web site created using create-react-app"
    />
    <link rel="apple-touch-icon" href="%PUBLIC_URL%/logo192.png" />
    <!--
      manifest.json provides metadata used when your web app is installed on a
      user's mobile device or desktop. See https://developers.google.com/web/fundamentals/web-app-manifest/
    -->
    <link rel="manifest" href="%PUBLIC_URL%/manifest.json" />
    <!--
      Notice the use of %PUBLIC_URL% in the tags above.
      It will be replaced with the URL of the `public` folder during the build.
      Only files inside the `public` folder can be referenced from the HTML.

      Unlike "/favicon.ico" or "favicon.ico", "%PUBLIC_URL%/favicon.ico" will
      work correctly both with client-side routing and a non-root public URL.
      Learn how to configure a non-root public URL by running `npm run build`.
    -->
    <title>React App</title>
  </head>
  <body>
    <noscript>You need to enable JavaScript to run this app.</noscript>
    <div id="root"></div>
    <!--
      This HTML file is a template.
      If you open it directly in the browser, you will see an empty page.

      You can add webfonts, meta tags, or analytics to this file.
      The build step will place the bundled scripts into the <body> tag.

      To begin the development, run `npm start` or `yarn start`.
      To create a production bundle, use `npm run build` or `yarn build`.
    -->
  </body>
</html>

So, the question is how do we reach to this file. For that you will have to look into the index.js file which has the following line.

ReactDOM.render(<App />, document.getElementById('root'));

ReactDOM.render() method with the syntax as ReactDOM.render(element, container[, callback]) renders a React element into the DOM in the supplied container and return a reference to the component.

In the render method used in index.js, element that is rendered is <App> component and the container is the ‘root’ element. If you noticed in index.html there is a div with id as root.

<div id="root"></div>

So that’s how the <App> component is projected with in the <div> element of index.html. App.js file defines the <App> component.

App.js

import React, { Component } from 'react';
import logo from './logo.svg';
import './App.css';
class App extends Component {
  render() {
    return (
      <div className="App">
        <header className="App-header">
          <img src={logo} className="App-logo" alt="logo" />
          <p>
            Edit <code>src/App.js</code> and save to reload.
          </p>
          <a
            className="App-link"
            href="https://reactjs.org"
            target="_blank"
            rel="noopener noreferrer"
          >
            Learn React
          </a>
        </header>
      </div>
    );
  }
}
export default App;

Now again the question is how do we come to index.js file. For that you will have to understand bundling a bit.

While creating your React app you may write a number of files (js, css) which are “bundled” using tools like Webpack, Rollup or Browserify. Bundling is the process of merging all the files into a single file (bundle.js). This bundle can then be included on a webpage to load an entire app at once. This helps in optimizing the code and increases app performance.

For an example suppose you have two js files app.js and math.js.

app.js

import { add } from './math.js';

console.log(add(10, 20)); 

math.js

export function add(a, b) {
  return a + b;
}

Then the bundled file looks something as given below-

function add(a, b) {
  return a + b;
}

console.log(add(10, 20));

Reference- https://reactjs.org/docs/code-splitting.html

When React app is bundled using Webpack, configuration for Webpack is provided using webpack.config.js file. You can have a look at it by navigating to node_modules/react-scripts/config/webpack.config.js

There you can see the entry key and output key which specify the entry point for webpack and the location where bundle.js file will be stored.

entry: paths.appIndexJs,
    output: {
      // The build folder.
      path: paths.appBuild,
      // Add /* filename */ comments to generated require()s in the output.
      pathinfo: isEnvDevelopment,
      // There will be one main bundle, and one file per asynchronous chunk.
      // In development, it does not produce real files.
      filename: isEnvProduction
        ? 'static/js/[name].[contenthash:8].js'
        : isEnvDevelopment && 'static/js/bundle.js',
      // There are also additional JS chunk files if you use code splitting.
      chunkFilename: isEnvProduction
        ? 'static/js/[name].[contenthash:8].chunk.js'
        : isEnvDevelopment && 'static/js/[name].chunk.js',
      assetModuleFilename: 'static/media/[name].[hash][ext]',

Paths that are referred are specified in Paths.js file at the same location as webpack.config.js. One of the entry in Paths.js is

appIndexJs: c(resolveApp, 'src/index'),

The above entry resolves to index.js and that’s how the entry point is known.

That's all for the topic React App Flow - create-react-app Structure. If something is missing or you have something to share about the topic please write a comment.


You may also like

January 18, 2022

Installing Node.js and NPM on Windows

Node.js is a popular run time environment for executing JavaScript applications. If you are using popular JS frameworks like Angular, React then also it is required that you should have Node.js installed on your system. In this tutorial we’ll see how to download and install Node.js and NPM (Node Package Manager) on a Windows system.

Installing Node.js and NPM on windows

1. Downloading Node.js installer

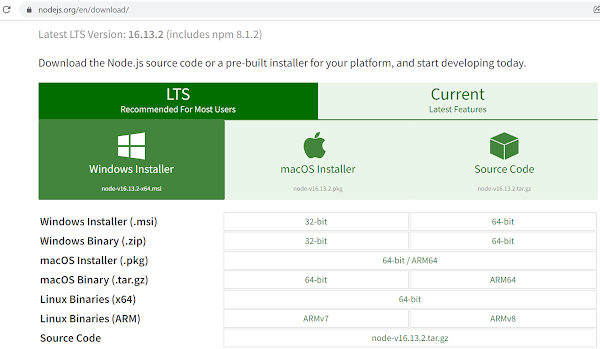
You can download Node.js from this location- https://nodejs.org/en/download/

Once you are on the page select one of the two choices LTS or Current. Better to opt for LTS (Long Term Support) version. Click on Windows Installer which will download the .msi file at the selected location in your system.

Nodejs download

2. Installing Node.js and NPM

Once the .msi file is downloaded navigate to the location where it is downloaded and double click the installer to start the installation.

Click next to start the Node.js setup wizard and follow the instructions-

  1. Review the license agreement. Accept the terms (if you are ok with them) and click next.
  2. Select the location where you want to install Node. You can safely go with the default location unless until you want to install it at a specific location.
  3. You will get a screen with check box to automatically install tools for native modules. By default, option is not selected and you can go with that option itself if you don't need these modules.
  4. Click install button to start installation.

Check for NPM

NPM comes bundled with the Node.js installation so you don’t need any extra steps to install NPM. You can verify whether NPM is properly installed or not by checking the version. Run the following command from command prompt.

npm -v

Verifying Node.js installation

Same way you can also verify Node.js installation by running the following command which displays the installed Node.js version.

Node -v

Node.js Hello World program

You can also write a small Java Script program to run with Node.js to check if everything is working fine after installation.

Save the following code as HelloWorld.js

const http = require('http');

const hostname = '127.0.0.1';
const port = 9010;

http.createServer((req, res) => {
  res.statusCode = 200;
  res.setHeader('Content-Type', 'text/plain');
  res.end('Hello World From Node.js');
}).listen(port, hostname, () => {
  console.log(`Server running at http://${hostname}:${port}/`);
});

Navigate to the location where you have saved this JS file and run the following command to run the script which starts the server listening at port 9010.

D:\knpcode >node HelloWorld.js
Server running at http://127.0.0.1:9010/

Open a web browser and type the URL- http://127.0.0.1:9010/

Hello World Nodejs

That's all for the topic Installing Node.js and NPM on Windows. If something is missing or you have something to share about the topic please write a comment.


You may also like

January 12, 2022

Java Stream noneMatch() With Examples

In the tutorial Java Stream allMatch() With Examples we discussed allMatch() method that returns true when all elements of this stream match the provided predicate. There is also a method noneMatch() in Java Stream API that checks whether no elements of this stream match the provided predicate. So noneMatch() can be termed as the opposite of allMatch() method.

noneMatch() Method in Java

Syntax of noneMatch() method is as given below.

boolean noneMatch(Predicate<? super T> predicate)

Here argument passed is of type Predicate functional interface. Method returns true if no element of the stream matches the provided predicate, otherwise false.

If the stream is empty then true is returned and the predicate is not evaluated.

noneMatch() is a short-circuiting terminal operation. It's a terminal operation means the stream pipeline is considered consumed, and can no longer be used after noneMatch() operation. It is also short-circuiting which means when presented with infinite input, it may terminate in finite time.

noneMatch() Java examples

1. Using noneMatch() to verify that all the elements in a List are greater than 20 or in other words there is no element in the list less than 20.

import java.util.Arrays;
import java.util.List;

public class NoneMatchDemo {
  public static void main(String[] args) {
    List<Integer> nameList = Arrays.asList(30, 40, 22, 55, 27, 65, 47);
    boolean result = nameList.stream().noneMatch(n -> n < 20);
    System.out.println(result);

  }
}
Output
true

2. Using noneMatch() along with filter method to check whether none of the students in Science stream have got less than 75 marks.

Student class
public class Student {
  private int rollNo;
  private String name;
  private String stream;
  private int marks;
  Student(int rollNo, String name, String stream, int marks){
    this.rollNo = rollNo;
    this.name = name;
    this.stream = stream;
    this.marks = marks;
  }
  public int getRollNo() {
    return rollNo;
  }
  public String getName() {
    return name;
  }

  public String getStream() {
    return stream;
  }

  public int getMarks() {
    return marks;
  }

  @Override
  public String toString() {
    return "Roll Number: " +  getRollNo() 
        + " Name: " + getName() + " Marks: " + getMarks();
  }
}
public class NoneMatchDemo {
  public static void main(String[] args) {
    List<Student> studentList = Arrays.asList(new Student(1, "Peter", "Science", 72),
              new Student(2, "Ram", "Science", 99),
              new Student(3, "Priscilla", "Art", 68),
              new Student(4, "Mahesh", "Art", 62),
              new Student(5, "Scott", "Commerce", 72));
    boolean result = studentList.stream()
          .filter(s -> s.getStream().equals("Science"))
          .noneMatch(s -> s.getMarks() < 75);
    System.out.println(result);
  }
}
Output
false

Here result is false as out of the 2 students in Science stream one has marks less than 75 which means there is a match.

That's all for the topic Java Stream noneMatch() With Examples. If something is missing or you have something to share about the topic please write a comment.


You may also like
January 11, 2022

Java Stream allMatch() With Examples

In the tutorial Java Stream anyMatch() With Examples we discussed anyMatch() method that returns true if any element matches the Predicate. There is also a method allMatch() in Java Stream API that checks whether all elements of this stream match the provided predicate.

allMatch() Method in Java

Syntax of allMatch() method is as given below.

boolean allMatch(Predicate<? super T> predicate)

Here argument passed is of type Predicate functional interface. Method returns true if all elements of the stream match the provided predicate, otherwise false.

If the stream is empty then true is returned and the predicate is not evaluated.

allMatch() is a short-circuiting terminal operation. It's a terminal operation means the stream pipeline is considered consumed after allMatch() operation, and can no longer be used. It is also short-circuiting which means when presented with infinite input, it may terminate in finite time.

allMatch() Java examples

1. Using allMatch() to verify that all the elements in a List are less than 20.

import java.util.Arrays;
import java.util.List;

public class AllMatchDemo {
  public static void main(String[] args) {
    List<Integer> nameList = Arrays.asList(10, 13, 12, 15, 17, 5, 7);
    boolean result = nameList.stream().allMatch(n -> n < 20);
    System.out.println(result);
  }
}
Output
true

2. Using allMatch() along with filter method to check whether all the students in Science stream have got more than 75 marks or not.

Student class
public class Student {
  private int rollNo;
  private String name;
  private String stream;
  private int marks;
  Student(int rollNo, String name, String stream, int marks){
    this.rollNo = rollNo;
    this.name = name;
    this.stream = stream;
    this.marks = marks;
  }
  public int getRollNo() {
    return rollNo;
  }
  public String getName() {
    return name;
  }

  public String getStream() {
    return stream;
  }

  public int getMarks() {
    return marks;
  }

  @Override
  public String toString() {
    return "Roll Number: " +  getRollNo() 
        + " Name: " + getName() + " Marks: " + getMarks();
  }
}
public class AllMatchDemo {
  public static void main(String[] args) {
    List<Student> studentList = Arrays.asList(new Student(1, "Peter", "Science", 75),
              new Student(2, "Ram", "Science", 99),
              new Student(3, "Priscilla", "Art", 68),
              new Student(4, "Mahesh", "Art", 62),
              new Student(5, "Scott", "Commerce", 72));
    boolean result = studentList.stream()
          .filter(s -> s.getStream().equals("Science"))
          .allMatch(s -> s.getMarks() > 75);
    System.out.println(result);
  }
}
Output
false

Here result is false as out of the 2 students in Science stream one has marks not greater than 75.

That's all for the topic Java Stream allMatch() With Examples. If something is missing or you have something to share about the topic please write a comment.


You may also like

January 9, 2022

Java Stream anyMatch() With Examples

In Java Stream API anyMatch(Predicate<? super T> predicate) method is used to check whether any element of this stream matches the provided predicate.

anyMatch() method in Java

Syntax of anyMatch() method is as given below.

boolean anyMatch(Predicate<? super T> predicate)

Method returns a boolean value true if any element of the stream matches the provided predicate, otherwise false.

anyMatch() is a short-circuiting terminal operation. It's a terminal operation means the stream pipeline is considered consumed, and can no longer be used. It is also short-circuiting which means when presented with infinite input, it may terminate in finite time.

anyMatch() method may not evaluate the predicate on all elements as soon as a matching element is found method returns.

If the stream is empty then false is returned and the predicate is not evaluated.

anyMatch() Java examples

1. In the first example anyMatch() method is used to check if a List of strings has any element matching the given condition (whether any name starts with “A”).

public class AnyMatchDemo {

  public static void main(String[] args) {
    List<String> nameList = Arrays.asList("Peter", "Ram", "Ajay", "Dan");
    boolean result = nameList.stream().anyMatch(n -> n.startsWith("A"));
    System.out.println(result);
  }
}
Output
true

2. In this example anyMatch() method is used to check if list of Users has any user with age greater than 60.

User class
public class User {
  private String name;
  private int age;
  User(String name, int age){
    this.name = name;
    this.age = age;
  }
  public String getName() {
    return name;
  }
  public void setName(String name) {
    this.name = name;
  }
  public int getAge() {
    return age;
  }
  public void setAge(int age) {
    this.age = age;
  }
  @Override
  public String toString() {
    return getName() + " " + getAge() + " \n";
  } 
}
public class AnyMatchDemo {

  public static void main(String[] args) {
      List<User> userList = Arrays.asList(new User("Peter", 59),
                new User("Ram", 19),
                new User("Mahesh", 32),
                new User("Scott", 32));
      boolean result = userList.stream().anyMatch(u -> u.getAge() > 60);
      System.out.println(result);
  }
}

Output
false

That's all for the topic Java Stream anyMatch() With Examples. If something is missing or you have something to share about the topic please write a comment.


You may also like

January 5, 2022

Java try-with-resources With Examples

Java 7 onward a new feature try-with-resources is available for automatic resource management. With this feature, try-with-resources in Java, one or more resources are declared with the try statement itself. The try-with-resources statement ensures that the declared resources are closed automatically at the end.

Here resource is an object that must be closed after the program is finished with it. For example, an opened file stream, DB connection etc.

Prior to try-with-resources

Prior to Java 7 try-with-resources to close a resource you had to do two things-

  1. Call close() method explicitly to close the opened resource.
  2. Call close() method in finally block to ensure that a resource is closed regardless of whether the try statement completes normally or abruptly.
Example code with finally
public class FinallyDemo {
  public static void main(String[] args) {
    BufferedReader br = null;
    try {
      br = new BufferedReader(new FileReader("D:\\test.txt"));
      System.out.println(br.readLine());
    } catch (IOException e) {
      e.printStackTrace();
    } finally {
      try {
        if (br != null){
         System.out.println("Closing the file");
         br.close();
        }
          
      } catch (IOException ex) {
        ex.printStackTrace();
      }
    }
  }
}
Notice pain points here-
  • You are writing a whole block of code to close a resource, failing to do that will mean resource kept opened resulting in slow performance and memory leaks.
  • You are forced to use a try-catch block again while closing the resource.

Using try-with-resources in Java

The try-with-resources gives you an option to declare the resource with try statement. It is ensured by try-with-resources that a resource is closed regardless of whether the try statement completes normally or abruptly.

Try-with-resources Java example code
public class FinallyDemo {
  public static void main(String[] args) {	
    try (BufferedReader br = new BufferedReader(new FileReader("D:\\test.txt"))){
      System.out.println(br.readLine());
    } catch (IOException e) {
      e.printStackTrace();
    } 
  }
}

Now the resource is declared within parentheses immediately after the try keyword, finally block is not required. BufferedReader object will be closed automatically now. You can see how much boiler plate code is reduced because of try-with-resources.

AutoCloseable interface

Now the question is how resources are closed automatically using try-with-resources in Java. It is because of the interface java.lang.AutoCloseable introduced in Java 7. Any object that implements java.lang.AutoCloseable interface can be used as a resource with try-with-resource. If resource used with try-with-resource doesn't implement AutoCloseable interface that will result in compile time error.

Java example
public class TryResource {
  public static void main(String[] args) {
    try (MyAutoCloseResource myResource = new MyAutoCloseResource()) {
      System.out.println("MyAutoCloseResource created in try-with-resources");
    }catch(Exception ex){
      ex.printStackTrace();
    }
  }
	
  // Class implementing AutoCoseable
  static class MyAutoCloseResource implements AutoCloseable { 
    @Override
    public void close() throws Exception {
      System.out.println("Closing MyAutoCloseResource");
    }
  }
}
Output
MyAutoCloseResource created in try-with-resources
Closing MyAutoCloseResource

You can see that the close() method of the resource is called automatically.

try-with-resources Java 9 enhancement

If you see the example given above for using try-with-resources one thing to notice is that the resource that has to be closed automatically is created with in the try statement of a try-with-resources that was one of the restriction while using try-with-resources prior to Java 9.

try (BufferedReader br = new BufferedReader(new FileReader("D:\\test.txt"))){
    System.out.println(br.readLine());
}

Even if resource is already declared it has to be rereferenced with in the try-with-resources so that it is automatically closed.

public class TryResources {
  public static void main(String[] args) throws IOException{    
    BufferedReader br = new BufferedReader(new FileReader("D:\\test.txt"));
    try (BufferedReader refbr = br){
      System.out.println(refbr.readLine());
    } catch (IOException e) {
      e.printStackTrace();
    } 
  }
}

Java 9 onward this restriction is not there anymore, now you can declare the resource outside and use the same reference with in the try statement. Only restriction is that the referenced variable with in the try-with-resource construct must be final or effectively final.

public class TryResources {
  public static void main(String[] args) throws IOException{    
    BufferedReader br = new BufferedReader(new FileReader("D:\\test.txt"));
    // same reference used 
    try (br){
      System.out.println(br.readLine());
    } catch (IOException e) {
      e.printStackTrace();
    } 
  }
}

Declaring multiple resources in a try-with-resources statement

You can declare multiple resources with try-with-resource statement, resources are separated by semicolon.

As example-
try (ZipFile zf = new ZipFile(zipFileName); BufferedWriter writer = Files.newBufferedWriter(outputFilePath, charset))

Resources are closed in the opposite order of their creation so close() method of BufferedWriter will be called first then the close() method of ZipFile will be called.

Suppressed exception with try-with-resource

If an exception is thrown from a try block and an exception is thrown from a try-with-resource statement too then the exception thrown by try-with-resource statement is suppressed and the exception thrown by the try block is returned.

This is in direct contrast to what happens in a case of finally block. Where the exception thrown by finally block is returned and the exception thrown by try block is suppressed in case both of these blocks throw an exception.

Let’s try to clear it with an example.

First we’ll see a code with finally block where both try and finally blocks are throwing exception. In the code there is also a custom implementation MyAutoCloseResource of AutoCloseable interface. You can see exception is thrown explicitly from the close() method. From the try block too an exception is thrown.

public class TryResource {
  public static void main(String[] args) {
    TryResource tr = new TryResource();
    try {
      tr.Test();
    } catch (Exception e) {
      System.out.println("Exception caught -- " + e.getMessage());
    }
  }
	
  private void Test() throws Exception{
    MyAutoCloseResource myResource = null;
    try {
      myResource  = new MyAutoCloseResource();
      throw new Exception("Exception in class Test");
       
    }finally{
      if(myResource != null){
      myResource.close();			
      }
    }
  }
  // Class implementing AutoCoseable
  class MyAutoCloseResource implements AutoCloseable {	  
    @Override
    public void close() throws Exception {
      System.out.println("Closing MyAutoCloseResource");
      throw new Exception("Exception while closing resource");
    }
  }
}
Output
Closing MyAutoCloseResource
Exception caught -- Exception while closing resource

From the output you can see that the exception thrown in the finally block is the one that is returned.

Now let’s see the same example with try-with-resource statement.

public class TryResource {
  public static void main(String[] args) {
    TryResource tr = new TryResource();
    try {
      tr.Test();
    } catch (Exception e) {
      System.out.println("Exception caught -- " + e.getMessage());
      System.out.println("Suppressed Exception  -- " + e.getSuppressed()[0]);
    }
  }
	
  private void Test() throws Exception{
    try(MyAutoCloseResource myResource = new MyAutoCloseResource()) {		
      throw new Exception("Exception in class Test");         
    }
  }
  // Class implementing AutoCoseable
  class MyAutoCloseResource implements AutoCloseable {
    @Override
    public void close() throws Exception {
      System.out.println("Closing MyAutoCloseResource");
      throw new Exception("Exception while closing resource");
    }
  }
}
Output
Closing MyAutoCloseResource
Exception caught -- Exception in class Test
Suppressed Exception -- java.lang.Exception: Exception while closing resource

From the output you can see that the exception thrown in the try block is the one that is returned.

To retrieve these suppressed exceptions you can call the Throwable.getSuppressed method from the exception thrown by the try block as shown in the Java code.

That's all for the topic Java try-with-resources With Examples. If something is missing or you have something to share about the topic please write a comment.


You may also like

January 4, 2022

final Vs finally Vs finalize in Java

Differences among final, finally and finalize in Java is an important interview question. One reason being, these words sound similar and another is it gives an interviewer a chance to branch out to many other areas. From final you can go on to talk about inheritance or method overriding. From finally you can start about exception handling. From finalize method you can talk about Object class. So you see just one question final Vs finally Vs finalize in Java has such a huge potential!

Now, when the importance of these words final, finally and finalize in Java is firmly established let’s try to get some details about them.

One point where they differ is both final and finally are reserved keywords in Java on the other hand finalize() is a method. Though when you talk about finally you generally say finally block as you will write a block of code enclosed with in a scope of finally.

final Vs finally Vs finalize in Java

final– final keyword restricts the access to variable, method or class.

When final is used with a variable the value of that variable can’t be changed once initialized.

When a method is declared as final that method can’t be overridden by any subclass.

When a class is declared as final that class can’t be extended.

Refer final in Java to know more about final keyword in Java.

final variable example
public class FinalVar {
  public static void main(String[] args) {
    final int test = 7;
    // modifying final variable
    test++;
  }
}

Here test is a final variable so changing its value will result in a compile time error “The final local variable test cannot be assigned. It must be blank and not using a compound assignment”.

final method example
class Read {
  public final void readFile() throws IOException{
    System.out.println("read file");
  }
}

public class FileRead extends Read {
  // Overridden method
  public void readFile() throws IOException{
    File file = new File("D://test.txt");
    BufferedReader br = new BufferedReader(new FileReader(file));
  }
}

Here readFile() is marked as final in the parent class Read so trying to override it in child class FileRead will result in a compile time error “Cannot override the final method from Read”.

final class example
	
final class Read {
  public void readFile() throws IOException{
    System.out.println("read file");
  }
}

public class FileRead extends Read {
  ...
  ...
}

Here class Read is marked as final so it can’t be subclassed. Class FileRead trying to extend Read class will result in compile time error “The type FileRead cannot subclass the final class Read”.

finally– finally keyword is part of exception handling in Java. It is used along with try-catch block. The code enclosed with in a finally block is always executed whether an exception is thrown in the code enclosed in try block or not.

In case no exception is thrown inside the try block, finally block is executed when try block exists.

When exception is thrown in a try block if there is a catch block that matches the exception type of the thrown exception that catch block is executed first and then the finally block.

In case catch block can’t handle the thrown exception finally block is still executed just before the method returns.

Because of the guarantee that finally block will always be executed it is used for putting clean up code. If in the code you have any input or output stream crated for reading or writing a file or there are opened DB connections then finally block is the safe place to close these resources.

Finally Java example program
public class FileRead {
  public void readFile(){
    BufferedReader br = null;
    try{
      br = new BufferedReader(new
          InputStreamReader(new FileInputStream(new 
              File("D:\\test1.txt"))));
    } catch (FileNotFoundException e) {
      // TODO Auto-generated catch block
      e.printStackTrace();
    }finally{
      try {
        br.close();
      } catch (IOException e) {
        // TODO Auto-generated catch block
        e.printStackTrace();
      }
    }
  }
  
  public static void main(String[] args) {
    FileRead fr = new FileRead();
    fr.readFile();    
  }
}

finalize– finalize() method is called by the garbage collector thread just before garbage collecting any object.

finalize method is present in Object class as a protected method, it’s syntax is as follows-

protected void finalize() throws Throwable

Since finalize method is in Object class so it is inherited by every class in Java. The finalize method in Object class has no implementation so the class, where some clean up is required, has to override it to perform clean up or to dispose of system resources.

Finalize method Java example
public class FinalizeExample {
  int num;
  FinalizeExample(int num){
    this.num = num;
  }
  public static void main(String[] args) {
    FinalizeExample obj1 = new FinalizeExample(5);
    FinalizeExample obj2 = new FinalizeExample(5);
    // object reference set as null explicitly
    // that makes it eligible for garabge collection
    obj1 = null;
    obj2 = null;
     // System.gc() call request to run garbage collector
    System.gc();
  }
	
  @Override
  protected void finalize() throws Throwable {      
    System.out.println("finalize method called for FinalizeExample object");       
  }
}
Output
finalize method called for FinalizeExample object

That's all for the topic final Vs finally Vs finalize in Java. If something is missing or you have something to share about the topic please write a comment.


You may also like
January 1, 2022

Java Methods With Examples

In Java programming language when you create a class it contains variables and methods. In this tutorial we’ll learn about Java methods. In the post Writing First Java Program we have already seen one method; main method which begins the execution of the program.

Methods in Java

A method is a collection of statements that can be executed by calling that method and it may or may not return a value after executing statements.

Syntax of a method in Java is as follows-

Access_modifier return_type methodName(parameter-list) {
  // body of method
}

Components in a Java method

A method in Java is made up of the following components-

1. Access modifier- All the four access modifiers - public, private, protected, default can be used with methods of the class.

  • If a method is declared as public then it is visible to all classes in the same package or other packages.
  • If a method is declared as private then that method can only be accessed in its own class.
  • If a method is declared as protected then it is accessible to any class in the same package or to any subclass (of the class where method is declared) even in different package.
  • If a method has default access specifier (declared with no access specifier) then it is accessible by any class with in the same package.

2. Return type- A method can return a value and the type of that value should be specified as the return type. If a method doesn’t return a value then the return type should be specified as void.

3. Method name- A method should have a name to identify that method. That name is used to call the method. A method name in the class doesn’t have to be unique but the method with the same name is said to be overloading the method and it needs to follow certain rules.

4. Parameter list- You can pass arguments to a method and it should be passed as a comma-delimited list of input parameters, preceded by their data types, enclosed by parentheses, (). If there are no parameters, you must use empty parentheses.

5. Method body- The method body, enclosed between braces {}, it contains the method's code along with the declaration of local variables.

6. Exception list— A method can also specify the list of exceptions that is expected to throw using throws clause.

7. Static method- You can also declare a method to be static. A static method is associated with the class and it can be called directly using the class name like ClassName.static_method(). You don't need to create an instance of a class to call a static method.

Here is an example of a Java method declaration which is a public method, takes two integers as arguments and also return a value of type int.

public int doAddition(int i, int j){
  int sum = i + j;
  return sum;
}

Method Naming convention in Java

Although a method name can be any legal identifier, code conventions restrict method names. By convention, method names should be a verb in lowercase or a multi-word name that begins with a verb in lowercase, followed by adjectives, nouns, etc. If method has a multi-word name, the first letter of each of the second and following words should be capitalized (known as camel case). Here are some examples:

add
doAddition
getFinalData
isEmpty

Java method examples

When a method is called it executes method body and returns to the point from where it was called after one of the following-

  • It completes all the statements in the method.
  • Reaches a return statement.
  • An exception occurs and method throws that exception.

1- Method that returns a value- In the first example there is a method doAddition() that takes two integers as arguments and return sum of those two integers.

public class MyClass {
  public static void main(String[] args) {
    MyClass obj = new MyClass();
    // calling method
    int sum = obj.doAddition(5, 10);
    System.out.println("Sum is- " + sum);	
  }

  public int doAddition(int i, int j){
    int sum = i + j;
    return sum;
  }
}
Output
Sum is- 15

2- Method with no return value (void)- In this Java method example there is a method display() which has one String argument and return type is void.

public class MyClass {
  public static void main(String[] args) {
    MyClass obj = new MyClass();
    obj.display("knpCode");
  }

  public void display(String str){
    System.out.println("Hello " + str);
  }
}
Output
Hello knpCode

3- Calling method of another class- In this example there are two classes ReverseWord and MyClass. In class ReverseWord there is a public method reverseString() which is called from MyClass using an instance of ReverseWord class.

public class ReverseWord {
  public String reverseString(String str){
    // validate String
    if((str == null) || (str.length() <= 1)){
        return str;
    }
    StringBuilder sb = new StringBuilder(str);
    return sb.reverse().toString();
  }
}
public class MyClass {
  public static void main(String[] args) {
    ReverseWord obj = new ReverseWord();
    String reversedString = obj.reverseString("knpCode");
    System.out.println("Reversed String is- " + reversedString);
  }

  public void display(String str){
    System.out.println("Hello " + str);
  }
}
Output
Reversed String is- edoCpnk

4- Calling method from another method- In this example there are two methods in the class method1 and method2 and method2() is called from method1().

public class MyClass {
  public static void main(String[] args) {
    MyClass obj = new MyClass();
    obj.method1();
    System.out.println("After calling method1");
  }

  private void method1(){
    System.out.println("in method1");
    this.method2();
    System.out.println("After calling method2");
  }

  private void method2(){
    System.out.println("in method2");
  }
}
Output
in method1
in method2
After calling method2
After calling method1
Few things to note here are-
  1. Access modifier is private for the methods so these methods can be used only with in this class.
  2. From method1, method2 is called using the this keyword.
  3. From the output you can see how method returns to the point from which it is called after finishing its execution.

Advantages of method

  1. Code reusability- Main advantage of using methods is code reusability. You can write any functionality with in a method and then that method can be called any time that functionality is needed.
  2. Encapsulation- Methods help with the object oriented concept encapsulation. Any member variable should only be manipulated by the method of that class.
  3. Method also help with polymorphism through method overloading and method overriding.

Reference: https://docs.oracle.com/javase/tutorial/java/javaOO/methods.html

That's all for the topic Java Methods With Examples. If something is missing or you have something to share about the topic please write a comment.


You may also like

Writing First Java Program - Hello World

This Java tutorial shows how you can write, compile and execute your first Java program which is going to be the HelloWorld Java program.

If you have just started learning Java and done with the installation of Java it is time to write your first Java program.

Want to install Java in Windows, see this post- Installing Java in Windows

Writing Java program

For writing your first Java program you can use an IDE like Eclipse and run it from there or write it in notepad and compile and run it from command line. Once you start some serious Java programming you will definitely use an IDE but for your first Java program it is better if you use command line for compilation and execution of the program. In this post we’ll cover both ways.

Hello World Java program from command line

Open a text editor like Notepad or gedit and copy the following program.

public class HelloWorld {
  public static void main(String[] args){
    System.out.println("Hello world, this is my first Java program");
  }
}

Save the file as HelloWorld.java, you have to give the file the same name as the name of the class which is public in you Java program. Since the name of the public class is HelloWorld, you will have to name the file as “HelloWorld”.

Open command prompt, go to the location where you have saved your file and compile it using javac command. For example I saved the file in knpcode folder.

D:\knpcode>javac HelloWorld.java

This command compiles your Java file, if compilation is successful you should see a file HelloWorld.class generated at the same location.

If you get error “javac is not recognized as an internal or external command” that means path to bin directory in your Java installation is not set, so ensure that path is set.

To execute your HelloWorld Java program execute the following command.

D:\knpcode>java HelloWorldHello world, this is my first Java program

As you can see message is displayed.

Understanding your first Java program

For writing a Java program you need to first define a class and then write methods with in the class.

The following statement defines a class HelloWorld which has an access modifier as public.

public class HelloWorld 

In this class you have only a single method main() which is defined as follows.

public static void main(String[] args){  System.out.println("Hello world, this is my first Java program");}

Java programming language mandates that there should be a main method which should be public, void, static. This main method is the starting point of the program execution.

To understand why main method is static in Java, refer this post- Why main Method static in Java

To understand the different keywords that make up the main() method-
publicAccess modifier for visibility. Public access modifier means it is visible to all the classes.

staticstatic keyword in Java when used with method means you don’t need to create an object of the class to invoke a static method. If you see in the Java program main method is executed on its own (actually it is executed by JVM) you didn’t need to create an object and invoke main method.

void– It represents the return type of the method, void means nothing is returned from the method.

String[] args– It is used for passing command line arguments.

The statement- System.out.println(“Hello world, this is my first Java program”); prints the message, with in the double quotes, to the console.

Hello World Java program using Eclipse IDE

If you want to use Eclipse IDE for writing Java program then the first step is to get Eclipse if you don’t have it already.

You can download the Eclipse version as per your OS and Java version from here- https://www.eclipse.org/downloads/

Once you have Eclipse downloaded and installed, you can open it and set the location for the workspace (folder where your projects will be stored).

Once Eclipse is started-

1- choose File – New – Project

2- Select Java Project from the list and click Next.

Hello World Java program

3- In “Create a Java Project” window, enter a name for your Java project, for example “myproject”.

4- Click Finish. Once prompted with the window having the message “This kind of project is associated with the Java perspective. Do you want to open this perspective now”. Click Open Perspective.

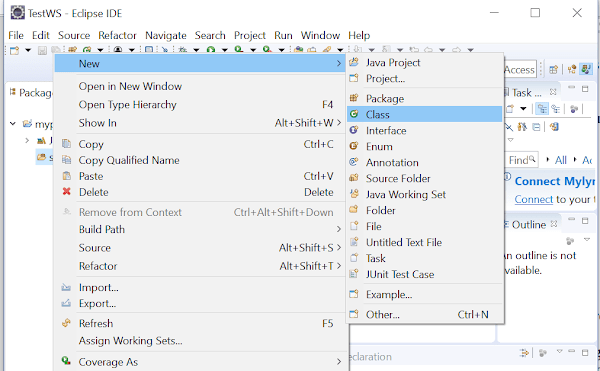
5- Once the Java perspective is opened you will see your created project on the left hand side. Expand it and right click the src folder. Select New – Class.

Java program in eclipse

6- In the New Java class window enter the class name “HelloWorld”. In the “Which method stubs would you like to create?” section select the public static void main(String[] args) checkbox. Click Finish.

7- That will create the class HelloWorld.java with the main method. Java editor for this class will also open.

public class HelloWorld {  public static void main(String[] args) {    // TODO Auto-generated method stub  }}

8- With in the main method add this line.

System.out.println("Hello world, this is my first Java program");

So that your HelloWorld.java class looks as follows.

public class HelloWorld {  public static void main(String[] args) {    System.out.println("Hello world, this is my first Java program");  }}

9- Save the file (you can use ctrl-s to save). Your Java file will also be compiled automatically when saved.

10- Right click the program file HelloWorld.java on the left hand side and select Run As – Java Application.

11- Eclipse Console will open and display "Hello world, this is my first Java program".

Done with first Java program, want to add more methods in your class then refer this post- Methods in Java

That’s all for the topic Writing First Java Program – Hello World. If something is missing or you have something to share about the topic please write a comment.


You may also like