July 16, 2021

Spring Boot Microservices Eureka + Ribbon

In the article Spring Boot Microservices example we saw an example of Spring Boot Microservice where we used Eureka for service registration and discovery. In this post we’ll extend that example further to see how to use both Eureka and Ribbon load balancer with Spring Boot to load the balance among micro services instances.

In the example there were two separate services User and Account which were registered with Eureka. From User service there was a call to Account service to fetch some data. In this post we’ll see how to configure more than one instances of Account service and use Ribbon load balancer to route the calls among those instances of Account service.

Load Balancing

In simple terms load balancing means distributing the load across several resources rather than putting all the load on a single resource. That helps in increasing throughput as there are more resources to share the load, increases reliability as there are more redundant resource to process the request even if any one resource goes down so there is no single point of failure.

Using Ribbon load balancing with Eureka

As we know Eureka is used for service registration and discovery where as Ribbon is a client side load balancer. Here I’ll try to explain how these two tools work together.

Eureka server maintains a service registry by registering each microservice with the Eureka server. When the inter-service communication happens, calling service interrogates the service registry using DiscoveryClient and gets in return all the instances of the called microservice. Now the question is, out of all the returned instances which one to call?

That’s where client load balancer like Ribbon comes in the picture. Client side load balancer uses an algorithm, like round robin (calling each instance in sequence) or using zone information (to locate a server in the same zone as the client), to get the instance of service that has to be called.

Spring Boot Microservice with loadbalancing

Spring Boot Micro Service with Ribbon example

In the Spring Boot Microservices example we have already seen how to configure Eureka server and how to register micro services User and Account with it by enabling discovery client (Using @EnableDiscoveryClient (or @EnableEurekaClient) annotation).

One problem was the URL used while calling Account service from User which hardcodes the host and port. That means every time same service will be called even if you create more instances of Account.

List<Account> accounts = new RestTemplate().exchange(
       "http://localhost:9000/accounts/{empId}", HttpMethod.GET, null, new
       ParameterizedTypeReference<List<Account>>(){}, id).getBody();

What we want is an abstraction so that the correct host and port is resolved at run time, that’s what we’ll try to configure using Netflix’s Ribbon load balancing service. To enable Ribbon you need to add the following dependency in pom.xml

<dependency>
  <groupId>org.springframework.cloud</groupId>
  <artifactId>spring-cloud-starter-netflix-ribbon</artifactId>
</dependency>

Though this dependency is added automatically when you add dependency for eureka client. So, this dependency will suffice.

<dependency>
  <groupId>org.springframework.cloud</groupId>
  <artifactId>spring-cloud-starter-netflix-eureka-client</artifactId>
</dependency>

Creating another instance of Account Microservice

Now we want to scale up our service and need multiple copies of Account. We already created a Spring Boot project for the same with the following in application.properties.

eureka.client.service-url.default-zone=http://localhost:8761/eureka
server.port=9000
spring.application.name=account

After starting this instance you can change the port to 9001 and start the Account application again. That way you will have two instances one listening at port 9000 and another at port 9001.

You can also create a Separate Spring Boot project copy the files from Account and paste the following in application.properties

eureka.client.service-url.default-zone=http://localhost:8761/eureka
server.port=9001
spring.application.name=account

Either way you will have two instances running of the same service. You can verify it in Eureka Server by accessing URL - http://localhost:8761/

Eureka with ribbon

Creating LoadBalanced aware RestTemplate

Since we are using an instance of RestTemplate to make a call to another Service so we can make the RestTemplate bean load balanced aware. That can be done using @LoadBalanced annotation which instructs Netflix Ribbon to wrap this RestTemplate bean with load balancing advice.

Create a Config.java class in SpringBootUser project as given below.

import org.springframework.cloud.client.loadbalancer.LoadBalanced;
import org.springframework.context.annotation.Bean;
import org.springframework.context.annotation.Configuration;
import org.springframework.web.client.RestTemplate;
 
@Configuration 
public class Config { 
  @Bean 
  @LoadBalanced
  RestTemplate restTemplate() { 
    return new RestTemplate(); 
  } 
}

Injecting the load balanced RestTemplate

Now you can inject this load balanced RestTemplate into the UserService. Then, in the URL, you can use the logical name of the service that was used to register it with Eureka. That’s how we are using this URL http://ACCOUNT/accounts/{empId} to access Account MicroService instance.

import java.util.List;
import org.springframework.beans.factory.annotation.Autowired;
import org.springframework.core.ParameterizedTypeReference;
import org.springframework.http.HttpMethod;
import org.springframework.stereotype.Service;
import org.springframework.web.bind.annotation.PathVariable;
import org.springframework.web.client.RestTemplate;

@Service
public class UserService {
  @Autowired
  private RestTemplate restTemplate;
    public List<Account> showEmployees(@PathVariable("id") String id) {
    System.out.println(id);
    
    List<Account> accounts = restTemplate.exchange(
    "http://ACCOUNT/accounts/{empId}", HttpMethod.GET, null, new
    ParameterizedTypeReference<List<Account>>(){}, id).getBody();
    // Another call (to demo load balancing)
    accounts = restTemplate.exchange(
            "http://ACCOUNT/accounts/{empId}", HttpMethod.GET, null, new
            ParameterizedTypeReference<List<Account>>(){}, id).getBody();
    return accounts;          
  }
}

Testing the application

Once the changes are done start all the applications i.e. Eureka Server, User MicroService and two instances of Account MicroService.

In the console of SpringBootUser application you can see that the Load balancer has recognized the list of servers and one of them will be called to service the request.

2020-04-25 17:02:06.405  INFO 9908 --- [nio-8080-exec-1] c.netflix.config.ChainedDynamicProperty  : Flipping property: ACCOUNT.ribbon.ActiveConnectionsLimit to use NEXT property: niws.loadbalancer.availabilityFilteringRule.activeConnectionsLimit = 2147483647
2020-04-25 17:02:06.573  INFO 9908 --- [nio-8080-exec-1] c.n.u.concurrent.ShutdownEnabledTimer    : Shutdown hook installed for: NFLoadBalancer-PingTimer-ACCOUNT
2020-04-25 17:02:06.575  INFO 9908 --- [nio-8080-exec-1] c.netflix.loadbalancer.BaseLoadBalancer  : Client: ACCOUNT instantiated a LoadBalancer: DynamicServerListLoadBalancer:{NFLoadBalancer:name=ACCOUNT,current list of Servers=[],Load balancer stats=Zone stats: {},Server stats: []}ServerList:null
2020-04-25 17:02:06.637  INFO 9908 --- [nio-8080-exec-1] c.n.l.DynamicServerListLoadBalancer      : Using serverListUpdater PollingServerListUpdater
2020-04-25 17:02:06.905  INFO 9908 --- [nio-8080-exec-1] c.netflix.config.ChainedDynamicProperty  : Flipping property: ACCOUNT.ribbon.ActiveConnectionsLimit to use NEXT property: niws.loadbalancer.availabilityFilteringRule.activeConnectionsLimit = 2147483647
2020-04-25 17:02:06.923  INFO 9908 --- [nio-8080-exec-1] c.n.l.DynamicServerListLoadBalancer      : DynamicServerListLoadBalancer for client ACCOUNT initialized: DynamicServerListLoadBalancer:{NFLoadBalancer:name=ACCOUNT,current list of Servers=[user:9000, user:9001],Load balancer stats=Zone stats: {defaultzone=[Zone:defaultzone;	Instance count:2;	Active connections count: 0;	Circuit breaker tripped count: 0;	Active connections per server: 0.0;]
},Server stats: [[Server:user:9000;	Zone:defaultZone;	Total Requests:0;	Successive connection failure:0;	Total blackout seconds:0;	Last connection made:Thu Jan 01 05:30:00 IST 1970;	First connection made: Thu Jan 01 05:30:00 IST 1970;	Active Connections:0;	total failure count in last (1000) msecs:0;	average resp time:0.0;	90 percentile resp time:0.0;	95 percentile resp time:0.0;	min resp time:0.0;	max resp time:0.0;	stddev resp time:0.0]
, [Server:user:9001;	Zone:defaultZone;	Total Requests:0;	Successive connection failure:0;	Total blackout seconds:0;	Last connection made:Thu Jan 01 05:30:00 IST 1970;	First connection made: Thu Jan 01 05:30:00 IST 1970;	Active Connections:0;	total failure count in last (1000) msecs:0;	average resp time:0.0;	90 percentile resp time:0.0;	95 percentile resp time:0.0;	min resp time:0.0;	max resp time:0.0;	stddev resp time:0.0]
]}ServerList:org.springframework.cloud.netflix.ribbon.eureka.DomainExtractingServerList@7ef76128

Accessing services

You can start the service by accessing URL- http://localhost:8080/user/1

Try to access the same URL in different browser tabs and you can see that requests are getting divided between two Account service instances.

Download source code- https://github.com/knpcode/SpringBoot-MicroService-Ribbon

That's all for the topic Spring Boot Microservices Eureka + Ribbon. If something is missing or you have something to share about the topic please write a comment.


You may also like

July 15, 2021

Spring Boot Microservices Example

In this article we’ll see a Spring Boot Microservices example with Eureka used for service registration and discovering the service. We’ll have two separate services User and Account developed as Microservices. With two microservices we'll also see how to call one microservice from another using RestTemplate.

When a large monolith application is split into two or more microservices those microservices may need to interact with each other. To do that these microservices need to be aware of each others existence and should be able to find each other. This process is known as service discovery. There is a tool called Eureka created by Netflix that can act as a discovery server, for that you need to register your microservices with the Eureka server.

So, in this Spring Boot Microservices example we are going to create 3 separate Spring Boot applications two for the functionality of User and Account and third one for Eureka Server.

Spring Boot application for Eureka Server

First we’ll create a Spring Boot project for configuring Eureka Server, this application acts as a service registry.

Starter you need to add for Eureka Server is spring-cloud-starter-netflix-eureka-server

Maven dependencies – pom.xml

pom.xml with the starter dependencies. Note that Spring Boot version used is 2.3.4.RELEASE and Spring Cloud version is Hoxton.SR8

<?xml version="1.0" encoding="UTF-8"?>
<project xmlns="http://maven.apache.org/POM/4.0.0" xmlns:xsi="http://www.w3.org/2001/XMLSchema-instance"
  xsi:schemaLocation="http://maven.apache.org/POM/4.0.0 https://maven.apache.org/xsd/maven-4.0.0.xsd">
  <modelVersion>4.0.0</modelVersion>
  <parent>
    <groupId>org.springframework.boot</groupId>
    <artifactId>spring-boot-starter-parent</artifactId>
    <version>2.3.4.RELEASE</version>
    <relativePath/>
  </parent>
  <groupId>com.knpcode</groupId>
  <artifactId>springeureka</artifactId>
  <version>0.0.1-SNAPSHOT</version>
  <name>EurekaServer</name>
  <description>Eureka Server project</description>

  <properties>
    <java.version>1.8</java.version>
    <spring-cloud.version>Hoxton.SR8</spring-cloud.version>
  </properties>

  <dependencies>
    <dependency>
      <groupId>org.springframework.cloud</groupId>
      <artifactId>spring-cloud-starter-netflix-eureka-server</artifactId>
    </dependency>

    <dependency>
      <groupId>org.springframework.boot</groupId>
      <artifactId>spring-boot-starter-test</artifactId>
      <scope>test</scope>
      <exclusions>
        <exclusion>
          <groupId>org.junit.vintage</groupId>
          <artifactId>junit-vintage-engine</artifactId>
        </exclusion>
      </exclusions>
    </dependency>
  </dependencies>

  <dependencyManagement>
    <dependencies>
      <dependency>
        <groupId>org.springframework.cloud</groupId>
        <artifactId>spring-cloud-dependencies</artifactId>
        <version>${spring-cloud.version}</version>
        <type>pom</type>
        <scope>import</scope>
      </dependency>
    </dependencies>
  </dependencyManagement>

  <build>
    <plugins>
      <plugin>
        <groupId>org.springframework.boot</groupId>
        <artifactId>spring-boot-maven-plugin</artifactId>
      </plugin>
    </plugins>
  </build>

</project>

Application class

Application class with main method.

import org.springframework.boot.SpringApplication;
import org.springframework.boot.autoconfigure.SpringBootApplication;
import org.springframework.cloud.netflix.eureka.server.EnableEurekaServer;

@EnableEurekaServer
@SpringBootApplication
public class EurekaServerApplication {
  public static void main(String[] args) {
    SpringApplication.run(EurekaServerApplication.class, args);
  }
}

In the application class apart from @SpringBootApplication annotation another annotation @EnableEurekaServer is also added.

@EnableEurekaServer annotation indicates that we want to run a Eureka Server. By seeing a dependency on Spring Cloud Eureaka, Spring Boot automatically configures the application as a service registry.

Eureka Server Configuration

In the application.properties put the following.

server.port=8761
eureka.instance.hostname=localhost
eureka.client.register-with-eureka=false
eureka.client.fetch-registry=false

server.port configures the port Eureka Server runs on.

For a stand alone instance we don’t want Eureka Server to be a client too that is why these two entries-

eureka.client.register-with-eureka=false

eureka.client.fetch-registry=false

Running Eureka Server

Eureka server application is ready and you can run the EurekaServerApplication class to start the Eureka Server.

You should get the following messages if every thing runs fine-

2020-03-12 14:53:16.457  INFO 14400 --- [      Thread-10] e.s.EurekaServerInitializerConfiguration : Started Eureka Server
2020-03-12 14:53:16.503  INFO 14400 --- [           main] o.s.b.w.embedded.tomcat.TomcatWebServer  : Tomcat started on port(s): 8761 (http) with context path ''
2020-03-12 14:53:16.507  INFO 14400 --- [           main] .s.c.n.e.s.EurekaAutoServiceRegistration : Updating port to 8761
2020-03-12 14:53:19.314  INFO 14400 --- [           main] o.n.s.EurekaServerApplication            : Started EurekaServerApplication in 30.203 seconds (JVM running for 33.929)

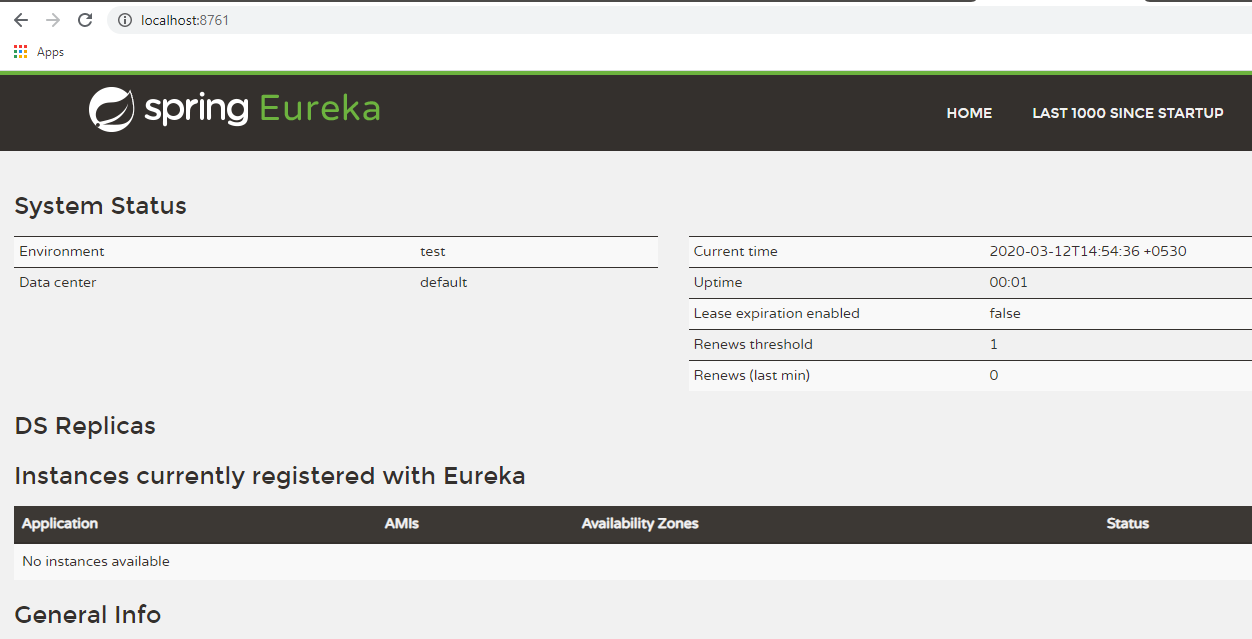
You can see the Eureka Server console by accessing URL- http://localhost:8761/

Spring boot eureka server

As you can see currently no instances are registered with Eureka. That’s what is the next task, to create Spring Boot microservices and register them with Eureka Server.

Spring Boot Account application

Create another Spring Boot project for Account Microservice, starter dependency for eureka client has to be added, in place of eureka-server, to register this Microservice as Eureka client. All the other dependencies remain same as used in Eureka Server application.

<dependency>
  <groupId>org.springframework.cloud</groupId>
  <artifactId>spring-cloud-starter-netflix-eureka-client</artifactId>
</dependency>

Rest Controller class

We’ll add a controller with the functionality to find all the accounts for the passed EmployeeId.

import java.util.List;
import org.springframework.beans.factory.annotation.Autowired;
import org.springframework.web.bind.annotation.GetMapping;
import org.springframework.web.bind.annotation.PathVariable;
import org.springframework.web.bind.annotation.RestController;

@RestController
public class AccountController {
  @Autowired
  private AccountService accountService;
  
  @GetMapping(value="/accounts/{empId}") 
  public List<Account>getAccountsByEmpId(@PathVariable String empId) { 
    System.out.println("EmpId------" + empId);
    List<Account> empAccountList = accountService.findAccountsByEmpId(empId);
    return empAccountList; 
  }
}

AccountService class

In the AccountService class you can see there is a dummy method to get the Accounts rather than accessing DB in order to keep the focus on interaction between microservices.

import java.util.ArrayList;
import java.util.List;
import org.springframework.stereotype.Service;

@Service
public class AccountService {
  public List<Account> findAccountsByEmpId(String empId){
    List<Account> accountList = getAccountList();
    List<Account> empAccountList = new ArrayList<>();
    for(Account account :  accountList) {
      if(account.getEmpId().equals(empId))
        empAccountList.add(account);
    }
    return empAccountList;
  }
    
  private List<Account> getAccountList(){
    List<Account> accountList = new ArrayList<>();
    accountList.add(new Account("1", "AC1", "MT"));
    accountList.add(new Account("1", "AC2", "IN"));
    accountList.add(new Account("2", "AC3", "IN"));
    return accountList;
  }
}
DTO Class

There is also an Account class that acts as a DTO or a model bean.

public class Account {
  private String empId;
  private String accountId;
  private String branch;
  Account(){
    
  }
  Account(String empId, String accountId, String branch){
    this.empId = empId;
    this.accountId = accountId;
    this.branch = branch;
  }
  public String getEmpId() {
    return empId;
  }
  public void setEmpId(String empId) {
    this.empId = empId;
  }
  public String getAccountId() {
    return accountId;
  }
  public void setAccountId(String accountId) {
    this.accountId = accountId;
  }
  public String getBranch() {
    return branch;
  }
  public void setBranch(String branch) {
    this.branch = branch;
  }
}

Application class

import org.springframework.boot.SpringApplication;
import org.springframework.boot.autoconfigure.SpringBootApplication;
import org.springframework.cloud.client.discovery.EnableDiscoveryClient;

@EnableDiscoveryClient
@SpringBootApplication
public class SpringBootAccountApplication {
  public static void main(String[] args) {
    SpringApplication.run(SpringBootAccountApplication.class, args);
  }
}

Application class is annotated with the @EnableDiscoveryClient (so that this application can be discovered as Eureka client, you can also use @EnableEurekaClient annotation instead of @EnableDiscoveryClient) along with the @SpringBootApplication annotation.

Configuration for Eureka Client

Following properties are also to be added to the application.properties file to register Account Microservice as Eureka client.

eureka.client.service-url.default-zone=http://localhost:8761/eureka
server.port=9000
spring.application.name=account

eureka.client.service-url.default-zone property tells our microservice where to look for Eureka Server.

Using spring.application.name you give a logical name to your microservice.

Server port is configured as 9000 so this Account application runs on port 9000.

Registering Account Microservice as Eureka client

Run the SpringBootAccountApplication class to start this RESTful service. It will automatically be registered as Eureka client. You can verify that seeing the messages on the console.

2020-03-12 15:23:58.585  INFO 12416 --- [  restartedMain] o.s.c.n.e.s.EurekaServiceRegistry        : Registering application ACCOUNT with eureka with status UP
2020-03-12 15:23:58.588  INFO 12416 --- [  restartedMain] com.netflix.discovery.DiscoveryClient    : Saw local status change event StatusChangeEvent [timestamp=1584006838588, current=UP, previous=STARTING]
2020-03-12 15:23:58.597  INFO 12416 --- [nfoReplicator-0] com.netflix.discovery.DiscoveryClient    : DiscoveryClient_ACCOUNT/user:account:9000: registering service...
2020-03-12 15:23:58.940  INFO 12416 --- [  restartedMain] o.s.b.w.embedded.tomcat.TomcatWebServer  : Tomcat started on port(s): 9000 (http) with context path ''
2020-03-12 15:23:58.945  INFO 12416 --- [  restartedMain] .s.c.n.e.s.EurekaAutoServiceRegistration : Updating port to 9000
2020-03-12 15:23:59.194  INFO 12416 --- [nfoReplicator-0] com.netflix.discovery.DiscoveryClient    : DiscoveryClient_ACCOUNT/user:account:9000 - registration status: 204
2020-03-12 15:24:02.128  INFO 12416 --- [  restartedMain] o.n.a.SpringBootAccountApplication       : Started SpringBootAccountApplication in 31.85 seconds (JVM running for 35.175)

Verifying Eureka Server

If you refresh the URL for Eureka Server- http://localhost:8761/ now you should see an instance registered. Name of the instance is same as what was configured as a logical name using the following property.

spring.application.name=account

Spring Boot microservice example

Spring Boot User application

Another microservice we need to create is the User service so create another project. There again add the same starter dependency to register this Microservice as Eureka client.

<dependency>
  <groupId>org.springframework.cloud</groupId>
  <artifactId>spring-cloud-starter-netflix-eureka-client</artifactId>
</dependency>

Rest Controller class

import java.util.List;
import org.springframework.beans.factory.annotation.Autowired;
import org.springframework.web.bind.annotation.GetMapping;
import org.springframework.web.bind.annotation.PathVariable;
import org.springframework.web.bind.annotation.RestController;

@RestController
public class UserController {
  @Autowired
  private UserService userService;
  
  @GetMapping(value="/user/{id}")
  public List<Account> showEmployees(@PathVariable("id") String id) {     
    List<Account> accounts = userService.showEmployees(id);
    // displaying accounts
    for(Account acct : accounts) {
      System.out.println(acct.getEmpId());
      System.out.println(acct.getAccountId());
      System.out.println(acct.getBranch());
    }
    return accounts;          
  }
}
UserService Class

In method showEmployees there is a call to the Account microservice to get all the associated accounts for the passed employee ID.

import java.util.List;
import org.springframework.beans.factory.annotation.Autowired;
import org.springframework.core.ParameterizedTypeReference;
import org.springframework.http.HttpMethod;
import org.springframework.stereotype.Service;
import org.springframework.web.bind.annotation.PathVariable;
import org.springframework.web.client.RestTemplate;

@Service
public class UserService {
  @Autowired
  private RestTemplate restTemplate;
  public List<Account> showEmployees(@PathVariable("id") String id) {
    System.out.println(id);
    //List<Account> accounts = new RestTemplate().exchange(
    //"http://localhost:9000/accounts/{empId}", HttpMethod.GET, null, new
    //ParameterizedTypeReference<List<Account>>(){}, id).getBody();
    
    List<Account> accounts = restTemplate.exchange(
    "http://ACCOUNT/accounts/{empId}", HttpMethod.GET, null, new
    ParameterizedTypeReference<List<Account>>(){}, id).getBody();
    return accounts;          
  }
}

restTemplate.exchange() is the method used for making remote call to another microservice.

  • First argument to restTemplate.exchange() is the URL to the Account microservice- "http://ACCOUNT/accounts/{empId}"
  • Second argument specifies that it is a HTTP Get command.
  • Third argument specifies the entity (headers and/or body) to write to the request. As we are not passing any request entity so it is null.
  • Fourth argument specifies the type of the response.
  • Fifth argument specifies the variables to expand in the template. We are passing id there which will replace {empId} in the URL.

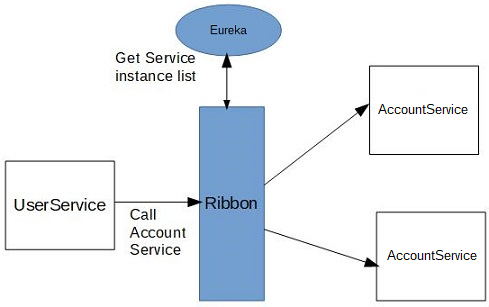
Using Ribbon Load Balancer

In the above method you can see that the URL used for calling Microservice is http://ACCOUNT/accounts/{empId} though you can also use http://localhost:9000/accounts/{empId} but that hardcodes the location which is not good.

To avoid that hardcoding we are using Netflix's Ribbon service which can be integrated with Eureka. What we need to do is to mark a RestTemplate bean to be configured to use a LoadBalancerClient, to do that we can create RestTemplate bean as following.

import org.springframework.cloud.client.loadbalancer.LoadBalanced;
import org.springframework.context.annotation.Bean;
import org.springframework.context.annotation.Configuration;
import org.springframework.web.client.RestTemplate;

@Configuration 
public class Config { 
  @Bean 
  @LoadBalanced
  RestTemplate restTemplate() { 
    return new RestTemplate(); 
  } 
}

Once you have this Load balanced restTemplate instance then you can use the logical name of the service, in the URL, that was used to register it with Eureka. That’s how we are using this URL http://ACCOUNT/accounts/{empId} to access Account MicroService.

Application class

import org.springframework.boot.SpringApplication;
import org.springframework.boot.autoconfigure.SpringBootApplication;
import org.springframework.cloud.client.discovery.EnableDiscoveryClient;

@EnableDiscoveryClient
@SpringBootApplication
public class SpringBootUserApplication {
  public static void main(String[] args) {
    SpringApplication.run(SpringBootUserApplication.class, args);
  }
}

Configuration for Eureka Client

Following properties are also to be added to the application.properties file to register User Microservice as Eureka client.

eureka.client.service-url.default-zone=http://localhost:8761/eureka
spring.application.name=user

Run the SpringBootUserApplication to start User MicroService. It will automatically be registered as Eureka client. You can verify that by seeing the messages on the console.

2020-03-12 16:24:00.228  INFO 9844 --- [  restartedMain] o.s.c.n.e.s.EurekaServiceRegistry        : Registering application USER with eureka with status UP
2020-03-12 16:24:00.231  INFO 9844 --- [  restartedMain] com.netflix.discovery.DiscoveryClient    : Saw local status change event StatusChangeEvent [timestamp=1584010440231, current=UP, previous=STARTING]
2020-03-12 16:24:00.240  INFO 9844 --- [nfoReplicator-0] com.netflix.discovery.DiscoveryClient    : DiscoveryClient_USER/user:user: registering service...
2020-03-12 16:24:00.402  INFO 9844 --- [nfoReplicator-0] com.netflix.discovery.DiscoveryClient    : DiscoveryClient_USER/user:user - registration status: 204
2020-03-12 16:24:00.572  INFO 9844 --- [  restartedMain] o.s.b.w.embedded.tomcat.TomcatWebServer  : Tomcat started on port(s): 8080 (http) with context path ''
2020-03-12 16:24:00.577  INFO 9844 --- [  restartedMain] .s.c.n.e.s.EurekaAutoServiceRegistration : Updating port to 8080
2020-03-12 16:24:03.278  INFO 9844 --- [  restartedMain] com.knpcode.user.SpringBootUserApplication   : Started SpringBootUserApplication in 28.889 seconds (JVM running for 33.647)

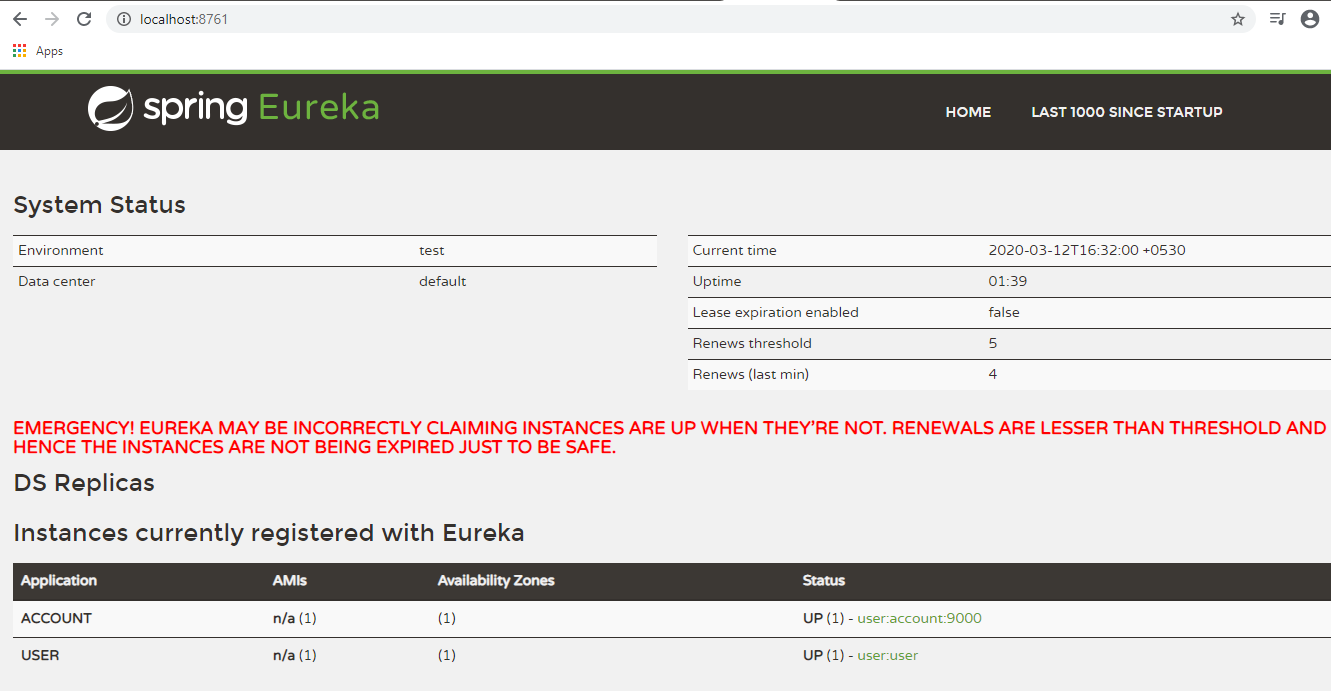
If you refresh the URL for Eureka Server- http://localhost:8761/ you should see both the MicroServices registered as Eureka clients.

Microservice with load balancing

Communication between MicroServices

Now we have two MicroSerivces created and running. Both of the MicroServices are registered with Eureka so these services can be discovered using Eureka.

Now when you access the URL http://localhost:8080/user/1 it will be serviced by showEmployees() method of the UserController in SpringBootUser application. From there using restTemplate.exchange() method it communicates with Account service.

Microservice with eureka client discovery

The URL (http://ACCOUNT/accounts/{empId}) passed in the exchange method triggers the whole process of load balancing and discovering the Eureka client as evident from the log messages.

2020-03-12 16:36:37.733  INFO 9844 --- [nio-8080-exec-1] c.netflix.config.ChainedDynamicProperty  : Flipping property: ACCOUNT.ribbon.ActiveConnectionsLimit to use NEXT property: niws.loadbalancer.availabilityFilteringRule.activeConnectionsLimit = 2147483647
2020-03-12 16:36:37.915  INFO 9844 --- [nio-8080-exec-1] c.n.u.concurrent.ShutdownEnabledTimer    : Shutdown hook installed for: NFLoadBalancer-PingTimer-ACCOUNT
2020-03-12 16:36:37.916  INFO 9844 --- [nio-8080-exec-1] c.netflix.loadbalancer.BaseLoadBalancer  : Client: ACCOUNT instantiated a LoadBalancer: DynamicServerListLoadBalancer:{NFLoadBalancer:name=ACCOUNT,current list of Servers=[],Load balancer stats=Zone stats: {},Server stats: []}ServerList:null
2020-03-12 16:36:37.963  INFO 9844 --- [nio-8080-exec-1] c.n.l.DynamicServerListLoadBalancer      : Using serverListUpdater PollingServerListUpdater
2020-03-12 16:36:38.090  INFO 9844 --- [nio-8080-exec-1] c.netflix.config.ChainedDynamicProperty  : Flipping property: ACCOUNT.ribbon.ActiveConnectionsLimit to use NEXT property: niws.loadbalancer.availabilityFilteringRule.activeConnectionsLimit = 2147483647
2020-03-12 16:36:38.098  INFO 9844 --- [nio-8080-exec-1] c.n.l.DynamicServerListLoadBalancer      : DynamicServerListLoadBalancer for client ACCOUNT initialized: DynamicServerListLoadBalancer:{NFLoadBalancer:name=ACCOUNT,current list of Servers=[user:9000],Load balancer stats=Zone stats: {defaultzone=[Zone:defaultzone;	Instance count:1;	Active connections count: 0;	Circuit breaker tripped count: 0;	Active connections per server: 0.0;]
},Server stats: [[Server:user:9000;	Zone:defaultZone;	Total Requests:0;	Successive connection failure:0;	Total blackout seconds:0;	Last connection made:Thu Jan 01 05:30:00 IST 1970;	First connection made: Thu Jan 01 05:30:00 IST 1970;	Active Connections:0;	total failure count in last (1000) msecs:0;	average resp time:0.0;	90 percentile resp time:0.0;	95 percentile resp time:0.0;	min resp time:0.0;	max resp time:0.0;	stddev resp time:0.0]
]}ServerList:org.springframework.cloud.netflix.ribbon.eureka.DomainExtractingServerList@5820f552
1
AC1
MT
1
AC2
IN
2020-03-12 16:36:38.995  INFO 9844 --- [erListUpdater-0] c.netflix.config.ChainedDynamicProperty  : Flipping property: ACCOUNT.ribbon.ActiveConnectionsLimit to use NEXT property: niws.loadbalancer.availabilityFilteringRule.activeConnectionsLimit = 2147483647
favicon.ico
2020-03-12 16:38:59.147  INFO 9844 --- [trap-executor-0] c.n.d.s.r.aws.ConfigClusterResolver      : Resolving eureka endpoints via configuration
2020-03-12 16:43:59.150  INFO 9844 --- [trap-executor-0] c.n.d.s.r.aws.ConfigClusterResolver      : Resolving eureka endpoints via configuration

Download sourcecode- SpringBoot-MicroService-Example

That's all for the topic Spring Boot Microservices Example. If something is missing or you have something to share about the topic please write a comment.


You may also like

July 10, 2021

How to Copy a Directory in Java

This post shows how to copy a directory in Java where all the files and sub folders with in a directory are recursively copied to a new directory.

Options for copying a directory in Java

For copying the folder tree structure which includes the sub-directories and all the files you can use one of the following options in Java-

  • Using File.listFiles() method which returns an array of abstract pathnames denoting the files in the directory. Then you can iterate the array to list the files and copy them to the target directory, you will have to recursively call your method to list files with in the sub-directories. See example.
  • Java 7 onward you can use Files.walkFileTree method which walks a file tree rooted at a given starting file. See example.
  • Java 8 onward you can use Files.walk() method which returns the Path objects as stream by walking the file tree rooted at a given starting file. See example.

Directory structure used

Java programs shown here to copy a directory in Java use the following directory structure.

copy a folder in Java

With in the parent folder there is one sub folder Child with two files and one file is stored in the parent folder.

Copying directory in Java using Files.walk() method

Java 8 onward You can use Files.walk() method which returns the Path objects as stream. Each path in that Stream can be checked then to verify whether it's a directory or a file. If it is a file, it has to be copied to the target location, in case of directory you need to create that directory at the target location.

import java.io.IOException;
import java.nio.file.Files;
import java.nio.file.Path;
import java.nio.file.Paths;
import java.util.stream.Stream;

public class CopyDirectory {
  public static void main(String[] args) {
    final String SOURCE_DIR = "F:/knpcode/Parent";
    final String TARGET_DIR = "F:/knpcode/Parent_New";
    directoryCopy(SOURCE_DIR, TARGET_DIR);
  }

  private static void directoryCopy(String sourceDir, String targetDir){
    Path sourcePath = Paths.get(sourceDir);
    Path targetPath = Paths.get(targetDir);
    try(Stream<Path> filePaths = Files.walk(sourcePath)) {
      filePaths.forEach(filePath -> {
        try {
          if (Files.isRegularFile(filePath)) {
            Path newFile = targetPath.resolve(sourcePath.relativize(filePath));
            Files.copy(filePath, newFile);
            System.out.println("Copied file " + newFile);
          }else{
            Path newDir = targetPath.resolve(sourcePath.relativize(filePath));
            Files.createDirectory(newDir);
            System.out.println("Created Directory " + newDir);
          }
        }catch (IOException e) {
          // TODO Auto-generated catch block
          e.printStackTrace();
        } 
      });
    }catch (IOException e) {
      // TODO Auto-generated catch block
      e.printStackTrace();
    }
  }
}
Output
Created Directory F:\knpcode\Parent_New
Created Directory F:\knpcode\Parent_New\Child
Copied file F:\knpcode\Parent_New\Child\hello.txt
Copied file F:\knpcode\Parent_New\Child\Project.docx
Copied file F:\knpcode\Parent_New\Test.txt

Copying directory in Java using Files.walkFileTree() method

Java 7 onward You can use Files.walkFileTree() method using which you can walk the tree structure of the source directory and copy all files and sub-directories in the process.

One of the argument of this method is a FileVisitor interface. You do need to provide implementation of this interface as per your requirement.

FileVisitor interface has four methods, for listing files in a folder you do need to implement two of them; preVisitDirectory and visitFile.

import java.io.IOException;
import java.nio.file.FileVisitResult;
import java.nio.file.Files;
import java.nio.file.Path;
import java.nio.file.Paths;
import java.nio.file.SimpleFileVisitor;
import java.nio.file.attribute.BasicFileAttributes;

public class CopyDirectory {
  public static void main(String[] args) {
    final String SOURCE_DIR = "F:/knpcode/Parent";
    final String TARGET_DIR = "G:/Parent_New";
    try {
      directoryCopy(SOURCE_DIR, TARGET_DIR);
    } catch (IOException e) {
      // TODO Auto-generated catch block
      e.printStackTrace();
    }
  }

  private static void directoryCopy(String sourceDir, String targetDir) throws IOException{
    Path sourcePath = Paths.get(sourceDir);
    Path targetPath = Paths.get(targetDir);
    // Walk the tree structure using WalkFileTree method       
    Files.walkFileTree(sourcePath, new SimpleFileVisitor<Path>(){
      @Override
      // Before visiting the directory, create directory 
      public FileVisitResult preVisitDirectory(final Path dir, final BasicFileAttributes attrs) throws IOException {
        Path newDir = targetPath.resolve(sourcePath.relativize(dir));
        System.out.println("Path- " + newDir.toString());
        Files.createDirectory(newDir);
        return FileVisitResult.CONTINUE;
      }
      @Override
      // For each visited file copy it
      public FileVisitResult visitFile(final Path file, final BasicFileAttributes attrs) throws IOException {
        Path newFile = targetPath.resolve(sourcePath.relativize(file));
        System.out.println("Path- " + newFile.getFileName());
        Files.copy(file, newFile);                
        return FileVisitResult.CONTINUE;
      }
    });  
  }
}

Copying directory in Java using File.listFiles() method

import java.io.File;
import java.io.IOException;
import java.nio.file.Files;

public class CopyDirectory {
  public static void main(String[] args) {
    final String SOURCE_PATH = "F:/knpcode/Parent";
    final String TARGET_PATH = "F:/knpcode/Parent_New";
    File sourceDir = new File(SOURCE_PATH);
    File targetDir = new File(TARGET_PATH);
    try {
      directoryCopy(sourceDir, targetDir);
    } catch (IOException e) {
      // TODO Auto-generated catch block
      e.printStackTrace();
    }
  }

  private static void directoryCopy(File sourceDir, File targetDir) throws IOException{
    if(sourceDir.isDirectory()){
      // create target directory
      if(!targetDir.exists()){
        targetDir.mkdir();
        System.out.println("Created Directory " + targetDir);
      }
      File[] fileList = sourceDir.listFiles();
      for(File file : fileList){
        File sourceFile =  new File(sourceDir, file.getName());
        File targetFile = new File(targetDir, file.getName());
        // Recursive call in case of directory
        directoryCopy(sourceFile, targetFile);
      }
    }else{ // if it is a file
      Files.copy(sourceDir.toPath(), targetDir.toPath());
      System.out.println("Copied file " + targetDir);
    }
  }
}
Output
Created Directory F:\knpcode\Parent_New
Created Directory F:\knpcode\Parent_New\Child
Copied file F:\knpcode\Parent_New\Child\hello.txt
Copied file F:\knpcode\Parent_New\Child\Project.docx
Copied file F:\knpcode\Parent_New\Test.txt

That's all for the topic How to Copy a Directory in Java. If something is missing or you have something to share about the topic please write a comment.


You may also like

July 3, 2021

Java Programs For Displaying Patterns

In this post we’ll have Java programs for displaying patterns which are the beginner level programs to understand and use loops in Java. In these Java programs outer and inner for loops are used to display patterns using numbers or symbols.

Java program for pyramid pattern – Pattern 1

A very popular pyramid patters is to display pyramid of numbers having the digit repeated as many times as the number in each row.

      1 
     2 2 
    3 3 3 
   4 4 4 4 
  5 5 5 5 5 
 6 6 6 6 6 6 
7 7 7 7 7 7 7 
public class PatternProgram {
  public static void main(String[] args) {
    Scanner sc = new Scanner(System.in);
    System.out.println("Enter number of rows in the pyramid (1-9)- ");
    int rows = sc.nextInt();
    displayPyramidPattern(rows);
  }
	
  private static void displayPyramidPattern(int rows){
    for(int i=1; i<=rows; i++){
      // print correct number of spaces 
      // in each row
      for(int j=0; j<rows-i; j++){
        System.out.print(" ");
      }
      // print number 
      for(int k=0; k<i; k++){
        System.out.print(i + " ");
      }
      System.out.println();           
    }     
  }
}

Java program for inverted pyramid – Pattern 2

If you want to display pyramid up side down.

7 7 7 7 7 7 7 
 6 6 6 6 6 6 
  5 5 5 5 5 
   4 4 4 4 
    3 3 3 
     2 2 
      1 
public class PatternProgram {

  public static void main(String[] args) {
    Scanner sc = new Scanner(System.in);
    System.out.println("Enter number of rows in the pyramid (1-9)- ");
    int rows = sc.nextInt();
    displayPyramidPattern(rows);
  }
	
  private static void displayPyramidPattern(int rows){
    for(int i=rows; i>=1; i--){
      // print correct number of spaces 
      // in each row
      for(int j=0; j<rows-i; j++){
        System.out.print(" ");
      }
      // print number 
      for(int k=0; k<i; k++){
        System.out.print(i + " ");
      }
      System.out.println();           
    }     
  }
}

Java program for half pyramid – Pattern 3

1 
2 2 
3 3 3 
4 4 4 4 
5 5 5 5 5 
6 6 6 6 6 6 
7 7 7 7 7 7 7 
8 8 8 8 8 8 8 8 
9 9 9 9 9 9 9 9 9 
public class PatternProgram {

  public static void main(String[] args) {
    Scanner sc = new Scanner(System.in);
    System.out.println("Enter number of rows in the pyramid (1-9)- ");
    int rows = sc.nextInt();
    displayPyramidPattern(rows);
  }
	
  private static void displayPyramidPattern(int rows){
    for(int i=1; i<=rows; i++){	            
      for(int j=0; j<i; j++){
        System.out.print(i + " ");
      }
      System.out.println();
              
    }    
  }
}

Java program for half pyramid – Pattern 4

              1 
            1 2 
          1 2 3 
        1 2 3 4 
      1 2 3 4 5 
    1 2 3 4 5 6 
  1 2 3 4 5 6 7 
1 2 3 4 5 6 7 8 
public class PatternProgram {

  public static void main(String[] args) {
    Scanner sc = new Scanner(System.in);
    System.out.println("Enter number of rows in the pyramid (1-9)- ");
    int rows = sc.nextInt();
    displayPyramidPattern(rows);
  }
	
  private static void displayPyramidPattern(int rows){
    for(int i=1; i<=rows; i++){	
      // print correct number of spaces 
      // in each row
      for(int j=0; j<2*(rows-i); j++){
        System.out.print(" ");
      }
      for(int j=1; j<=i; j++){
        System.out.print(j+" ");
      }
      System.out.println();	
    } 
  }
}

Java program for half pyramid – Pattern 5

In this pattern numbers are in series rather than being reset in each row. This pattern is known as Floyd's triangle.

1 
2 3 
4 5 6 
7 8 9 10 
11 12 13 14 15
public class PatternProgram {

  public static void main(String[] args) {
    Scanner sc = new Scanner(System.in);
    System.out.println("Enter number of rows in the pyramid (1-9)- ");
    int rows = sc.nextInt();
    displayPyramidPattern(rows);
  }
	
  private static void displayPyramidPattern(int rows){
    int num = 1;
    for(int i=1; i<=rows; i++){	            
      for(int j=0; j<i; j++){
        System.out.print(num++ + " ");
      }
      System.out.println();				
    } 
  }
}

Java program for pyramid pattern – Pattern 6

Pyramid where number increments and decrements in the same row.

       1
      121
     12321
    1234321
   123454321
  12345654321
 1234567654321
123456787654321
public class PatternProgram {

  public static void main(String[] args) {
    Scanner sc = new Scanner(System.in);
    System.out.println("Enter number of rows in the pyramid (1-9)- ");
    int rows = sc.nextInt();
    displayPyramidPattern(rows);
  }
	
  private static void displayPyramidPattern(int rows){
    for(int i=1; i<=rows; i++){
      // print correct number of spaces 
      // in each row
      for(int j=0; j<rows-i; j++){
        System.out.print(" ");
      }
      // print incrementing part
      for(int k=1; k<i; k++){
        System.out.print(k);
      }
      // print decrementing part
      for(int k=i; k>=1; k--){
        System.out.print(l);
      }
      System.out.println();     
    }    
  }
}

Java program for pyramid pattern – Pattern 7

Pyramid using ‘*’ symbol.

     * 
    * * 
   * * * 
  * * * * 
 * * * * * 
* * * * * * 
public class PatternProgram {

  public static void main(String[] args) {
    Scanner sc = new Scanner(System.in);
    System.out.println("Enter number of rows in the pyramid (1-9)- ");
    int rows = sc.nextInt();
    displayPyramidPattern(rows);
  }
	
  private static void displayPyramidPattern(int rows){
    for(int i=1; i<=rows; i++){
      // print correct number of spaces 
      // in each row
      for(int j=0; j<rows-i; j++){
        System.out.print(" ");
      }
      // print number 
      for(int k=0; k<i; k++){
        System.out.print("* ");
      }
      System.out.println();           
    }     
  }
}

Java program for pattern – Pattern 8

8 7 6 5 4 3 2 1 
8 7 6 5 4 3 2 
8 7 6 5 4 3 
8 7 6 5 4 
8 7 6 5 
8 7 6 
8 7 
8 
public class PatternProgram {

  public static void main(String[] args) {
    Scanner sc = new Scanner(System.in);
    System.out.println("Enter number of rows in the pyramid (1-9)- ");
    int rows = sc.nextInt();
    displayPyramidPattern(rows);
  }
	
  private static void displayPyramidPattern(int rows){
    for(int i=1; i<=rows; i++){	            
      for(int j=rows; j>=i; j--){
        System.out.print(j + " ");
      }
      System.out.println();            
    }    
  }
}

Java pattern program – Pattern 9

1
12
123
1234
12345
123456
1234567
12345678
1234567
123456
12345
1234
123
12
1
public class PatternProgram {

  public static void main(String[] args) {
    Scanner sc = new Scanner(System.in);
    System.out.println("Enter number of rows in the pyramid (1-9)- ");
    int rows = sc.nextInt();
    displayPyramidPattern(rows);
  }
	
  private static void displayPyramidPattern(int rows){
    //For upper half-incrementing
    for(int i=1; i<=rows; i++){
      for(int j=1; j<=i; j++){
        System.out.print(j);
      }            
      System.out.println();            
    }
    //For lower half-decrementing
    for(int i=rows; i>=1; i--){
      for(int j=1; j<i; j++){
        System.out.print(j);
      }
      System.out.println();
    }     
  }
}

Java pattern program – Pattern 10

12345678
1234567
123456
12345
1234
123
12
1
12
123
1234
12345
123456
1234567
12345678
public class PatternProgram {

  public static void main(String[] args) {
    Scanner sc = new Scanner(System.in);
    System.out.println("Enter number of rows in the pyramid (1-9)- ");
    int rows = sc.nextInt();
    displayPyramidPattern(rows);
  }
	
  private static void displayPyramidPattern(int rows){
    for(int i=rows; i>=1; i--){
      for(int j=1; j<=i; j++){
        System.out.print(j);
      }	           
      System.out.println();	           
    }
    for(int i=2; i<=rows; i++){
      for(int j=1; j<=i; j++){
        System.out.print(j);
      }
      System.out.println();
    }     
  }
}

Java pattern program – Pattern 11

7777777
 666666
  55555
   4444
    333
     22
      1
     22
    333
   4444
  55555
 666666
7777777
public class PatternProgram {

  public static void main(String[] args) {
    Scanner sc = new Scanner(System.in);
    System.out.println("Enter number of rows in the pyramid (1-9)- ");
    int rows = sc.nextInt();
    displayPyramidPattern(rows);
    sc.close();
  }
	
  private static void displayPyramidPattern(int rows){
    for(int i=rows; i>=1; i--){
      for(int j=i; j<rows; j++){
        System.out.print(" ");
      }	
      for(int j = 1; j <= i; j++){
        System.out.print(i);
      }	           
      System.out.println();	           
    }
    for(int i=2; i<=rows; i++){
      for(int j=rows; j>i; j--){
        System.out.print(" ");
      }
      for(int j=1; j<=i; j++){
        System.out.print(i);
      }
      System.out.println();
    }     
  }
}

Java pattern program – Pattern 12

8 8 8 8 8 8 8 8 
 7 7 7 7 7 7 7 
  6 6 6 6 6 6 
   5 5 5 5 5 
    4 4 4 4 
     3 3 3 
      2 2 
       1 
      2 2 
     3 3 3 
    4 4 4 4 
   5 5 5 5 5 
  6 6 6 6 6 6 
 7 7 7 7 7 7 7 
8 8 8 8 8 8 8 8 
public class PatternProgram {

  public static void main(String[] args) {
    Scanner sc = new Scanner(System.in);
    System.out.println("Enter number of rows in the pyramid (1-9)- ");
    int rows = sc.nextInt();
    displayPyramidPattern(rows);
    sc.close();
  }
	
  private static void displayPyramidPattern(int rows){
    //for upper pyramid
    for(int i=rows; i>=1; i--){
      // print correct number of spaces 
      // in each row
      for(int j=0; j<rows-i; j++){
        System.out.print(" ");
      }
      // print number 
      for(int k=0; k<i; k++){
        System.out.print(i + " ");
      }
      System.out.println();           
    }  
    //for lower pyramid
    for(int i=2; i<=rows; i++){
      // print correct number of spaces 
      // in each row
      for(int j=0; j<rows-i; j++){
        System.out.print(" ");
      }
      // print number 
      for(int k=0; k<i; k++){
        System.out.print(i + " ");
      }
      System.out.println();           
    }     
  }
}

Java pattern program – Pattern 13

12345654321
 123454321
  1234321
   12321
    121
     1
    121
   12321
  1234321
 123454321
12345654321
public class PatternProgram {

  public static void main(String[] args) {
    Scanner sc = new Scanner(System.in);
    System.out.println("Enter number of rows in the pyramid (1-9)- ");
    int rows = sc.nextInt();
    displayPyramidPattern(rows);
    sc.close();
  }
	
  private static void displayPyramidPattern(int rows){
    for(int i=rows; i>=1; i--){
      // print correct number of spaces 
      // in each row
      for(int j=0; j<rows-i; j++){
        System.out.print(" ");
      }
      // print incrementing part
      for(int k=1; k<i; k++){
        System.out.print(k);
      }
      // print decrementing part
      for(int k=i; k>=1; k--){
        System.out.print(k);
      }
      System.out.println();     
    }
    for(int i=2; i<=rows; i++){
      // print correct number of spaces 
      // in each row
      for(int j=0; j<rows-i; j++){
        System.out.print(" ");
      }
      // print incrementing part
      for(int k=1; k<i; k++){
        System.out.print(k);
      }
      // print decrementing part
      for(int k=i; k>=1; k--){
        System.out.print(k);
      }
      System.out.println();     
    }     
  }
}

That's all for the topic Java Programs For Displaying Patterns. If something is missing or you have something to share about the topic please write a comment.


You may also like

July 2, 2021

Spring Boot + Data JPA + Oracle One to Many Example

In this article we’ll see an example of Spring Boot + Data JPA + Oracle DB + Spring REST. In the example two tables are used to demonstrate One-to-Many and Many-to-One relationship.

In the Spring Data JPA repositories used in the example, custom methods are also used to show how you can write methods to generate queries automatically for “Between” and “Greater than” by using these keywords in the methods in the data JPA repositories. We'll also see how you can write query yourself by using @Query annotation with Spring Data JPA.

DB Tables

There are two tables Customer and Transaction, since a customer can have many transactions that means there is one-to-many relationship between Customer and Transaction.

one to many JPA
Queries for creating tables
CREATE TABLE "TEST"."CUSTOMER" 
   (	"CUST_NAME" VARCHAR2(20 BYTE), 
	"CUST_EMAIL" VARCHAR2(20 BYTE), 
	"CUST_ADDR" VARCHAR2(30 BYTE), 
	"CUST_ID" NUMBER GENERATED ALWAYS AS IDENTITY MINVALUE 1 MAXVALUE 9999999999999999999999999999 INCREMENT BY 1 START WITH 1000 CACHE 20 NOORDER  NOCYCLE  NOKEEP  NOSCALE  NOT NULL ENABLE, 
	 CONSTRAINT "CUSTOMER_PK" PRIMARY KEY ("CUST_ID")
);
CREATE TABLE "TEST"."TRANSACTION" 
   (	"TXN_DATE" DATE, 
	"TXN_AMOUNT" NUMBER(10,2), 
	"CUST_ID" NUMBER, 
	"TXN_ID" NUMBER(4,0) GENERATED ALWAYS AS IDENTITY MINVALUE 1 MAXVALUE 9999999999999999999999999999 INCREMENT BY 1 START WITH 1000 CACHE 20 NOORDER  NOCYCLE  NOKEEP  NOSCALE  NOT NULL ENABLE, 
	 CONSTRAINT "TRANSACTION_PK" PRIMARY KEY ("TXN_ID"), 
	 CONSTRAINT "TRANSACTION_FK" FOREIGN KEY ("CUST_ID")
	  REFERENCES "TEST"."CUSTOMER" ("CUST_ID")
   );

As you can see Id is automatically created in both the tables using Identity.

In Transaction table there is a foreign key constraint referencing CUST_ID of the Customer table.

Maven Dependencies – pom.xml

This Spring Boot Rest service example uses Data JPA and Oracle DB so the dependencies for these have to be added.

<?xml version="1.0" encoding="UTF-8"?>
<project xmlns="http://maven.apache.org/POM/4.0.0" xmlns:xsi="http://www.w3.org/2001/XMLSchema-instance"
  xsi:schemaLocation="http://maven.apache.org/POM/4.0.0 https://maven.apache.org/xsd/maven-4.0.0.xsd">
  <modelVersion>4.0.0</modelVersion>
  <parent>
    <groupId>org.springframework.boot</groupId>
    <artifactId>spring-boot-starter-parent</artifactId>
    <version>2.2.5.RELEASE</version>
    <relativePath/> <!-- lookup parent from repository -->
  </parent>
  <groupId>com.knpcode</groupId>
  <artifactId>jpademo</artifactId>
  <version>0.0.1-SNAPSHOT</version>
  <name>SBJPADemo</name>
  <description>Project for JPA</description>

  <properties>
    <java.version>1.8</java.version>
  </properties>

  <dependencies>
    <dependency>
      <groupId>org.springframework.boot</groupId>
      <artifactId>spring-boot-starter-data-jpa</artifactId>
    </dependency>
    <dependency>
      <groupId>org.springframework.boot</groupId>
      <artifactId>spring-boot-starter-web</artifactId>
    </dependency>

    <dependency>
      <groupId>org.springframework.boot</groupId>
      <artifactId>spring-boot-devtools</artifactId>
      <scope>runtime</scope>
      <optional>true</optional>
    </dependency>
    <!--Oracle driver -->
    <dependency>
      <groupId>com.oracle.ojdbc</groupId>
      <artifactId>ojdbc8</artifactId>
      <version>19.3.0.0</version>
    </dependency>
    <dependency>
      <groupId>org.springframework.boot</groupId>
      <artifactId>spring-boot-starter-test</artifactId>
      <scope>test</scope>
      <exclusions>
        <exclusion>
          <groupId>org.junit.vintage</groupId>
          <artifactId>junit-vintage-engine</artifactId>
        </exclusion>
      </exclusions>
    </dependency>
  </dependencies>

  <build>
    <plugins>
      <plugin>
        <groupId>org.springframework.boot</groupId>
        <artifactId>spring-boot-maven-plugin</artifactId>
      </plugin>
    </plugins>
  </build>
</project>

JPA Entity classes

There are two entity classes which map to Customer and Transaction tables respectively.

@Entity 
@Table(name="CUSTOMER")
public class Customer implements Serializable{
  private static final long serialVersionUID = -7496362624106858939L;
  // Primary key 
  @Id
  @GeneratedValue(strategy = GenerationType.IDENTITY)
  @Column(name="CUST_ID")
  private int custId;
  @Column(name="CUST_NAME")
  private String custName;
  @Column(name="CUST_ADDR")
  private String custAddr;
  @Column(name="CUST_EMAIL")
  private String custEmail;
  // One to many mapping with transactions	
  @OneToMany(mappedBy = "customer", cascade = 	CascadeType.ALL)
  private Set<Transaction> transactions;

  public Set<Transaction> getTransactions() {
    return transactions;
  }
  public void setTransactions(Set transactions) {
    this.transactions = transactions;
    for(Transaction txn : transactions) {
      txn.setCustomer(this);
    }
  }
  public int getCustId() {
    return custId;
  }
  public void setCustId(int custId) {
    this.custId = custId;
  }
  public String getCustName() {
    return custName;
  }
  public void setCustName(String custName) {
    this.custName = custName;
  }
  public String getCustAddr() {
    return custAddr;
  }
  public void setCustAddr(String custAddr) {
    this.custAddr = custAddr;
  }
  public String getCustEmail() {
    return custEmail;
  }
  public void setCustEmail(String custEmail) {
    this.custEmail = custEmail;
  }	
}

As you can notice with @OneToMany mapping here mappedBy attribute is used in the Customer class, making it the inverse side of the relationship.

One other thing to notice is the setTransactions() method where customer is explicitly set for the transactions, this is required to make it work while testing the REST API with postman or swagger, otherwise customerId won’t be saved in the Transaction table.

public void setTransactions(Set<Transaction> transactions) {
  this.transactions = transactions;
  for(Transaction txn : transactions) {
    txn.setCustomer(this);
  }
}

Another way to ensure that you can save both customer and transaction is by making Customer class as the owning side too, though that is not a recommended solution. That can be done by using the @OneToMany annotation in the following way.

// One to many mapping with transactions	
@OneToMany(cascade = CascadeType.ALL)
@Fetch(FetchMode.JOIN)
@JoinColumn(name="CUST_ID")
private Set transactions;

If you make Customer class also the owning side then you don’t need to explicitly set customer in the transaction instances so setTransactions() method can be written as-

public void setTransactions(Set<Transaction> transactions) {
  this.transactions = transactions;
}
Transaction Entity class
@Entity 
@Table(name="TRANSACTION")
public class Transaction implements Serializable{
  private static final long serialVersionUID = 6392890629580631252L;
  @Id
  @GeneratedValue(strategy = GenerationType.IDENTITY)
  @Column(name="TXN_ID")
  private int txnId;
  @Column(name="TXN_DATE")
  private LocalDateTime txnDate;
  @Column(name="TXN_AMOUNT")
  private double txnAmount;
  @ManyToOne(fetch = FetchType.LAZY)
  @JoinColumn(name="CUST_ID", nullable=false)
  private Customer customer;
  public int getTxnId() {
    return txnId;
  }
  public void setTxnId(int txnId) {
    this.txnId = txnId;
  }
  public LocalDateTime getTxnDate() {
    return txnDate;
  }
  public void setTxnDate(LocalDateTime txnDate) {
    this.txnDate = txnDate;
  }
  public double getTxnAmount() {
    return txnAmount;
  }
  public void setTxnAmount(double txnAmount) {
    this.txnAmount = txnAmount;
  }
  @JsonIgnore
  public Customer getCustomer() {
    return customer;
  }

  public void setCustomer(Customer customer) {
    this.customer = customer;
  }
}

Here @JsonIgnore annotation is used to avoid the infinite cycle of Transaction fetching Customer data which in turn fetches Transaction data and so on.

Controller classes

Controller classes with the REST API methods mapping to the URL path.

CustomerController
import java.util.List;
import org.springframework.beans.factory.annotation.Autowired;
import org.springframework.http.HttpStatus;
import org.springframework.web.bind.annotation.DeleteMapping;
import org.springframework.web.bind.annotation.GetMapping;
import org.springframework.web.bind.annotation.PathVariable;
import org.springframework.web.bind.annotation.PostMapping;
import org.springframework.web.bind.annotation.PutMapping;
import org.springframework.web.bind.annotation.RequestBody;
import org.springframework.web.bind.annotation.ResponseStatus;
import org.springframework.web.bind.annotation.RestController;
import com.knpcode.dto.CustomerTransactionDTO;
import com.knpcode.entities.Customer;
import com.knpcode.service.CustomerService;

@RestController
public class CustomerController {
  @Autowired
  CustomerService customerService;
  
  // insert customer
  @PostMapping("/customer")
  @ResponseStatus(HttpStatus.CREATED)
  public Customer addCustomer(@RequestBody Customer customer){
    //  Should have some exception handling
    return customerService.insertCustomer(customer);
  }
    
  // Get all customers
  @GetMapping("/customers")
  public List<Customer> getAllCustomers(){
    return customerService.getAllCustomers();
  }
    
  // Updating customer record
  @PutMapping("/updatecustomer")
  public Customer updateCustomer(@RequestBody Customer customer) {	
    return customerService.updateCustomer(customer);
  }
    
  // delete customer
  @DeleteMapping("/customer/{id}")
  @ResponseStatus(value=HttpStatus.OK, reason="Customer Deleted")
  public void deleteCustomer(@PathVariable int id){
    customerService.deleteCustomer(id);
  }
    
  // Get customers with transaction amount greater than the passed amount
  @GetMapping("/customers/amount/{amount}")
  public List<Customer> getAllCustomersByAmount(@PathVariable double amount){
    return customerService.getAllCustomersByAmount(amount);
  }
}
TransactionController
import java.time.LocalDateTime;
import java.util.List;
import org.springframework.beans.factory.annotation.Autowired;
import org.springframework.format.annotation.DateTimeFormat;
import org.springframework.web.bind.annotation.GetMapping;
import org.springframework.web.bind.annotation.PathVariable;
import org.springframework.web.bind.annotation.RestController;
import com.knpcode.entities.Transaction;
import com.knpcode.service.TransactionService;

@RestController
public class TransactionController {
  @Autowired
  TransactionService transactionService;
    
  // Get transaction by ID
  @GetMapping("transaction/{id}")
  public Transaction getTransactionById(@PathVariable int id) {
    return transactionService.getTransactionById(id);
  }

  // Get transactions by Date
  @GetMapping("transactions/{date}")
  public List<Transaction> getTransactionsByDate(@PathVariable("date") @DateTimeFormat(iso = DateTimeFormat.ISO.DATE_TIME) LocalDateTime date) {
    return transactionService.getTransactionsByDate(date);
  }
    
  // Get transactions between the passed amount range
  @GetMapping("/transactions/range/{amount}")
  public List<Transaction> getAllTransactionsBetweenAmount(@PathVariable("amount") String amountRange){
    return transactionService.getAllTransactionsBetweenAmount(amountRange);
  }

  // Get transactions greater than the passed amount
  @GetMapping("/transactions/amount/{amount}")
  public List<Transaction> getAllTransactionsByAmount(@PathVariable double amount){
    return transactionService.getAllTransactionsByAmount(amount);
  }
}

JPA Repositories

Since Spring data is used so you just need to create Repository interfaces.

CustomerRepository
import java.util.List;
import org.springframework.data.jpa.repository.JpaRepository;
import org.springframework.data.jpa.repository.Query;
import com.knpcode.entities.Customer;
import com.knpcode.entities.Transaction;

public interface CustomerRepository extends JpaRepository<Customer, Integer>{

  @Query("select distinct c from Customer c join fetch c.transactions t "
      + " where t.txnAmount > ?1")
  List<Customer> findAllCustomersByTxnAmountGreaterThan(double amount);
}

Apart from the usual CRUD methods which CustomerRepository inherits by extending JpaRepository there is also a custom method findAllCustomersByTxnAmountGreaterThan() which is annotated with @Query method and the query is provided with that annotation.

Query provided uses the fetch join which allows associations or collections of values to be fetched eagerly only for the current query. Since we need both Customer and transaction in the single select so fetch join is a good option here.

TransactionRepository
import java.time.LocalDateTime;
import java.util.List;
import org.springframework.data.jpa.repository.JpaRepository;
import com.knpcode.entities.Transaction;

public interface TransactionRepository extends JpaRepository<Transaction, Integer> {
  List<Transaction> findTransactionByTxnAmountBetween(double fromAmount, double toAmount);
  List<Transaction> findTransactionByTxnAmountGreaterThan(double amount);
  List<Transaction> findTransactionsByTxnDateBetween(LocalDateTime fromDate, LocalDateTime toDate);
}

In the TransactionRepository there are three custom methods-

  • findTransactionByTxnAmountBetween- Find all the transactions having transaction amount between the given range.
  • findTransactionByTxnAmountGreaterThan- Find all the transactions having transaction amount greater than the passed amount.
  • findTransactionsByTxnDateBetween- Find all the transactions between the passed date range.

Query is not provided for these methods Spring data itself generates the query by parsing the method name. Alternatively you can provide query yourself by using @Query annotation.

Service classes

CustomerService interface
import java.util.List;
import com.knpcode.dto.CustomerTransactionDTO;
import com.knpcode.entities.Customer;

public interface CustomerService {
  Customer insertCustomer(Customer customer);
  List<Customer> getAllCustomers();
  Customer updateCustomer(Customer customer);
  void deleteCustomer(int id);
  List<Customer> getAllCustomersByAmount(double amount);
}
CustomerServiceImpl class
import java.util.ArrayList;
import java.util.List;
import org.springframework.beans.factory.annotation.Autowired;
import org.springframework.stereotype.Service;
import com.knpcode.dao.CustomerRepository;
import com.knpcode.dto.CustomerTransactionDTO;
import com.knpcode.entities.Customer;
import com.knpcode.entities.Transaction;

@Service
public class CustomerServiceImpl implements CustomerService{
  @Autowired
  private CustomerRepository repository;
  @Override
  public Customer insertCustomer(Customer customer) {
    return repository.save(customer);
  }

  @Override
  public List<Customer> getAllCustomers() {
    return repository.findAll();
  }

  @Override
  public Customer updateCustomer(Customer customer) {
    Customer custDB = repository.findById(customer.getCustId()).get();
    custDB.setCustEmail(customer.getCustEmail());
    return repository.save(custDB);
  }

  @Override
  public void deleteCustomer(int id) {
    repository.deleteById(id);
  }

  @Override
  public List<Customer> getAllCustomersByAmount(double amount) {
    List<Customer> customers = repository.findAllCustomersByTxnAmountGreaterThan(amount);
    return customers;
  }
}

TransactionService interface

import java.time.LocalDateTime;
import java.util.List;
import com.knpcode.entities.Transaction;

public interface TransactionService {
  Transaction getTransactionById(int id);
  List<Transaction> getTransactionsByDate(LocalDateTime date);
  List<Transaction> getAllTransactionsBetweenAmount(String amountRange);
  List<Transaction> getAllTransactionsByAmount(double amount);
}
TransactionServiceImpl class
import java.time.LocalDateTime;
import java.time.LocalTime;
import java.util.List;
import org.springframework.beans.factory.annotation.Autowired;
import org.springframework.stereotype.Service;
import com.knpcode.dao.TransactionRepository;
import com.knpcode.entities.Transaction;

@Service
public class TransactionServiceImpl implements TransactionService{
  @Autowired
  private TransactionRepository repository;
  @Override
  public Transaction getTransactionById(int id) {
    return repository.findById(id).get();
  }

  @Override
  public List<Transaction> getTransactionsByDate(LocalDateTime fromDate) {
    // Passing the range for date- 00:00:00 to 23:59:00
    LocalDateTime toDate = LocalDateTime.of(fromDate.toLocalDate(), LocalTime.of(23, 59, 59));
    return repository.findTransactionsByTxnDateBetween(fromDate, toDate);
  }

  @Override
  public List<Transaction> getAllTransactionsBetweenAmount(String amountRange) {
    // Splitting the amount range passed in the form amt1-amt2
    String[] temp = amountRange.split("-");
    double fromAmount = Double.parseDouble(temp[0]);
    double toAmount = Double.parseDouble(temp[1]);
    System.out.println("fromAmount " + fromAmount);
    System.out.println("toAmount " + toAmount);
    return repository.findTransactionByTxnAmountBetween(fromAmount, toAmount);
  }

  @Override
  public List<Transaction> getAllTransactionsByAmount(double amount) {
    return repository.findTransactionByTxnAmountGreaterThan(amount);
  }
}

DB Configuration

DB configuration like connection URL, user, password can be put in the application.properties file residing in src/main/resources. Please change the values as per your configuration.

spring.datasource.url=jdbc:oracle:thin:@localhost:1521/XEPDB1
spring.datasource.username=test
spring.datasource.password=test
spring.datasource.driver-class-name=oracle.jdbc.driver.OracleDriver
 
spring.jpa.show-sql=true
#spring.jpa.properties.hibernate.format_sql=true

Application class

Application class with the main method.

import org.springframework.boot.SpringApplication;
import org.springframework.boot.autoconfigure.SpringBootApplication;

@SpringBootApplication
public class SbjpaDemoApplication {
  public static void main(String[] args) {
    SpringApplication.run(SbjpaDemoApplication.class, args);
  }
}

Running the application and accessing the REST services

You can start the example by running the application class as a Java application (or Spring boot app).

Spring Boot automatically configures the application as a Spring Boot Rest service + Data JPA application. Once you see the message that the embedded Tomcat server is started you can test the methods using Postman.

Creating a Customer

Spring Boot JPA Postman

You can verify in the DB tables that the corresponding customer and transaction records are inserted.

Customer Table
Transaction table

Updating an existing customer

Update record Data JPA

Getting Customer and Transaction data having transaction amount greater than passed amount

Get transaction by ID

Get transactions between the given amount range

That's all for the topic Spring Boot + Data JPA + Oracle One to Many Example. If something is missing or you have something to share about the topic please write a comment.


You may also like