December 31, 2022

ZonedDateTime in Java With Examples

The java.time.ZonedDateTime class is part of new date and time API added in Java 8 that represents a date-time with a time-zone in the ISO-8601 calendar system, such as 2019-11-02T09:27:07+05:30[Asia/Calcutta].

Java ZonedDateTime class stores all date and time fields, to a precision of nanoseconds, and a time-zone, with a zone offset. This class is immutable thus thread-safe. Since it is marked as final so can't be extended. In this post we’ll see some examples demonstrating usage of Java ZonedDateTime class.

Creating instances of ZonedDateTime

ZonedDateTime class in Java doesn't have any public constructors to obtain an instance, you will use a factory method to get an instance.

1. Using now() method you can obtain the current date-time from the system clock in the default time-zone.

ZonedDateTime zdt = ZonedDateTime.now();
System.out.println(zdt);//2019-11-02T09:27:07.083270100+05:30[Asia/Calcutta]

You can also pass a ZoneId to obtain the current date-time from the system clock in the specified time-zone.

ZonedDateTime zdt = ZonedDateTime.now(ZoneId.of("Europe/Paris"));
System.out.println(zdt);//2019-11-02T05:05:31.583917800+01:00[Europe/Paris]

2. You can obtain an instance of ZonedDateTime using of() method by passing a year, month, day, hour, minute, second, nanosecond and time-zone.

ZonedDateTime zdt = ZonedDateTime.of(2019, 10, 25, 15, 10, 21, 252, ZoneId.of("America/Chicago"));
System.out.println(zdt);//2019-10-25T15:10:21.000000252-05:00[America/Chicago]
You can also pass instances of LocalDate, LocalTime and ZoneId to get a ZonedDateTime
of(LocalDate date, LocalTime time, ZoneId zone)

You can also pass instance of LocalDateTime and ZoneId to get a ZonedDateTime

of(LocalDateTime localDateTime, ZoneId zone)

Formatting ZonedDateTime (Converting to String)

For converting ZonedDateTime to String you can use DateTimeFormatter class which specifies the pattern for conversion.

public class FormatDate {
  public static void main(String[] args) {	
    ZonedDateTime zdt = ZonedDateTime.of(2019, 10, 25, 15, 10, 21, 252, ZoneId.of("America/Chicago"));
    // Z - Time Zone offset
    DateTimeFormatter dtf = DateTimeFormatter.ofPattern("yyyy-MM-dd hh:mm:ss a Z");
    System.out.println(zdt.format(dtf));
    
    // z - time zone name
    dtf = DateTimeFormatter.ofPattern("MM/dd/yyyy HH:mm:ss z");
    System.out.println(zdt.format(dtf));
    
    //V - time-zone ID
    dtf = DateTimeFormatter.ofPattern("MM/dd/yyyy - HH:mm:ss VV");
    System.out.println(zdt.format(dtf)); 
  }
}
Output
2019-10-25 03:10:21 PM -0500
10/25/2019 15:10:21 GMT-05:00
10/25/2019 - 15:10:21 America/Chicago

Converting String to ZonedDateTime

Using parse() method you can convert String to ZonedDateTime.

public class FormatDate {
  public static void main(String[] args) {	
    String dateWithZone = "10/25/2019 15:10:21 GMT-05:00";
    DateTimeFormatter dtf = DateTimeFormatter.ofPattern("MM/dd/yyyy HH:mm:ss z");
    ZonedDateTime zdt = ZonedDateTime.parse(dateWithZone, dtf);
    System.out.println(zdt); 
  }
}
Output
2019-10-25T15:10:21-05:00[GMT-05:00]

Getting date, time and zone values from ZonedDateTime

ZonedDateTime class has methods to get year, month, day, hour, minute, second values as well as zone information.

public class FormatDate {
  public static void main(String[] args) {			
    ZonedDateTime zdt = ZonedDateTime.of(2019, 10, 25, 15, 10, 21, 252, ZoneId.of("America/Chicago"));
    
    System.out.println("Year- " + zdt.getYear());
    System.out.println("Month- " + zdt.getMonthValue());
    System.out.println("Day- " + zdt.getDayOfMonth());
    
    System.out.println("Hour- " + zdt.getHour());
    System.out.println("Minute- " + zdt.getMinute());
    System.out.println("Second- " + zdt.getSecond());
    System.out.println("NanoSecond- " + zdt.getNano());
    
    System.out.println("Zone- " + zdt.getZone()); 
  }
}
Output
Year- 2019
Month- 10
Day- 25
Hour- 15
Minute- 10
Second- 21
NanoSecond- 252
Zone- America/Chicago

Adding or subtracting years, months, days to ZonedDateTime

There are methods to add or subtract days, months and years from a Java ZonedDateTime.

public class FormatDate {
  public static void main(String[] args) {			
    ZonedDateTime zdt = ZonedDateTime.of(2019, 10, 25, 15, 10, 21, 252, ZoneId.of("America/Chicago"));
    System.out.println("Created Zoned Date-Time: " + zdt); 

    System.out.println("Year after subtraction- " + zdt.minusYears(2));
    System.out.println("Month after subtraction- " + zdt.minusMonths(4));
    System.out.println("Day after subtraction- " + zdt.minusDays(35));

    System.out.println("Year after addition- " + zdt.plusYears(2));
    System.out.println("Month after addition- " + zdt.plusMonths(4));
    System.out.println("Day after addition- " + zdt.plusDays(35));
  }
}
Output
Created Zoned Date-Time: 2019-10-25T15:10:21.000000252-05:00[America/Chicago]
Year after subtraction- 2017-10-25T15:10:21.000000252-05:00[America/Chicago]
Month after subtraction- 2019-06-25T15:10:21.000000252-05:00[America/Chicago]
Day after subtraction- 2019-09-20T15:10:21.000000252-05:00[America/Chicago]
Year after addition- 2021-10-25T15:10:21.000000252-05:00[America/Chicago]
Month after addition- 2020-02-25T15:10:21.000000252-06:00[America/Chicago]
Day after addition- 2019-11-29T15:10:21.000000252-06:00[America/Chicago]

Adding or subtracting hours, minute, second to ZonedDateTime

There are methods to add or subtract hours, minutes, seconds, nano seconds from a ZonedDateTime.

public class FormatDate {
  public static void main(String[] args) {			
    ZonedDateTime zdt = ZonedDateTime.of(2019, 10, 25, 15, 10, 21, 252, ZoneId.of("America/Chicago"));
    System.out.println("Created Zoned Date-Time: " + zdt); 

    System.out.println("Hour after subtraction- " + zdt.minusHours(2));
    System.out.println("Minute after subtraction- " + zdt.minusMinutes(25));
    System.out.println("Second after subtraction- " + zdt.minusSeconds(35));

    System.out.println("Hour after addition- " + zdt.plusHours(2));
    System.out.println("Minute after addition- " + zdt.plusMinutes(4));
    System.out.println("Second after addition- " + zdt.plusSeconds(35));
    System.out.println("NanoSecond after addition- " + zdt.plusNanos(250));
  }
}
Output
Created Zoned Date-Time: 2019-10-25T15:10:21.000000252-05:00[America/Chicago]
Hour after subtraction- 2019-10-25T13:10:21.000000252-05:00[America/Chicago]
Minute after subtraction- 2019-10-25T14:45:21.000000252-05:00[America/Chicago]
Second after subtraction- 2019-10-25T15:09:46.000000252-05:00[America/Chicago]
Hour after addition- 2019-10-25T17:10:21.000000252-05:00[America/Chicago]
Minute after addition- 2019-10-25T15:14:21.000000252-05:00[America/Chicago]
Second after addition- 2019-10-25T15:10:56.000000252-05:00[America/Chicago]
NanoSecond after addition- 2019-10-25T15:10:21.000000502-05:00[America/Chicago]

Getting LocalDateTime, LocalDate, LocalTime from ZonedDateTime

public class FormatDate {
  public static void main(String[] args) {			
    ZonedDateTime zdt = ZonedDateTime.of(2019, 10, 25, 15, 10, 21, 252, ZoneId.of("America/Chicago"));
    System.out.println("Created Zoned Date-Time: " + zdt); 

    LocalDateTime ldt = zdt.toLocalDateTime();
    System.out.println("Extracted LocalDateTime: " + ldt); 

    LocalDate ld = zdt.toLocalDate();
    System.out.println("Extracted LocalDate: " + ld);

    LocalTime lt = zdt.toLocalTime();
    System.out.println("Extracted LocalTime: " + lt); 
  }
}
Output
Created Zoned Date-Time: 2019-10-25T15:10:21.000000252-05:00[America/Chicago]
Extracted LocalDateTime: 2019-10-25T15:10:21.000000252
Extracted LocalDate: 2019-10-25
Extracted LocalTime: 15:10:21.000000252

Comparing ZonedDateTimes in Java

For comparing two ZonedDateTime instances there are the following methods-

  • compareTo(ChronoLocalDateTime<?> other)- Compares this date-time to another date-time. Returns negative value if less than tha passed LocalDateTime instance, positive if greater.
  • isAfter(ChronoLocalDateTime<?> other)- Checks if this date-time is after the specified date-time.
  • isBefore(ChronoLocalDateTime<?> other)- Checks if this date-time is before the specified date-time.
  • isEqual(ChronoLocalDateTime<?> other)- Checks if this date-time is equal to the specified date-time.
public class FormatDate {
  public static void main(String[] args) {			
    ZonedDateTime zdt1 = ZonedDateTime.of(2019, 10, 25, 15, 10, 21, 252, ZoneId.of("America/Chicago"));
    ZonedDateTime zdt2 = ZonedDateTime.of(2018, 8, 5, 4, 15, 21, 252, ZoneId.of("America/Chicago"));
    System.out.println("Created Zoned Date-Time1: " + zdt1); 
    System.out.println("Created Zoned Date-Time2: " + zdt2); 


    System.out.println(zdt1.compareTo(zdt2));
    System.out.println(zdt2.compareTo(zdt1));

    System.out.println(zdt1.isAfter(zdt2));
    System.out.println(zdt1.isBefore(zdt2));
    System.out.println(zdt1.isEqual(zdt2));
  }
}
Output
Created Zoned Date-Time1: 2019-10-25T15:10:21.000000252-05:00[America/Chicago]
Created Zoned Date-Time2: 2018-08-05T04:15:21.000000252-05:00[America/Chicago]
1
-1
true
false
false

That's all for the topic ZonedDateTime in Java With Examples. If something is missing or you have something to share about the topic please write a comment.


You may also like

December 30, 2022

Instant in Java With Examples

The java.time.Instant class is part of new date and time API added in Java 8 that represents a single instantaneous point on the time-line.

Instant is stored in two fields, it stores a long representing epoch-seconds and an int representing nanosecond-of-second, which will always be between 0 and 999,999,999. The epoch-seconds are measured from the standard Java epoch of 1970-01-01T00:00:00Z where instants after the epoch have positive values, and earlier instants have negative values. To initialize these two field there is a private constructor in the Java Instant class-

/**
 * @param epochSecond  the number of seconds from 1970-01-01T00:00:00Z
 * @param nanos  the nanoseconds within the second, must be positive
 */
private Instant(long epochSecond, int nanos) {
  super();
  this.seconds = epochSecond;
  this.nanos = nanos;
}

Instant class is immutable thus thread-safe. Since it is marked as final so can't be extended.

Creating instances of Instant

Instant class doesn't have any public constructors to obtain an instance, you will use a factory method to get an instance.

  1. now()- Obtains the current instant from the system clock.
    Instant instant = Instant.now();
    System.out.println(instant); //2019-11-07T05:21:04.464715600Z
  2. now(Clock clock)- Obtains the current instant from the specified clock.
    Instant instant = Instant.now(Clock.systemDefaultZone());
    System.out.println(instant); //2019-11-07T05:36:01.210573Z
  3. ofEpochMilli(long epochMilli)- Obtains an instance of Instant using milliseconds from the epoch of 1970-01-01T00:00:00Z.
    Instant instant = Instant.ofEpochMilli(System.currentTimeMillis());
    System.out.println(instant); //2019-11-07T05:39:27.853Z
  4. ofEpochSecond(long epochSecond)- Obtains an instance of Instant using seconds from the epoch of 1970-01-01T00:00:00Z.
    Instant instant = Instant.ofEpochSecond(System.currentTimeMillis()/1000);
    System.out.println(instant); //2019-11-07T05:39:27.853Z
  5. ofEpochSecond(long epochSecond, long nanoAdjustment)- Obtains an instance of Instant using seconds from the epoch of 1970-01-01T00:00:00Z and nanosecond fraction of second.
    Instant instant = Instant.ofEpochSecond(System.currentTimeMillis()/1000, 235);
    System.out.println(instant); //2019-11-07T05:40:55.000000235Z
  6. parse(CharSequence text)- Obtains an instance of Instant from a text string such as 2007-12-03T10:15:30.00Z. Using parse method you can convert String to an Instant.
    Instant instant = Instant.parse("2019-10-28T11:35:15Z");
    System.out.println(instant); //2019-10-28T11:35:15Z

Getting epoch seconds and nano second values from Instant

Since Instant instance is stored in two fields; epochSecond and nanos so there are methods to extract these two fields from a java.time.Instant instance.

public class InsantExample {
  public static void main(String[] args) {
    Instant instant = Instant.parse("2019-10-28T11:35:15.245Z");
    // epoch seconds
    System.out.println(instant.getEpochSecond());
    // Nanos
    System.out.println(instant.getNano());
  }
}
Output
1572262515
245000000

Time calculations using Instant

There are methods to add or subtract date and time values from an Instant.

Minus methods
  • minus(long amountToSubtract, TemporalUnit unit)- Returns a copy of this instant with the specified amount subtracted.
  • minus(TemporalAmount amountToSubtract)- Returns a copy of this instant with the specified amount subtracted.
  • minusMillis(long millisToSubtract)- Returns a copy of this instant with the specified duration in milliseconds subtracted.
  • minusNanos(long nanosToSubtract)- Returns a copy of this instant with the specified duration in nanoseconds subtracted.
  • minusSeconds(long secondsToSubtract)- Returns a copy of this instant with the specified duration in seconds subtracted.
public class InsantExample {
  public static void main(String[] args) {
    Instant instant = Instant.parse("2019-10-28T11:35:15.245Z");
    System.out.println("Instant- " + instant);
    
    System.out.println("Instant second subtraction- " + instant.minusSeconds(15));
    System.out.println("Instant millis subtraction- " + instant.minusMillis(2000));
    System.out.println("Instant nanos subtraction- " + instant.minusNanos(45));
    
    // Uses minus(long amountToSubtract, TemporalUnit unit)
    System.out.println("Instant days subtraction- " + instant.minus(10, ChronoUnit.DAYS));
    // Uses minus(TemporalAmount amountToSubtract)
    System.out.println("Instant days subtraction- " + instant.minus(Period.ofDays(10)));
    System.out.println("Instant Hours subtraction- " + instant.minus(Duration.ofHours(3)));
  }
}
Output
Instant- 2019-10-28T11:35:15.245Z
Instant second subtraction- 2019-10-28T11:35:00.245Z
Instant millis subtraction- 2019-10-28T11:35:13.245Z
Instant nanos subtraction- 2019-10-28T11:35:15.244999955Z
Instant days subtraction- 2019-10-18T11:35:15.245Z
Instant days subtraction- 2019-10-28T08:35:15.245Z
Plus methods
  • plus(long amountToAdd, TemporalUnit unit)- Returns a copy of this instant with the specified amount added.
  • plus(TemporalAmount amountToAdd)- Returns a copy of this instant with the specified amount added.
  • plusMillis(long millisToAdd)- Returns a copy of this instant with the specified duration in milliseconds added.
  • plusNanos(long nanosToAdd)- Returns a copy of this instant with the specified duration in nanoseconds added.
  • plusSeconds(long secondsToAdd)- Returns a copy of this instant with the specified duration in seconds added.
public class InsantExample {
  public static void main(String[] args) {
    Instant instant = Instant.parse("2019-10-28T11:35:15.245Z");
    System.out.println("Instant- " + instant);
    
    System.out.println("Instant second addition- " + instant.plusSeconds(15));
    System.out.println("Instant millis addition- " + instant.plusMillis(2000));
    System.out.println("Instant nanos addition- " + instant.plusNanos(45));
    
    // Uses plus(long amountToAdd, TemporalUnit unit)
    System.out.println("Instant days addition- " + instant.plus(10, ChronoUnit.DAYS));
    // Uses plus(TemporalAmount amountToAdd)
    System.out.println("Instant days addition- " + instant.plus(Period.ofDays(10)));
    System.out.println("Instant Hours addition- " + instant.plus(Duration.ofHours(3)));
  }
}
Output
Instant- 2019-10-28T11:35:15.245Z
Instant second addition- 2019-10-28T11:35:30.245Z
Instant millis addition- 2019-10-28T11:35:17.245Z
Instant nanos addition- 2019-10-28T11:35:15.245000045Z
Instant days addition- 2019-11-07T11:35:15.245Z
Instant Hours addition- 2019-10-28T14:35:15.245Z

Comparing two Instant Instances in Java

  • compareTo(Instant otherInstant)- Compares this instant to the specified instant. Returns negative if less than the passes Instant instance, positive otherwise.
  • equals(Object otherInstant)- Checks if this instant is equal to the specified instant. Returns true if the other instant is equal to this one.
  • isAfter(Instant otherInstant)- Checks if this instant is after the specified instant.
  • isBefore(Instant otherInstant)- Checks if this instant is before the specified instant.
public class InsantExample {
  public static void main(String[] args) {
    Instant instant1 = Instant.parse("2019-10-28T11:35:15.245Z");
    System.out.println("Instant1- " + instant1);
    
    Instant instant2 = Instant.parse("2019-09-22T16:25:10.245Z");
    System.out.println("Instant2- " + instant2);
    
    // Should return + value
    System.out.println("Instant comparison- " + instant1.compareTo(instant2));
    System.out.println("Instanct Instances equal- " + instant1.equals(instant2));
    System.out.println("Instant After- " + instant1.isAfter(instant2));
    System.out.println("Instant Before- " + instant1.isBefore(instant2));
  }
}
Output
Instant1- 2019-10-28T11:35:15.245Z
Instant2- 2019-09-22T16:25:10.245Z
Instant comparison- 1
Instanct Instances equal- false
Instant After- true
Instant Before- false

That's all for the topic Instant in Java With Examples. If something is missing or you have something to share about the topic please write a comment.


You may also like

December 14, 2022

issubclass() in Python With Examples

The Python issubclass() is a built-in function that checks whether the passed class is a subclass of the specified another class or not.

Syntax of the Python issubclass() is as given below-

issubclass(class, classinfo)

Function returns True if class is a subclass (direct, indirect or virtual) of classinfo.

classinfo may be a class or a tuple of class objects, if it is a tuple of class objects then class (first argument) is checked against each entry in the tuple.

Python issubclass() examples

1. As obvious you will be using issubclass() function when you are using inheritance in Python. Here is a hierarchical structure where Employee class inherits from Person and Manager class inherits from Employee, so we have Multi-level inheritance scenario here. Let’s check different combinations using issubclass().

class Person:
  def __init__(self, name, age):
    self.name = name
    self.age = age

  def display_info(self):
    print('Name:', self.name)
    print('Age:', self.age)


class Employee(Person):
  def __init__(self, emp_id, department, name, age):
    super().__init__(name, age)
    self.emp_id = emp_id
    self.department = department

  def display_info(self):
    super().display_info()
    print('Id:', self.emp_id)
    print('Department:', self.department)


class Manager(Employee):
  def __init__(self, perks, emp_id, department, name, age):
    super().__init__(emp_id, department, name, age)
    self.perks = perks

  def display_info(self):
    super().display_info()
    print('Perks:', self.perks)


print("issubclass(Employee, Person):", issubclass(Employee, Person))
print("issubclass(Manager, Person):", issubclass(Manager, Person))
print("issubclass(Manager, Employee):", issubclass(Manager, Employee))
print("issubclass(Employee, Manager):", issubclass(Employee, Manager))
print("issubclass(Person, Employee):", issubclass(Person, Employee))
Output
issubclass(Employee, Person): True
issubclass(Manager, Person): True
issubclass(Manager, Employee): True
issubclass(Employee, Manager): False
issubclass(Person, Employee): False

Manager indirectly inherits from Person too so it is of type Person also that’s why issubclass(Manager, Person) returns true. Vice-versa is not true though Manager is not subclass of Employee, Person is not a sub-class of Employee too so both these function calls return false.

2. In this example we’ll pass a tuple as second argument in issubclass() function.

class Person:
  def __init__(self, name, age):
    self.name = name
    self.age = age

  def display_info(self):
    print('Name:', self.name)
    print('Age:', self.age)


class Employee(Person):
  def __init__(self, emp_id, department, name, age):
    super().__init__(name, age)
    self.emp_id = emp_id
    self.department = department

  def display_info(self):
    super().display_info()
    print('Id:', self.emp_id)
    print('Department:', self.department)


class Manager(Employee):
  def __init__(self, perks, emp_id, department, name, age):
    super().__init__(emp_id, department, name, age)
    self.perks = perks

  def display_info(self):
    super().display_info()
    print('Perks:', self.perks)


print("issubclass(Employee, (str, list))):", issubclass(Employee, (str, list)))
print("issubclass(Employee, (str, list, Person)):", issubclass(Employee, (str, list, Person)))
print("issubclass(Manager, (str, list)):", issubclass(Manager, Employee))
print("issubclass(Person, (Employee, Manager)):", issubclass(Person, (Employee, Manager)))
print("issubclass(Person, (Employee, Manager, object)):", issubclass(Person, (Employee, Manager, object)))
Output
issubclass(Employee, (str, list))): False
issubclass(Employee, (str, list, Person)): True
issubclass(Manager, (str, list)): True
issubclass(Person, (Employee, Manager)): False
issubclass(Person, (Employee, Manager, object)): True

First call obviously returns false as Employee is not a subclass of either str or list.

Second is true because Employee is subclass of Person and one of the entry in the tuple passes the check.

Last call issubclass(Person, (Employee, Manager, object)) returns true because object is the super class of all classes in Python.

That's all for the topic issubclass() in Python With Examples. If something is missing or you have something to share about the topic please write a comment.


You may also like

December 13, 2022

React Example - Remove Object From an Array of Objects

If you want to remove an object from an array of objects in your React application best option is to use filter method which filters out the item that has to be removed and returns a new array containing rest of the elements. Since a new array is returned by filter method so you don't mutate the state rather you set state to this new array.

Remove object from an array of objects using filter

With in the filter method, provide a function that runs for each array element. With in that function, you'll have to write the condition, each array element is tested against that condition, if it passes the condition it is added to the new array otherwise not.

As an example, let's have a shopping cart with certain products added. With each listed product there is also a delete button to remove that product from the list.

There are two components; Products and ProductItem

Products.js

import { Fragment, useState } from "react";
import ProductItem from "./ProductItem";
const productList = [
    { id: 1, name: 'Laptop', price: 455.50 },
    { id: 2, name: 'Mouse', price: 15.89 },
    { id: 3, name: 'USB', price: 10.00 },
    { id: 4, name: 'HDD', price: 55.50 },
  ];
const Products = (props) =>{
    const [products, setProducts] = useState(productList);
    const removeProduct = (id) => {
        setProducts(products.filter((product) => product.id !== id));
    }
    return(
        <Fragment>
            <h2>Product List</h2>
            <table>
                <thead>
                    <tr>
                        <th>Name</th>
                        <th>Price</th>
                    </tr>
                </thead>
                <tbody>
                {
                    products.map((product) => (
                        <ProductItem key={product.id} id={product.id} 
                        name={product.name} price={product.price} onRemoveHandler={removeProduct}/>                  
                    ))
                }
                </tbody>
            </table>
        </Fragment>
    );
}

export default Products;
Important points to note in the code are-
  1. Array is initialized with some product objects. This array is then set as the initial state with in the useState hook.
  2. Array is iterated using map method, in each iteration <ProductItem> component is called with some props data.
  3. removeProduct function gets the id of the product which has to be removed and uses filter method to filter out the specific product. New array created by filter method is then pass to the setProducts() method to update state.

ProductItem.js

This component renders each product as one table row and a delete button with each product.

const ProductItem = (props) => {
    const onClickHandler = () => {
        props.onRemoveHandler(props.id);
    }
    return (
        <tr>
            <td>{props.name}</td>
            <td>{props.price}</td>
            <td><button onClick={onClickHandler}>Delete</button></td>
        </tr>
    )
}

export default ProductItem;

That's all for the topic React Example - Remove Object From an Array of Objects. If something is missing or you have something to share about the topic please write a comment.


You may also like

December 12, 2022

super() in Python With Examples

In this tutorial we’ll see what is super() function in Python and how to use it.

Python super() function

super() is a built-in function in Python which returns a proxy object that can be used to delegate method calls (including call to constructor) to immediate parent class from the child class.

Syntax of super()

Syntax of super() in Python is as following-

super([type[, object-or-type ]])

Suppose you have a child class C inheriting from base class B defined as given below-

class C(B):
  def method(self, arg):
    super().method(arg)

In the method there is a call to method which is defined in the super class using the super() function. Since both of the parameters are optional so this call super().method(arg) is equivalent to super(C, self).method(arg) where both of the parameters are passed.

Use of super()

1. Since super() is a proxy object (indirect reference) to the super class so rather than using the super class name directly you can use super() to call super class method. If we take the following class structure

class C(B):
  def method(self, arg):
    super().method(arg)

Here you could have also called method of the parent class by using this statement-

B.method(arg)

Using super() sub-class is not tightly bound to the same super class. In case you later want to change the class class C inherits from, super() will point to the new super class.

class C(A):
  def method(self, arg):
    super().method(arg)

Now super().method(arg) calls the method of the class A.

2. Usage of super() also helps in reducing the code redundancy. See the example to know more.

Python example using super()

In the example there is a class called Person that acts as a base class and another class Employee that inherits from Person class. Employee class also adds properties of its own and also overrides the parent class method.

class Person:
  def __init__(self, name, age):
    self.name = name
    self.age = age

  def display_info(self):
    print('In display_info method of Person class')
    print('Name:', self.name)
    print('Age:', self.age)


class Employee(Person):
  def __init__(self, person_id, department, name, age):
    self.name = name
    self.age = age
    self.person_id = person_id
    self.department = department

  def display_info(self):
    print('In display_info method of Employee class')
    print('Id:', self.person_id)
    print('Name:', self.name)
    print('Age:', self.age)
    print('Department:', self.department)

In the child class Employee you can notice the redundancy of initializing the parent class’ fields in the constructor though there is a constructor in the parent class which is already doing that. Same way in the display_info () method we have print statement to print name and age too though there is a method in Person class which is already doing that.

Here we can use super() to call constructor of the parent class to initialize fields that are there in the parent class. Using super() we can also call the parent() class method. Here is the modified Employee class-

class Employee(Person):
  def __init__(self, person_id, department, name, age):
    super().__init__(name, age)
    self.person_id = person_id
    self.department = department

  def display_info(self):
    super().display_info()
    print('In display_info method of Employee class')
    print('Id:', self.person_id)
    print('Department:', self.department)

As you can see super() is used to call the parent class constructor with the fields that can be initialized there.

super().__init__(name, age)

From the overridden display_info() method there is a call to the method of the parent class.

super().display_info()

On creating an object of Employee class and calling the method using that object

e = Employee(1, "IT", "Michael Weyman", 42)
e.display_info()
Output
In display_info method of Person class
Name: Michael Weyman
Age: 42
In display_info method of Employee class
Id: 1
Department: IT

That's all for the topic super() in Python With Examples. If something is missing or you have something to share about the topic please write a comment.


You may also like

December 7, 2022

React Example - Insert New Object in an Array

In this tutorial we'll see how to insert an object into an array of objects in your React application especially when you are storing that array in state. What you need to keep in mind is that the you should not mutate an array when you store them in state. You should rather create a new array with the required changes and set state to use this new array.

Inserting into an array - React

As stated above you need to create a new array which should contain the existing elements and then the new element at the end.

Preferred way to do it, in React, is to use spread operator to get all the existing elements and then add the new array element.

As an example, we'll have a ProductForm component to add a new Product to an array. There is also a Products component that shows the products which are in the array.

Products.js

import { Fragment } from "react";
const Products = (props) =>{
    return(
        <Fragment>
            <h2>Product List</h2>
            <ul>{
                props.products.map((product) => (
                    <li key={product.id}>
                        Id- {product.id} <br />
                        Name- {product.name}                    
                    </li>
                ))
            }
            </ul>
        </Fragment>
    );
}
export default Products;

List of products is passed to the Products component from the parent component (App.js), that is why it is accessible here through props.

ProductForm.js

import { Fragment } from "react";
import { useState } from "react";

const ProductForm = (props) => {
    const [prodName, setProdName] = useState('');
    const clickHandler = () => {
        props.onAddProduct(prodName);
        setProdName('');
    }
    return(
        <Fragment>
            <h2>Product Form</h2>
            <input
                value={prodName}
                onChange={e => setProdName(e.target.value)}
            />
            <button onClick={clickHandler}>Add Product</button>
        </Fragment>
    );
}

export default ProductForm;

Some point to note in ProductForm component-

  1. Uses useState hook to maintain the product name state.
  2. On the click of the button, clickHandler() function is called which in turn calls the onAddProduct function in another component, that is why it is called using props.

App.js

const productList = [
  { id: 1, name: 'Laptop', price: 455.50 },
  { id: 2, name: 'Mouse', price: 15.89 },
  { id: 3, name: 'USB', price: 10.00 },
  { id: 4, name: 'HDD', price: 55.50 },
];
function App() {
  const [products, setProducts] = useState(productList);
  const addProductHandler = (productName) => {
    setProducts([
      ...products,
      { id: Math.round(Math.random() * 10), name: productName }
    ]);
  }
  return (
    <div>
      <ProductForm onAddProduct={addProductHandler}/>
      <hr />
      <Products products={products}/>

    </div>
  );
};

export default App;

Important points to note here-

  1. An array is created with some existing product objects in it.
  2. The array is stored in the state.
  3. In addProductHandler() function new array is created by adding the existing products (using spread operator) and then adding the new product object (Math.random is used to create new ID here, not an ideal way but does the job here!). This new array is then set as new state by passing it to setProducts().
    setProducts([
      ...products,
      { id: Math.round(Math.random() * 10), name: productName }
    ]);
    
  4. Reference to the addProductHandler function is passed in <ProductForm> tag as props.
    <ProductForm onAddProduct={addProductHandler}/>
    
  5. products Array is passed in Products tag as props.
    <Products products={products}/>
    

With everything done if a new product "Keyboard" is added through the form, it should be added to the products array.

That's all for the topic React Example - Insert New Object in an Array. If something is missing or you have something to share about the topic please write a comment.


You may also like

December 5, 2022

React Example - Update Object in an Array of Objects

It is a very common requirement to update one or more objects in an array of objects in your React application. What you need to keep in mind is that the you should not mutate an array when you store them in state. You should rather create a new array with the required changes and set state to use this new array.

Update object in array of objects

If you want to modify one or more items of an array, you can use map() to create a new array. Steps are as given below.

  1. Iterate the array using map() function.
  2. Function passed as first argument with in map() should have the condition to decide whether object should be updated or not.
  3. If condition is satisfied then update that object otherwise return the object as is. That way you will have a new array with all the objects including updated one.

As an example, let's have a shopping cart with certain products added. On the click of the button increase or decrease the product count.

import { useState } from "react";

const INITIAL_PRODUCTS = [{
    id: 1,
    name: 'Samosa',
    count: 5,
  }, 
  {
    id: 2,
    name: 'Roti',
    count: 4,
  }, 
  {
    id: 3,
    name: 'Chicken Tikka Masala',
    count: 2,
  },
  {
    id: 4,
    name: 'Matar Paneer',
    count: 1,
  }];

const ShoppingCart = () => {
    const [products, setProducts] = useState(INITIAL_PRODUCTS);
    const handleIncreaseClick = (productId) => {
        const updatedProducts = products.map(product => {
            // update count property of the matching object
            if(product.id === productId){
              return {...product, 
                      count:product.count + 1};
            }else{
              // return object unchanged
              return product;
            } 
          });
        setProducts(updatedProducts);
    }
    const handleDecreaseClick = (productId) => {
        let updatedProducts = products.map(product => {
            if(product.id === productId){
              return {...product, 
                      count:product.count - 1};
            }else{
              return product;
            } 
        });
        updatedProducts = updatedProducts.filter(p => p.count > 0);
        setProducts(updatedProducts);
    }
    return (
        <ul>
            {
                products.map(product => (
                    <li key={product.id}>
                        {product.name}
                        -
                        {product.count}
                        <button onClick={()=> {
                            handleIncreaseClick(product.id)
                        }}>+</button>
                        <button onClick={()=> {
                            handleDecreaseClick(product.id)
                        }}>-</button>
                    </li>
                ))
            }
        </ul>
    );
}

export default ShoppingCart;

Important points to note in the code are-

  1. Array is initialized with some product objects.
  2. Clicking the ‘+’ button triggers the handleIncreaseClick() function with the id of the product passed as an argument. In the handleIncreaseClick() function create a new array by going through all the products, the product for which the id matches increase the count by 1, otherwise return the product without any change.
  3. Then set the products state by passing this new array.
  4. Clicking the ‘-’ button triggers the handleDecreaseClick() function with the id of the product passed as an argument. If the product id matches, decrease the count by 1. One more thing is to later check for the products with count as 0 to remove them from the array. For that filter() is used.
Update object in array of objects

That's all for the topic React Example - Update Object in an Array of Objects. If something is missing or you have something to share about the topic please write a comment.


You may also like

December 2, 2022

How to Split a String in Java

This post shows how you can split a String in Java using split() method. String you need to split may be delimited using pipe, tab or spaces so let’s see how to use split() method to split such delimited data strings in Java. Note that if you are using any special symbol with in the regular expression then you do need to escape it using escape character (\).

Splitting String delimited using pipe(|) symbol - Java code

public class SplitString {
  public static void main(String[] args) {
    String str = "A001|BOA|Ronda|5000";
    String[] data = str.split("\\|");
    System.out.println("Name- " + data[2]);
  }
}
Output
Name- Ronda

Splitting data in Java delimited using tab (\t)

public class SplitString {
  public static void main(String[] args) {
    String str = "A001	BOA	Ronda	5000";
    String[] data = str.split("\t");
    System.out.println("Amount- " + data[3]);
  }
}
Output
Amount- 5000

Splitting data delimited using spaces- Java code

public class SplitString {
  public static void main(String[] args) {
    String str = "A001  BOA Ronda 5000";
    // Matches any number of spaces
    String[] data = str.split("\\s+");
    System.out.println("Amount- " + data[3]);
  }
}
Output
Amount- 5000

Splitting data delimited using single space

public class SplitString {
  public static void main(String[] args) {
    String str = "A001 BOA Ronda 5000";
    // Matches any number of spaces
    String[] data = str.split("\\s");
    System.out.println("Name- " + data[2]);
  }
}
Output
Name- Ronda

That's all for the topic How to Split a String in Java. If something is missing or you have something to share about the topic please write a comment.


You may also like

December 1, 2022

Java Condition Interface

Condition interface which resides in java.util.concurrent.locks has methods for inter thread communication similar to Object class monitor methods (wait, notify and notifyAll). Condition provides methods like await(), signal(), signalAll(). Where a Lock replaces the use of synchronized methods and statements, a Condition replaces the use of the Object monitor methods.

Some of the methods defined in java.util.concurrent.locks.Condition interface are given below.

  • await()- Causes the current thread to wait until it is signalled or interrupted.
  • await(long time, TimeUnit unit)- Causes the current thread to wait until it is signalled or interrupted, or the specified waiting time elapses.
  • awaitNanos(long nanosTimeout)- Causes the current thread to wait until it is signalled or interrupted, or the specified waiting time elapses.
  • awaitUninterruptibly()- Causes the current thread to wait until it is signalled.
  • awaitUntil(Date deadline)- Causes the current thread to wait until it is signalled or interrupted, or the specified deadline elapses.
  • signal()- Wakes up one waiting thread.
  • signalAll()- Wakes up all waiting threads.

How to get Condition instance

A Condition instance is intrinsically bound to a lock. To obtain a Condition instance for a particular Lock instance use its newCondition() method.

Example using Condition interface methods

Following producer consumer program uses the methods of the Condition interface for intercommunication between two threads.

In the example Consumer thread starts removing items from buffer only when buffer is full till then the Consumer thread is in wait state because of await() method.

package com.knpcode.proj.Programs;

import java.util.concurrent.locks.Condition;
import java.util.concurrent.locks.Lock;
import java.util.concurrent.locks.ReentrantLock;

public class ProduceConsume {
  public static void main(String[] args) {
    int capacity = 5;
    // shared object
    Buffer buffer = new Buffer(capacity);
    Thread t1 = new Thread(new Producer(buffer, capacity), "Producer");
    Thread t2 = new Thread(new Consumer(buffer, capacity), "Consumer");
    t1.start();
    t2.start(); 
  }

  // Producer class to add elements to buffer
  static class Producer implements Runnable{
    Buffer buffer;
    int capacity;
    Producer(Buffer buffer, int capacity){
      this.buffer = buffer;
      this.capacity = capacity;
    }
    @Override
    public void run() {
      for(int i = 1; i <= capacity; i++){
        try {
          buffer.put(i);
        } catch (InterruptedException e) {
          // TODO Auto-generated catch block
          e.printStackTrace();
        }
      }
    }
  }
  // Consumer class to remove elements from buffer
  static class Consumer implements Runnable{
    Buffer buffer;
    int capacity;
    Consumer(Buffer buffer, int capacity){
      this.buffer = buffer;
      this.capacity = capacity;
    }
    
    @Override
    public void run() {
      for(int i = 1; i <= capacity; i++){
        try {
          System.out.println("Item removed- " + buffer.take());
        } catch (InterruptedException e) {
          // TODO Auto-generated catch block
          e.printStackTrace();
        }
      }
    }
  }
	
  static class Buffer {
    private Object[] items;
    final Lock lock = new ReentrantLock();
    // Conditions
    final Condition notFull  = lock.newCondition(); 
    final Condition notEmpty = lock.newCondition(); 
    int putptr, takeptr, count;
    public Buffer(int capacity){
      items = new Object[capacity];
    }
		
    public void put(Object x) throws InterruptedException {
      lock.lock();
      try {
        while (count == items.length)
          notFull.await();
        items[putptr] = x;
        System.out.println("Putting- "+ x);
        if (++putptr == items.length) { 
          putptr = 0;
        }
        ++count;
        notEmpty.signal();
      } finally {
        lock.unlock();
      }
    }

    public Object take() throws InterruptedException {
      lock.lock();
      try {
        while (count == 0) {
          notEmpty.await();
        }
        Object item = items[takeptr];
        if (++takeptr == items.length) {
          takeptr = 0;
        }
        --count;
        notFull.signal();
        return item;
      } finally {
        lock.unlock();
      }
    }
  }
}
Output
Putting- 1
Putting- 2
Putting- 3
Putting- 4
Putting- 5
Item removed- 1
Item removed- 2
Item removed- 3
Item removed- 4
Item removed- 5

That's all for the topic Java Condition Interface. If something is missing or you have something to share about the topic please write a comment.


You may also like

November 29, 2022

React Portals With Examples

Normally in React when a component is rendered, it is mounted into the DOM as a child of the nearest parent node. This works fine for most of the scenarios but sometimes you may want to insert a child into a different location in the DOM. Portals in react provide a way to render children into a DOM node that exists outside the DOM hierarchy of the parent component.

Why React portal

So, why is it important to render children into a DOM node outside the parent hierarchy sometimes? There are couple of advantages which are visible when you are using a modal, hovercards or tooltips, basically something which should be displayed as an overlay not as part of the parent component.

  • First advantage is to have a semantically correct HTML. Logically a modal or hovercard should not be part of “root” element, it should be rendered in a separate DOM node.
  • Poroperties for the child node are inherited from the parent component. For example, height, width, overflow: hidden, z-index which may cause modal, tooltip or hover card to be cropped or some part of it hidden.

To avoid the above-mentioned issues, you can use portals in React to render children into a separate DOM node.

React portal Syntax

A portal is created using createPortal() method which is part of react-dom package.

ReactDOM.createPortal(child, container)

Parameters

child- Something that can be rendered such as an element, string, or fragment.

container- DOM node location where child should be injected.

React portal example

As an example, we'll create a Modal dialog box where we need to have a backdrop and the modal box itself. If you click anywhere on the backdrop, modal box should close. There will also be a close button with in the box.

Initially we won't use React portal to render this Modal box which means it will be rendered with in the Parent component.

ModalDialog.js

import './ModalDialog.css'
const ModalDialog = (props) => {
    return (
        <div className="modal-backdrop" onClick={props.handleClose}>
            <div className="modal-content">
                {props.children}
                <button onClick={props.handleClose}>Close</button>
            </div>

        </div>
    );
}

export default ModalDialog;

ModalDialog.css

.modal-backdrop {
    position: fixed;
    top: 0;
    left: 0;
    width: 100%;
    height: 100vh;
    z-index: 20;
    background-color: rgba(0, 0, 0, 0.75);
}

.modal-content {
    top: 12vh;
    left: 5%;
    width: 50%;
    height: 40%;
    background-color: white;
    padding: 1rem;
    border-radius: 10px;
    z-index: 30;
    display: flex;
    align-items: center;
    justify-content: center;
    font-size: 1.4rem; 
}

App.js

Here we have state management for modal (open or closed) using useState hook. There is also a button to open Modal box, clicking this button sets the isModalOpen to true which results in modal box being displayed.

Closing the modal triggers the closeHandler() function which is kind of child to parent component communication by lifting the state up.

import ModalDialog from "./Components/UI/ModalDialog";
function App() {
  const [isModalOpen, setIsModalOpen] = useState(false);
  const closeHandler = () => {
    setIsModalOpen(false);
  }
  return (
    <div>
      <button onClick={() => setIsModalOpen(true)}>
          Click to Open Modal
      </button>
      {isModalOpen && <ModalDialog handleClose={closeHandler}> 
        This is Modal Content
      </ModalDialog>}
    </div>
  );
};
React Portals

As you can see Modal is rendered as a Child component of App component wrapped with in root element.

Let's make changes to render Modal outside the DOM hierarchy of the parent component.

In public\index.html add another <div> element. This <div> element is the container for injecting the Modal.

<div id="modalOverlay"></div>
<div id="root"></div>

In the ModalDialog.js wrap the code with in createPortal() method.

import reactDom from 'react-dom';
import './ModalDialog.css'
const Modal = (props) => {
    return (
        <div className="modal-backdrop" onClick={props.handleClose}>
            <div className="modal-content">
                {props.children}
                <button onClick={props.handleClose}>Close</button>
            </div>

        </div>
    );
}
const portalElement = document.getElementById('modalOverlay');
const ModalDialog = (props) => {
    return reactDom.createPortal(<Modal handleClose={props.handleClose}>{props.children}</Modal>, portalElement);

}

export default ModalDialog;

Points to note here-

  1. First you need to import from react-dom. You can also import createPortal directly
    import { createPortal } from 'react-dom';
    	
  2. createPortal() method takes two arguments, first is the child that has to be rendered. To make it more readable what constitutes a child has been assigned to a constant Modal.
  3. Second argument to the createPortal() method is a container. We already added one <div> element in the index.html with id as “modalOverlay”. That element is assigned to another constant portalElement.
  4. Use of portal only changes the DOM tree structure not the parent child component relationship. <ModalDialog> is still used in App.js to render the child component. props are also used to have parent-child communication the same way as before.
React Portals Example

Now Modal component is rendered into a separate DOM node outside the DOM hierarchy of the parent component.

That's all for the topic React Portals With Examples. If something is missing or you have something to share about the topic please write a comment.


You may also like

November 28, 2022

JDBC Driver Types

JDBC API in Java programming language provides a standard, universal way to connect to databases. It is the responsibility of different DB vendors to provide the implementation of the interfaces in JDBC API and that implementation by DB vendors is provided as JDBC drivers.

Types of JDBC drivers

Based on these different implementations JDBC drivers are categorized into four types.

  • Type 1 driver: JDBC-ODBC bridge JDBC driver
  • Type 2 driver: Written partly in Java and partly in native code
  • Type 3 driver: Pure Java client and middleware server translating client request to data source.
  • Type 4 driver: Written completely in Java.

Type 1 JDBC Driver

Type 1 JDBC driver implements the JDBC API as a mapping to another data access API, such as ODBC (Open Database Connectivity).

The JDBC-ODBC Bridge driver is an example of type 1 JDBC driver that maps JDBC API requests to ODBC requests.

Disadvantages
  1. Type 1 driver is an old driver that is not supported any more by Oracle.
  2. These drivers are not fully written in Java and depends on native library so Type 1 drivers are not portable.
  3. Each JDBC call is mapped to ODBC request and then to DB making it very slow.
Type 1 JDBC driver

Type 2 JDBC Driver

Type 2 JDBC drivers are written partly in the Java programming language and partly in native code. These drivers use native client side libraries specific to the data source to which they connect to.

Oracle's OCI (Oracle Call Interface) client-side driver is an example of a Type 2 driver.

Disadvantages
  1. Since native libraries are required so there is platform dependency.
  2. JDBC calls are translated to native calls using native libraries making it a slow driver though not as slow as Type 1 driver.
  3. Native API must be installed on the client machines.
Type 2 JDBC Driver

Type 3 JDBC Driver

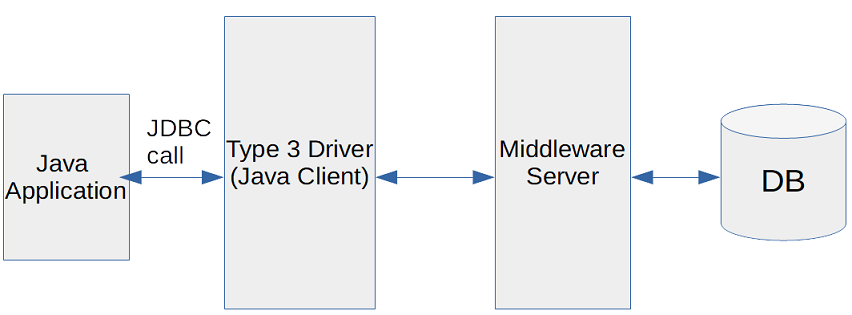
In Type 3 JDBC driver client is written in Java which connects to a middleware server using a database independent protocol. JDBC calls from the client are translated by middleware server to the vendor specific DB calls and then forwarded to the data source.

Disadvantages
  1. Requires a middleware server.
  2. Since there are two stages; JDBC call to midleware server then vendor specific translation and communication to the DB so the JDBC call processing takes more time.
Type 3 JDBC Driver

Type 4 JDBC Driver

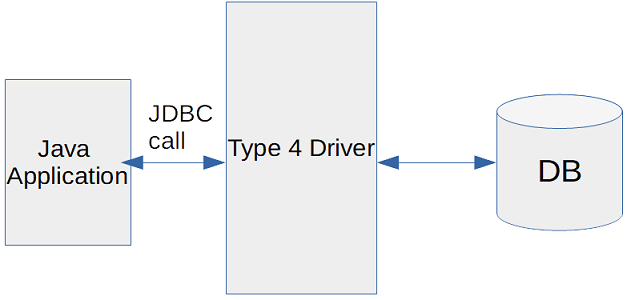
Type 4 JDBC drivers are written completely in Java and don't require any native code libraries or middleware server to sit in the middle. Type 4 drivers implement the network protocol for a specific data source and connect directly to data source.

Type 4 JDBC drivers are also known as thin drivers

Disadvantages
  1. Since driver itself implements the vendor specific network protocol so Type 4 drivers are DB specific and generally supplied by the DB vendors.
Type 4 JDBC Driver

That's all for the topic JDBC Driver Types. If something is missing or you have something to share about the topic please write a comment.


You may also like

November 25, 2022

React useContext Hook With Examples

In React application, props is one way to pass data from parent to child component. But it may become an overhead to maintain props in each component if you have a big hierarchy of nested components. React Context API provides another way to maintain global state. Once a context is created with some value in a component, that context will be available to all the nested child components without using "props". The useContext hook in React is used to read the context value in a component where it is needed.

Why useContext hook in React

First let's try to understand what exactly is the problem with props where useContext hook provides a better alternative than "props-drilling".

As an example, we have 3 components ComponentA, ComponentB and ComponentC and we have to pass data from parent component (ComponentA) to child component.

ComponentA.js

From ComponentA, value for theme is passed to the child component, ComponentB.

import ComponentB from "./ComponentB";
const ComponentA = () => {
    return(
        <ComponentB theme="dark"></ComponentB>
    );
}    
export default ComponentA;

ComponentB.js

The same theme value has to be passed to the ComponentC so you'll again use props to pass it further down.

import ComponentC from "./ComponentC";
const ComponentB = (props) => {
    return(
     <ComponentC theme={props.theme}></ComponentC>
    );
}    
export default ComponentB;

ComponentC.js

const ComponentC = (props) => {
    return (
        <p>Current theme is- {props.theme}</p>
    );
}    
export default ComponentC;

Though a simple example with not much nesting but the problem here, as you can notice, is that ComponentB has to do the task of passing the props further down to make it available to ComponentC. You don't have any mechanism to pass that data directly from ComponentA to ComponentC so that all the components in the hierarchy don't have to manage props.

Context provides you with that mechanism to provide data to the nested components without the overhead of managing props.

How to work with useContext

In order to understand how useContext works you'll have to understand the working of React Context API which has three main steps.

  1. Create context using React.createContext.
  2. Enclose the component with <CreatedContext.Provider>. Using Provider lets you provide a context value.
    <CreatedContext.Provider value="ctxValue">
        <SomeComponent />
    </CreatedContext.Provider>
    

    React Context guarantees that this SomeComponent component and any components inside it, no matter how deep, will be able to access the passed context values.

    If the passed context values change, React will re-render the components reading the context as well.

  3. Read the context value in the Component where you need it using useContext() hook.

useContext hook syntax

const value = useContext(SomeContext)

parameters

SomeContext: The argument passed to the useContext() is the context that you've previously created with createContext.

useContext returns the context value for the calling component.

useContext React example

If we take the same example of 3 components ComponentA, ComponentB and ComponentC where we have to pass some data from parent component (ComponentA) to child component. This time we'll use Context to pass data.

1. Creating Context

First step is to create Context. Since many components in different files will need access to the same context so it's common to declare contexts in a separate file.

Contexts.js

import { createContext } from 'react';
export const ThemeContext = createContext('light');

You can pass default value while creating context. If matching context provider is not present default value acts as a fallback value. If you don't have any meaningful default value, pass null while creating context.

Note that Context value can be anything an object, function handle, string. Here we are using a string value.

2. Providing context

createContext() returns a context object which in itself doesn’t hold any information. Typically, you will enclose your higher component with the <Context.Provider> specifying the context value.

App.js

function App() {
  return (
    <ThemeContext.Provider value="dark">
      <ComponentA></ComponentA>
    </ThemeContext.Provider>
  );
};

export default App;

Now the ComponentA component and any components inside it, no matter how deep, will be able to access the passed context values.

ComponentA.js

import ComponentB from "./ComponentB";

const ComponentA = () => {
    return(
        <ComponentB />
    );
}    
export default ComponentA;

As you can see now there is no need to pass theme value using props.

ComponentB.js

import ComponentC from "./ComponentC";
const ComponentB = () => {
    return(
     <ComponentC />
    );
}    
export default ComponentB;

3. Accessing Context value.

Read the context value in the Component where you need it using useContext() hook which lets you read and subscribe to context from your component.

ComponentC.js

import { useContext } from "react";
import { ThemeContext } from "./Contexts";

const ComponentC = () => {
    const themeCtx = useContext(ThemeContext);
    return (
        <p>Current theme is- {themeCtx}</p>
    );
}    
export default ComponentC;

Passing dynamic data via context

In the above example value passed with Context provider is hardcoded but most of the times you will want it to be a dynamic value. To update context, you need to combine it with useState hook. Declare a state variable in the parent component and pass the current state down as the context value to the provider.

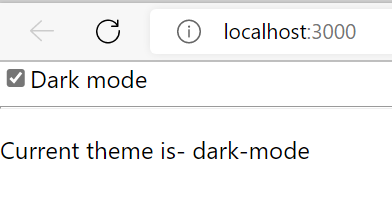
Here is the changed App.js where we have a checkbox to select theme, which is managed in a state variable named isDarkMode. In the context provider value is now changed dynamically using the current state.

import './App.css';
import { useState } from 'react';
import { ThemeContext } from './components/Examples/Contexts';
import ComponentA from './components/Examples/ComponentA';

function App() {
  const [isDarkMode, setIsDarkMode] = useState(0);
 
  return (

    <div>
      <input
        type="checkbox"
        checked={isDarkMode}
        onChange={e => setIsDarkMode(e.target.checked)}
      />
      Dark mode

      <hr />
      <ThemeContext.Provider value={isDarkMode? 'dark-mode' : 'light-mode'}>
        <ComponentA></ComponentA>
      </ThemeContext.Provider>
    </div>  
  );
}
export default App;
useContext hook React
useContext hook example

For example where context value is an object, check this post- React Context API With Examples

That's all for the topic React useContext Hook With Examples. If something is missing or you have something to share about the topic please write a comment.


You may also like

November 23, 2022

React useRef Hook With Examples

In this tutorial you'll see what is useRef() hook in React, how to use it and where to use it.

useRef() hook in React

useRef is a built-in hook in React which is used to reference a value that can be persisted across re-renders.

Syntax of useRef hook is as given below-

const ref = useRef(initialValue)

useRef returns an object with a single property named 'current'. Initially this property current is set to the initialValue you have passed. It can be a value of any type.

You can later set the value of ref.current property to something else.

Important points about useRef hook

  1. The returned reference object will persist for the full lifetime of the component, which means it won't change between component re-renderings.
  2. You can change its current property to store information and read it later. This is possible because reference object is persisted across all renders.
  3. Changing the current property doesn’t trigger a component re-rendering. That’s how useRef differs from useState hook where state change triggers a re-render.

useRef React Examples

Two use cases where useRef can be used are.

  1. Directly accessing DOM nodes.
  2. Persisting a value across renders.

Directly accessing DOM nodes

You can use useRef hook in combination with ref attribute to get access to the DOM nodes. Once you have access to the DOM node you can perform operations like focusing on an element, getting value of an element.

In the example we'll have a form with two input elements for entering user name and city. We'll use refs-

  1. To focus on the name input field.
  2. To access values of the input elements so that we can do some basic validation like elements have some value or not.

Steps to access DOM elements using refs are as follows

  1. Define a ref object using useRef() hook. For example const cityRef = useRef();
  2. Pass the ref object to the ref attribute of the element <input type="text" id="city" ref={cityRef} />
  3. Once the association is done cityRef.current stores that DOM node. So, you have access to <input>’s DOM node.

UserDetails.js (Uses react-bootstrap for styling)

import { useEffect, useRef, useState } from "react";
import { Alert, Card } from "react-bootstrap";

const UserDetails = () => {
    const nameRef = useRef();
    const cityRef = useRef();
    const [error, setError] = useState({show:false,
                                        title:'',
                                    errorMsg:''});
    useEffect(() => {
        nameRef.current.focus();
    }, []);
    const submitHandler = (event) => {
        event.preventDefault();
        const enteredName = nameRef.current.value;
        const enteredCity = cityRef.current.value;

        if(enteredName.trim() === '' || enteredCity.trim() === ''){
            setError({show:true,
                title:'Invalid Input',
                errorMsg:'Please enter a valid value for both name and city'});
            return;
        }
        console.log('Name ' + nameRef.current.value);
        console.log('City ' + cityRef.current.value);
        nameRef.current.value = '';
        cityRef.current.value = '';
    }
    const handleClose = () => {
        setError({show:false,
            title:'',
        errorMsg:''});
    }
    return (
        <Card className="mt-3 mx-auto" style={{ width: '25rem' }}>
            <form onSubmit={submitHandler}>
                    <Alert show={error.show} variant="danger" onClose={handleClose} dismissible>
                    <Alert.Heading>{error.title}</Alert.Heading>
                    <p>{error.errorMsg}</p>
                </Alert>
                <label htmlFor="name">User Name</label>
                <input type="text" id="name" 
                    placeholder="Enter user name" ref={nameRef} />
                <br/>
                <label htmlFor="city">City</label>
                <input type="text" id="city" 
                    placeholder="Enter city" ref={cityRef} />
                    <br/><br/>
                <div>
                    <button onClick={submitHandler}>Submit</button>
                </div>
            </form>
        </Card>
    )
}

export default UserDetails;
  1. In the code, element focusing is done inside the useEffect() hook. Since nameRef.current stores reference to the name input node, when the component mounts, you can call focus() on the html element using this ref.
  2. nameRef.current and cityRef.current store references to the name and city input elements respectively. By accessing value attribute of these elements, you can get values of these inputs and do the required validation. This logic is written in submitHandler() function.
  3. useState() hook is used to set the error state. An error object is used which has these properties show, title, errorMsg. Error message is displayed if show property is set to true.

Persisting a value across renders

useRef can store a mutable value across different renders. How that can be useful? Let's try to understand with an example.

Suppose you have written a component Timer to show current time and you are using setInterval() JavaScript function to call the given function after given time interval (1 second in our case). There is also a button to stop refreshing time. Button click triggers an event handler where we need to call clearInterval() function.

There is one problem though, how to get access to myInterval in stopTimer function as myInterval is not in scope there.

import { useEffect, useRef, useState } from "react";
const Timer = () => {
    const [time, setTime] = useState(new Date());
    useEffect(() => {
        const myInterval = setInterval(() => {
            setTime(new Date());
        }, 1000);
    });
    const stopTimer = () => {
        //Needs access to id (myInterval) to clear interval
    }
    return (
        <div>
            Time is: {time.toLocaleTimeString()}
            <br />
            <button onClick={stopTimer}>Stop</button>
        </div>
    );
}

export default Timer;

That's where you can use useRef hook to store myInterval id so that it can be accessed anywhere in the component and retains its value during re-renders.

import { useEffect, useRef, useState } from "react";

const Timer = () => {
    const [time, setTime] = useState(new Date());
    const intervalRef = useRef();
    useEffect(() => {
        const myInterval = setInterval(() => {
            setTime(new Date());
        }, 1000);
        intervalRef.current = myInterval;
        return () => clearInterval(intervalRef.current);
    });
    const stopTimer = () => {
        //Needs access to id (myInterval) to clear interval
        clearInterval(intervalRef.current);
    }
    return (
        <div>
            Time is: {time.toLocaleTimeString()}
            <br />
            <button onClick={stopTimer}>Stop</button>
        </div>
    );
}

export default Timer;
In the code useRef returns a reference object intervalRef which is then used to store the myInterval id.
intervalRef.current = myInterval;
When interval has to be cleared same reference object can be accessed.
 
clearInterval(intervalRef.current);

That's all for the topic React useRef Hook With Examples. If something is missing or you have something to share about the topic please write a comment.


You may also like