January 19, 2024

Java Stream – Convert a Stream to Map

In this tutorial you’ll see how to convert a Stream to Map using collector method and utility methods like toMap() and groupingBy() of Collectors class in Java Stream API.

Syntax of toMap() method is as given below-

toMap(Function<? super T,? extends K> keyMapper, Function<? super T,? extends U> valueMapper)

This method returns a Collector that accumulates elements into a Map. Both of the arguments passed to the method are of type Function which is a functional interface. Using these mapping functions keyMapper and valueMapper, keys and values of the resulting Map are calculated.

1. Using Collectors.toMap() method

In the following example a list of students is collected to a Map where key is the student’s roll number and value is Student name.

Student class used is-

public class Student {
  private int rollNo;
  private String name;
  private String stream;
  private int marks;
  Student(int rollNo, String name, String stream, int marks){
    this.rollNo = rollNo;
    this.name = name;
    this.stream = stream;
    this.marks = marks;
  }
  public int getRollNo() {
    return rollNo;
  }
  public String getName() {
    return name;
  }

  public String getStream() {
    return stream;
  }

  public int getMarks() {
    return marks;
  }

  @Override
  public String toString() {
    return "Roll Number: " +  getRollNo() 
        + " Name: " + getName() + " Marks: " + getMarks();
  }
}
import java.util.Arrays;
import java.util.List;
import java.util.Map;
import java.util.stream.Collectors;

public class StreamToMap {

  public static void main(String[] args) {
    List<Student> studentList = Arrays.asList(new Student(1, "Mercy", "Science", 73),
              new Student(2, "Ram", "Science", 99),
              new Student(3, "Priscilla", "Art", 68),
              new Student(4, "Jacques", "Maths", 97),
              new Student(5, "Peter", "Science", 76));
    Map<Integer, String> studentMap = studentList.stream()
                          .collect(Collectors.toMap(Student::getRollNo, Student::getName));  
    System.out.println(studentMap);
  }
}
Output
{1=Mercy, 2=Ram, 3=Priscilla, 4=Jacques, 5=Peter}

If you want to collect to a Map where key is the student’s roll number and value is the student object then it can be done as. Here utility method Function.identity() is used which returns a function that always returns its input argument.

public class StreamToMap {

  public static void main(String[] args) {
    List<Student> studentList = Arrays.asList(new Student(1, "Mercy", "Science", 73),
              new Student(2, "Ram", "Science", 99),
              new Student(3, "Priscilla", "Art", 68),
              new Student(4, "Jacques", "Maths", 97),
              new Student(5, "Peter", "Science", 76));
    Map<Integer, Student> studentMap = studentList.stream()
                          .collect(Collectors.toMap(Student::getRollNo, Function.identity()));  
    System.out.println(studentMap);
  }
}
Output
{1=Roll Number: 1 Name: Mercy Marks: 73, 2=Roll Number: 2 Name: Ram Marks: 99, 3=Roll Number: 3 Name: Priscilla Marks: 68, 4=Roll Number: 4 Name: Jacques Marks: 97, 5=Roll Number: 5 Name: Peter Marks: 76}

2. Using Collectors.groupingBy() method

groupingBy() method also collects elements into a map by dividing elements into two lists of elements as per the passed grouping function. The collector produces a Map<K, List> where key specifies a group and List contains the elements which map to the associated key.

public class StreamToMap {

  public static void main(String[] args) {
    List<Student> studentList = Arrays.asList(new Student(1, "Peter", "Science", 75),
              new Student(2, "Ram", "Science", 99),
              new Student(3, "Priscilla", "Art", 68),
              new Student(4, "Mahesh", "Art", 62),
              new Student(5, "Scott", "Commerce", 72));
      Map<String, List<Student>> names = studentList.stream()
          .collect(Collectors.groupingBy(Student::getStream));
      // Iterating the returned Map
      names.entrySet().forEach(es->{System.out.println("Stream- " + es.getKey());
      System.out.println("**Students**");
      es.getValue().forEach(e->System.out.println(e.getName()));});
  }
}
Output
Stream- Art
**Students**
Priscilla
Mahesh
Stream- Science
**Students**
Peter
Ram
Stream- Commerce
**Students**
Scott

That's all for the topic Java Stream – Convert a Stream to Map. If something is missing or you have something to share about the topic please write a comment.


You may also like

January 18, 2024

Java Stream boxed() With Examples

The boxed() method in Java Stream is used to wrap the primitive value (int, long or double) to its respective wrapper class object.

There are primitive specializations of Stream named IntStream, LongStream and DoubleStream each of these interfaces have a boxed() method that returns a Stream consisting of the elements of this stream, each boxed to an Integer, Long or Double respectively. Note that boxed() is an intermediate operation.

boxed stream Java examples

Let’s see few examples how to box a primitive value into its wrapper class using boxed() method.

1. boxed() in IntStream which is used to get a Stream consisting of the elements of this stream, each boxed to an Integer.

import java.util.List;
import java.util.stream.Collectors;
import java.util.stream.IntStream;
import java.util.stream.Stream;

public class BoxedIntStream {
  public static void main(String[] args) {    
    Stream<Integer> wrappedInts = IntStream.of(1, 2, 3, 4, 5).boxed();
    List<Integer> numList = wrappedInts.collect(Collectors.toList());
    System.out.println(numList);
  }
}
Output
[1, 2, 3, 4, 5]

Here IntStream having int elements first uses boxed() method to wrap these primitive ints into an object of Integer class and then use the Stream consisting of those Integer objects to convert into a List. Doing it directly won’t work, so the following statement results in compile time error.

List<Integer> numList = IntStream.of(1,2,3,4,5).collect(Collectors.toList());

2. boxed() in LongStream which is used to get a Stream consisting of the elements of this stream, each boxed to a Long.

import java.util.List;
import java.util.stream.Collectors;
import java.util.stream.LongStream;

public class BoxedLongStream {
  public static void main(String[] args) {
    List<Long> numList = LongStream.of(6, 7, 8, 9, 10)
          .boxed()
          .collect(Collectors.toList());
    System.out.println(numList);
  }
}
Output
[6, 7, 8, 9, 10]

3. boxed() in DoubleStream which is used to get a Stream consisting of the elements of this stream, each boxed to a Double.

import java.util.List;
import java.util.stream.Collectors;
import java.util.stream.DoubleStream;

public class BoxedDoubleStream {
  public static void main(String[] args) {
    List<Double> numList = DoubleStream.of(6, 7, 8, 9, 10)
                               .boxed()
                               .collect(Collectors.toList());
    System.out.println(numList);

  }
}
Output
[6.0, 7.0, 8.0, 9.0, 10.0]

That's all for the topic Java Stream boxed() With Examples. If something is missing or you have something to share about the topic please write a comment.


You may also like

January 17, 2024

Java Stream concat() With Examples

If you want to merge two streams you can use concat() method in Java Stream API.

Syntax of concat() method

concat(Stream<? extends T> a, Stream<? extends T> b)

Here a represents the first stream and b represents the second stream. Method returns a stream consisting all the elements of the first stream followed by all the elements of the second stream.

The resulting stream is ordered if both of the input streams are ordered, and parallel if either of the input streams is parallel.

concat() method Java examples

1. Using concat() method to merge streams of Strings.

public class ConcatDemo {
  public static void main(String[] args) {
    Stream<String> stream1 = Stream.of("A", "B", "C");
    Stream<String> stream2 = Stream.of("D", "E", "F");
    Stream<String> mergedStream = Stream.concat(stream1, stream2);
    mergedStream.forEach(System.out::println);
  }
}
Output
A
B
C
D
E
F

2. Using concat method to merge more than 2 streams. You can also layer the concat() method to merge more than two streams, in the following example 4 streams are concatenated.

public class ConcatDemo {
  public static void main(String[] args) {
    Stream<Integer> stream1 = Stream.of(1, 2, 3);
    Stream<Integer> stream2 = Stream.of(4, 5, 6);
    Stream<Integer> stream3 = Stream.of(7, 8, 9);
    Stream<Integer> stream4 = Stream.of(10, 11, 12);
    Stream<Integer> mergedStream = Stream.concat(stream1, 
            Stream.concat(Stream.concat(stream2, stream3), stream4));
    mergedStream.forEach(e -> System.out.print(e + " "));
  }
}
Output
1 2 3 4 5 6 7 8 9 10 11 12 

3. Using concat() with other stream operations. A very common scenario is to merge two streams and get only the distinct elements, that can be done by using distinct() in Java stream.

public class ConcatDemo {
  public static void main(String[] args) {
    Stream<Integer> stream1 = Stream.of(1, 2, 3, 4, 5, 6);
    Stream<Integer> stream2 = Stream.of(4, 4, 3, 1, 8, 6);

    Stream<Integer> mergedStream = Stream.concat(stream1, stream2).distinct();
    mergedStream.forEach(e -> System.out.print(e + " "));
  }
}
Output
1 2 3 4 5 6 8 

That's all for the topic Java Stream concat() With Examples. If something is missing or you have something to share about the topic please write a comment.


You may also like

January 16, 2024

Java Stream count() With Examples

In Java Stream API there is a count() method that returns the count of elements in the stream. In this tutorial you’ll learn about count() method with the help of some examples.

Java Stream count() method

Syntax of the count() method is as follows-

long count()

count method is a special case of a reduction operation as it takes a sequence of input elements and combines them into a single summary result. This method is a terminal operation meaning it produces a result and stream pipeline is considered consumed, and can no longer be used after count operation.

count() method Java examples

1. Using count() to get the number of elements in a List by using list as a Stream source.

import java.util.Arrays;
import java.util.List;

public class CountDemo {

  public static void main(String[] args) {
    List<Integer> numList = Arrays.asList(3, 5, 4, 12, 16, 0, 7, 6);
    long result = numList.stream().count();
    System.out.println("Number of elements- " + result);
  }
}
Output
Number of elements- 8

2. You can also use count() method along with other operations to get the count of stream elements after applying other operations. In the following example first filter() method is used to filter out elements as per the given condition (elements should be greater than 10) then count() is used to get the count of elements in the stream after applying filter operation.

public class CountDemo {

  public static void main(String[] args) {
    List<Integer> numList = Arrays.asList(3, 5, 4, 12, 16, 0, 7, 6);
    long result = numList.stream().filter(e -> e > 10).count();
    System.out.println("Number of elements- " + result);
  }
}
Output
Number of elements- 2

3. In the following example count() is used to get the count of distinct elements.

public class CountDemo {

  public static void main(String[] args) {
    List<Integer> numList = Arrays.asList(3, 5, 5, 12, 16, 12, 3, 6);
    long result = numList.stream().distinct().count();
    System.out.println("Number of elements- " + result);
  }
}
Output
Number of elements- 5

That's all for the topic Java Stream count() With Examples. If something is missing or you have something to share about the topic please write a comment.


You may also like

January 15, 2024

AtomicInteger in Java With Examples

java.util.concurrent.atomic package in Java has classes that support lock free atomic operations. That means using classes contained in this package atomicity of operations is guaranteed for integer, long, boolean values along with object references and arrays with out using explicit synchronization or locks. In this post we'll discuss one of such class AtomicInteger in Java which provides an int value that may be updated atomically.

AtomicInteger in Java

AtomicInteger class which is part of java.util.concurrent.atomic package provides methods to get, set, increment, update, compare int value as an atomic operation that too with out using locks or synchronized keyword to regulate access to shared variable by multiple threads.

Atomic classes use CAS (Compare and Swap) to ensure data integrity using non-blocking algorithms. That’s why these classes are considered to be faster than locking where one thread acquires the object lock while other threads are blocked.

Java AtomicInteger Constructors

There are two constructors in AtomicInteger class.

  • AtomicInteger()- Creates a new AtomicInteger with 0 as initial value.
  • AtomicInteger(int initialValue)- Creates a new AtomicInteger initialized with the given initial value.

AtomicInteger Java examples

One of the common use is to provide an atomically incremented counter using an AtomicInteger. For that purpose incrementAndGet() method can be used which atomically increments the current value.

Atomically incremented counter using AtomicInteger
public class AtomicIntExample {
  public static void main(String[] args) {
    ExecutorService executor = Executors.newFixedThreadPool(2);
    AtomicInteger atomicInt = new AtomicInteger();
    for(int i = 0; i < 10; i++){
      executor.submit(()->System.out.println("Counter- " + atomicInt.incrementAndGet()));
    }
    executor.shutdown();
  }
}
Output
Counter- 1
Counter- 2
Counter- 3
Counter- 4
Counter- 5
Counter- 6
Counter- 7
Counter- 8
Counter- 9
Counter- 10

In the above example Runnable is implemented as a lambda expression. If you prefer Runnable implemented the old way here is the same example.

public class AtomicIntExample {
  public static void main(String[] args) {
    ExecutorService executor = Executors.newFixedThreadPool(2);
    AtomicInteger atomicInt = new AtomicInteger();
    CounterRunnable runnableTask = new  CounterRunnable(atomicInt);
    for(int i = 0; i < 10; i++){
      executor.submit(runnableTask);
    }
    executor.shutdown();
  }
}

class CounterRunnable implements Runnable{
  AtomicInteger atomicInt;
  CounterRunnable(AtomicInteger atomicInt){
    this.atomicInt = atomicInt;
  }
  @Override
  public void run() {
    System.out.println("Counter- " + atomicInt.incrementAndGet());		
  }
}

Methods in AtomicInteger class

Some of the atomic methods in the Java AtomicInteger class are as follows-

  • addAndGet(int delta)- Atomically adds the given value to the current value.
  • compareAndSet(int expect, int update)- Atomically sets the value to the given updated value if the current value == the expected value.
  • getAndDecrement()- Atomically decrements by one the current value.
  • getAndIncrement()- Atomically increments by one the current value.
  • getAndSet(int newValue)- Atomically sets to the given value and returns the old value.
  • getAndUpdate(IntUnaryOperator updateFunction)- Atomically updates the current value with the results of applying the given function, returning the previous value.
  • incrementAndGet()- Atomically increments by one the current value.

Comparing and setting value using AtomicInteger

You can compare and set value using compareAndSet() method which takes two arguments expected value and update. If expected value is equal to the current value of the AtomicInteger instance then the value is updated. Returns true if successful. False return indicates that the actual value was not equal to the expected value.

public class AtomicIntExample {
  public static void main(String[] args) {
    ExecutorService executor = Executors.newFixedThreadPool(2);
    AtomicInteger atomicInt = new AtomicInteger(0);
    
    for(int i = 1; i <= 10; i++){
      // delay between each update submission
      try {
        TimeUnit.MILLISECONDS.sleep(20);
      } catch (InterruptedException e) {
        // TODO Auto-generated catch block
        e.printStackTrace();
      }
      executor.submit(new RunnableTask(atomicInt, atomicInt.get(), i));
    }
    System.out.println("Updated value- " + atomicInt.get());
    executor.shutdown();
  }
}

class RunnableTask implements Runnable{
  AtomicInteger atomicInt;
  int expectedVal;
  int newVal;
  RunnableTask(AtomicInteger atomicInt, int expectedVal, int newVal){
    this.atomicInt = atomicInt;
    this.expectedVal = expectedVal;
    this.newVal = newVal;
  }
  @Override
  public void run() {
    System.out.println("Value updated- " + atomicInt.compareAndSet(expectedVal, newVal));		
  }
}
Output
Value updated- true
Value updated- true
Value updated- true
Value updated- true
Value updated- true
Value updated- true
Value updated- true
Value updated- true
Value updated- true
Value updated- true
Updated value- 10

That's all for the topic AtomicInteger in Java With Examples. If something is missing or you have something to share about the topic please write a comment.


You may also like

January 14, 2024

Generate Random Numbers Java Stream

If you are writing a Java program to generate random numbers, two tried and tested ways are to either use Math.random() method or methods of Random class to get a random number but the limitation with these methods is that they generate a single random number and you would need to use them in a loop in case you need a list of random numbers. With the introduction of Java Stream API in Java 8, Random class has also been expanded to include methods that can return a stream of ints, longs or doubles which means a return type of IntStream, LongStream or DoubleStream.

Random class methods for generating streams

In Random class there are following methods for generating infinite streams-

1. ints()- Returns an effectively unlimited stream of int values.

2. ints(int randomNumberOrigin, int randomNumberBound)- Returns an effectively unlimited stream of int values within the given bounds.

Following methods restrict the generated random numbers.

1. ints(long streamSize)- Returns a stream producing the given streamSize number of int values.

2. ints(long streamSize, int randomNumberOrigin, int randomNumberBound)- Returns a stream producing the given streamSize number of int values within the given bounds.

Same set of methods also exist for producing long and double random numbers-

  • longs()
  • longs(long streamSize)
  • longs(long randomNumberOrigin, long randomNumberBound)
  • longs(long streamSize, long randomNumberOrigin, long randomNumberBound)
and
  • doubles()
  • doubles(double randomNumberOrigin, double randomNumberBound)
  • doubles(long streamSize), doubles(long streamSize, double randomNumberOrigin
  • double randomNumberBound)

Generating stream of random number examples

1. An infinite stream of integers using ints() method of the Random class. Here limit() method of Java Stream is used to limit the stream.

import java.util.Random;

public class RandomNumberGeneration {
  public static void main(String[] args) {
    Random random = new Random();
    random.ints().limit(10).forEach(System.out::println);
  }
}
Output
164843204
-1469424678
1335628408
29431696
267957743
-944667359
228878324
672262783
1504662080
-262691321

2. In this example we’ll generate 10 random numbers in between the lower and upper bounds of 10 and 50.

public class RandomNumberGeneration {
  public static void main(String[] args) {
    Random random = new Random();
    random.ints(10, 10, 51).forEach(System.out::println);
  }
}
Output
39
29
14
49
26
29
37
50
31
48

Note that with in the passed bounds lower bound is inclusive where as upper bound is exclusive that’s why to make upper bound till 50, 51 is passed as the argument.

3. If you want 10 random doubles with in the range 0 and 1.

public class RandomNumberGeneration {
  public static void main(String[] args) {
    Random random = new Random();
    random.doubles(10, 0, 1).forEach(System.out::println);
  }
}
Output
0.6099718485028252
0.3440097793096719
0.31985736196344106
0.6028702735888255
0.8780031623608885
0.09055972507136933
0.8280686637964826
0.7917602864784455
0.7277181639918716
0.8424139111003316

That's all for the topic Generate Random Numbers Java Stream. If something is missing or you have something to share about the topic please write a comment.


You may also like

January 13, 2024

Summarizing Collectors in Java Stream

In this tutorial you’ll learn about the different summarizing collectors in Java Stream API that returns a summary statistics Collectors.

Summarizing collectors in Collectors class

There are three summarizing collector methods in Collectors class which are as following-

  • summarizingInt(ToIntFunction<? super T> mapper)- Returns a Collector which applies an int-producing mapping function to each input element.
  • summarizingLong(ToLongFunction<? super T> mapper)- Returns a Collector which applies an long-producing mapping function to each input element.
  • summarizingDouble(ToDoubleFunction<? super T> mapper)- Returns a Collector which applies an double-producing mapping function to each input element.

Argument to these methods is a corresponding functional interface ToIntFunction, ToLongFunction and ToDoubleFunction that represents a function that produces respectively a int, long or double valued result.

Return type of the method used is also as per type and the Collectors returned are of type IntSummaryStatistics, LongSummaryStatistics and DoubleSummaryStatistics.

Summary statistics object that you can get by using these methods encapsulates attributes like-

  • count
  • min
  • max
  • sum
  • average

These summarizing collectors are great utility methods to compute all the above values with in a single pass.

Collectors.summarizingInt() Java example

For the examples we’ll use the Person class objects.

public class Person {
  private String name;
  private int dependents;
  private long age;
  private double weight;
  Person(String name, int dependents, long age, double weight){
    this.name = name;
    this.dependents = dependents;
    this.age = age;
    this.weight = weight;
  }
  public String getName() {
    return name;
  }
  public int getDependents() {
    return dependents;
  }

  public long getAge() {
    return age;
  }
  public double getWeight() {
    return weight;
  }
}

1. To get the summary statistics for the weight field which is of type int.

import java.util.Arrays;
import java.util.IntSummaryStatistics;
import java.util.List;
import java.util.stream.Collectors;

public class SummarizingCollectorDemo {
  public static void main(String[] args) {
    List<Person> personList = Arrays.asList(new Person("Peter", 2, 45, 75.6),
              new Person("Ram", 3, 34, 80),
              new Person("Priscilla", 1, 26, 68),
              new Person("Ajay", 4, 35, 71.5),
              new Person("Dan", 0, 58, 77.8));
    IntSummaryStatistics stats = personList.stream()
                    .collect(Collectors.summarizingInt(Person::getDependents));
    System.out.println("Total count of person- " + stats.getCount());
    System.out.println("Max dependents- " + stats.getMax());
    System.out.println("Min dependents- " + stats.getMin());
    System.out.println("Total number of dependents- " + stats.getSum());
    System.out.println("Average number of dependents- " + stats.getAverage());
  }
}
Output
Total count of person- 5
Max dependents- 4
Min dependents- 0
Total number of dependents- 10
Average number of dependents- 2.0

Collectors.summarizingLong() and Collectors.summarizingDouble() Java example

import java.util.Arrays;
import java.util.DoubleSummaryStatistics;
import java.util.List;
import java.util.LongSummaryStatistics;
import java.util.stream.Collectors;

public class SummarizingCollectorDemo {
  public static void main(String[] args) {
    List<Person> personList = Arrays.asList(new Person("Peter", 2, 45, 75.6),
              new Person("Ram", 3, 34, 80),
              new Person("Priscilla", 1, 26, 68),
              new Person("Ajay", 4, 35, 71.5),
              new Person("Dan", 0, 58, 77.8));

    LongSummaryStatistics longSummaryStats = personList.stream()
        .collect(Collectors.summarizingLong(Person::getAge));
    
    DoubleSummaryStatistics doubleSummaryStats = personList.stream()
        .collect(Collectors.summarizingDouble(Person::getWeight));
    System.out.println("Summary statistics for age- " + longSummaryStats);
    System.out.println("Summary statistics for weight- " + doubleSummaryStats);
  }
}
Output
Summary statistics for age- LongSummaryStatistics{count=5, sum=198, min=26, average=39.600000, max=58}
Summary statistics for weight- DoubleSummaryStatistics{count=5, sum=372.900000, min=68.000000, average=74.580000, max=80.000000}

That's all for the topic Summarizing Collectors in Java Stream. If something is missing or you have something to share about the topic please write a comment.


You may also like

January 12, 2024

Setter Dependency Injection in Spring

In the post dependency injection in Spring we have already gone through the concept of dependency injection, in this post we’ll see in details one of the type of dependency injection- Setter dependency injection in Spring.

For another type of dependency injection, Constructor dependency injection check this post- Constructor Dependency Injection in Spring

Spring Setter dependency injection

In setter based DI Spring container calls setter methods on your beans after invoking a no-argument constructor or no-argument static factory method to instantiate your bean.

For configuring setter based dependencies you can use XML configuration as well as annotations. We’ll see examples of doing it using both of these ways.

Spring Setter dependency injection Example

In the example there is a class to place orders called Order and purchase can be done from an online store or a retail store. In Order class dependencies for the properties are injected using setter dependency injection.

public interface IStore {
  public void doPurchase(int items);
}
public class OnlineStore implements IStore {
  public void doPurchase(int items) {
    System.out.println("Doing online purchase of " + items + " Items");
  }
}
public class RetailStore implements IStore {
  public void doPurchase(int items) {
    System.out.println("Doing purchase of " + items + " Items from a brick and mortar store");
  }
}
public class Order {
  private IStore store;
  private int items;

  public void setStore(IStore store) {
    this.store = store;
  }
  public void setItems(int items) {
    this.items = items;
  }

  public void buyItems() {
    store.doPurchase(items);
  }
}

In the Order class these are two properties one reference to Istore type and another an int. There are setter methods for those properties which will be called by the Spring container to set the configured values.

If you are using XML configuration then beans are defined as given in the following XML-

<?xml version="1.0" encoding="UTF-8"?>
<beans xmlns="http://www.springframework.org/schema/beans"
    xmlns:xsi="http://www.w3.org/2001/XMLSchema-instance"
    xmlns:context="http://www.springframework.org/schema/context"
    xsi:schemaLocation="http://www.springframework.org/schema/beans 
        http://www.springframework.org/schema/beans/spring-beans.xsd
        http://www.springframework.org/schema/context
        http://www.springframework.org/schema/context/spring-context.xsd">
  <!-- Store bean --> 
  <bean id="store" class="com.knpcode.SpringProject.RetailStore" />           
  <!-- Order bean with dependencies -->
  <bean id="orderBean" class="com.knpcode.SpringProject.Order">
    <property name="store" ref="store" />
    <property name="items" value="20" />
  </bean>
</beans>

For providing setter dependencies <property> tag is used.

  • When dependency is for another bean “ref” attribute is used.
  • For any primitive type or String “value” attribute is used.

You can use the following class with main method to read the configuration and call the bean method.

public class App {
  public static void main( String[] args ){
    // create context using configuration
    ClassPathXmlApplicationContext context = new ClassPathXmlApplicationContext("appcontext.xml");
    Order order = (Order) context.getBean("orderBean");
    order.buyItems();
    // close the context
    context.close();
  }
}

Spring Setter dependency injection using annotations

If you want to configure setter dependencies in Spring using annotations then you will have to use @Service or @Component annotation with the classes to signify that these are Spring managed component and will be automatically discovered when component scanning is done.

Annotate setter methods with @autowired to inject the setter dependencies automatically.

@Service
public class OnlineStore implements IStore {
  public void doPurchase(int items) {
    System.out.println("Doing online purchase of " + items + " Items");
  }
}
@Service
public class RetailStore implements IStore {
  public void doPurchase(int items) {
    System.out.println("Doing purchase of " + items + " Items from a brick and mortar store");
  }
}
import org.springframework.beans.factory.annotation.Autowired;
import org.springframework.beans.factory.annotation.Qualifier;
import org.springframework.beans.factory.annotation.Value;
import org.springframework.stereotype.Service;

@Service
public class Order {
  private IStore store;
  @Value("20")
  private int items;
  @Autowired
  @Qualifier("onlineStore")
  public void setStore(IStore store) {
    this.store = store;
  }
  public void buyItems() {
    store.doPurchase(items);
  }
}

Since there are two objects of type store so @Qualifier annotation has been used to tell which bean has to be wired otherwise you will get an error "No qualifying bean of type 'com.knpcode.SpringProject.IStore' available"

Autowiring works with references only so primitive value is provided using @Value annotation.

If you want to use XML to set up component scanning for automatically discovering beans then it can be done using following XML.

<?xml version="1.0" encoding="UTF-8"?>
<beans xmlns="http://www.springframework.org/schema/beans"
    xmlns:xsi="http://www.w3.org/2001/XMLSchema-instance"
    xmlns:context="http://www.springframework.org/schema/context"
    xsi:schemaLocation="http://www.springframework.org/schema/beans 
        http://www.springframework.org/schema/beans/spring-beans.xsd
        http://www.springframework.org/schema/context
        http://www.springframework.org/schema/context/spring-context.xsd">
          
  <context:component-scan base-package="com.knpcode.SpringProject" />
</beans>

XML configuration won’t have any dependencies now only <context:component-scan> tag.

Constructor-based or setter-based Dependency injection

As per Spring documentation constructor based DI is preferred over setter-based DI.

"Since you can mix constructor-based and setter-based DI, it is a good rule of thumb to use constructors for mandatory dependencies and setter methods or configuration methods for optional dependencies.
The Spring team generally advocates constructor injection as it enables one to implement application components as immutable objects and to ensure that required dependencies are not null. Furthermore constructor-injected components are always returned to client (calling) code in a fully initialized state.
Setter injection should primarily only be used for optional dependencies that can be assigned reasonable default values within the class. Otherwise, not-null checks must be performed everywhere the code uses the dependency."

That's all for the topic Setter Dependency Injection in Spring. If something is missing or you have something to share about the topic please write a comment.


You may also like

January 11, 2024

Java try-catch Block With Examples

Robust code should be able to handle exceptional conditions too. In Java exception handling try and catch blocks are used to handle exceptions which helps in continuing with the flow of the program and also prevents the program from terminating automatically. In this post we'll see details about try-catch block in Java.

Try block in Java

If code in your method throws an exception, the default exception handling mechanism will stop your method execution and throw that exception to be handled by default handler. If you want to capture that exception with in the method then you should enclose your code, that might throw an exception, in try block.

General form of try block in Java is as follows-
try{
  ....
  ....
}
catch and finally blocks.

Try block must be followed by a catch block or a finally block or both. There can be multiple catch blocks too after try block.

Catch block in Java

A catch block is used to handle the exception thrown in the try block. A catch block must immediately follow a try block. There can be multiple catch blocks for different exception types that can be thrown in a try block.

See how you can handle different exceptions with in one catch block using Multi-Catch Exception in Java.

A try-catch-finally block in Java has the following form-

try {
   // Code that may throw excpetion
}
catch (ExceptionType1 exp){
   // Exception handler for  ExceptionType1
}
catch(ExceptionType2 exp){
  // Exception handler for  ExceptionType2
}
finally{
  // code that has to be executed after try block completes
}

If try-catch not used to handle exceptions

First let’s see what happens when you don’t use try-catch block in Java for handling exception in your code. Here we have a method which takes 2 integer as arguments and divide those numbers. In the code divisor is passed as zero, which will result in ArithmeticException.

public class ExceptionDemo {
  public static void main(String[] args) {
    ExceptionDemo ed = new ExceptionDemo();
    double result = ed.division(7, 0);
    System.out.println("result is - " + result);
  }

  private double division(int num1, int num2){
    double result;
    result = num1/num2;
    
    return result;	
  }
}
Output
Exception in thread "main" java.lang.ArithmeticException: / by zero
at com.knpcode.ExceptionDemo.division(ExceptionDemo.java:13)
at com.knpcode.ExceptionDemo.main(ExceptionDemo.java:7)

Since there is no try-catch block in the code, default exception handler is called in case of exception which terminates the program and prints the stack trace.

Using try-catch block for exception handling

You can write the same code with a try-catch block in Java where you handle the exceptional condition in your code and pass the result as zero in case of exception along with an appropriate message.

public class ExceptionDemo {
  public static void main(String[] args) {
    ExceptionDemo ed = new ExceptionDemo();
    double result = ed.division(7, 0);
    System.out.println("result is - " + result);
  }
	
  private double division(int num1, int num2){
    double result;
    try{
      result = num1/num2;
    }catch(ArithmeticException exp){
      System.out.println("Exception occurred while dividing" + exp.getMessage());
      // assigining zero to result
      result = 0;
    }
    return result;	
  }
}
Output
Exception occurred while dividing/ by zero
result is - 0.0
In this changed code you can see that program is not terminated when the exception occurred, result value is displayed now. In the catch block exception is handled by assigning zero to result and also message is displayed showing the cause of exception.

Nested try statement in Java

You can have a nested try statement also in Java exception handling. In a nested try a try-catch block resides with in an outer try-catch block. Once code enters a nested try statement that becomes the current context for exception handling. In case an exception occurs in an inner try and no catch block is found to handle the exception of that type, next (outer) try statement is checked for an exception handler and so on.

General form of nested try statement in Java

 
try{
  ..
  ..
  try{
	..
	..
  }catch(ExceptionType-1 e){
	..
	..
  }
}catch(ExceptionType-2 e){
	..
	..
}

Advantages of Nested try statement

If you have a section of code that may throw a specific exception then you can enclose that section with in a try-catch block to handle that exception. Outer most try statement which encloses the whole code may be designed to catch more generic exceptions.

Java nested try statement example

Here we have a Java program where two arguments are passed and then one passed argument is divided by another. So we can check for number of arguments and throw an illegal argument exception that should be caught by the outermost handler. While dividing check for division by zero exception which should be handled by a nested try statement. While converting passed arguments to int you can check for NumberFormatException with in a nested try statement.

public class NestedTryDemo {
  public static void main(String[] args) {
    int num1 = 0;
    int num2 = 0;
    try{
      if(args.length != 2){
        throw new IllegalArgumentException("Two parameters should be passed");
      }
      try{
        num1 = Integer.parseInt(args[0]);
        num2 = Integer.parseInt(args[1]);
        System.out.println("num1 = " + num1 + "num2 = " + num2);
      }catch(NumberFormatException e){
        System.out.println("Error while converting string to integer");
        throw e;
      }
      try{
        double result = num1/num2;
      }catch(ArithmeticException e){
        System.out.println("Error while division");
        e.printStackTrace();
      }
      
    }catch(Exception exp){
      exp.printStackTrace();
    }
  }
}

Trying to run this code with arguments "2" and "t5" will result in following exception.

java.lang.NumberFormatException: For input string: "t5"
	at java.lang.NumberFormatException.forInputString(Unknown Source)
	at java.lang.Integer.parseInt(Unknown Source)
	at java.lang.Integer.parseInt(Unknown Source)
	at com.knpcode.NestedTryDemo.main(NestedTryDemo.java:14)

Trying to run this code with arguments "3" and "0" will result in following exception.

num1 = 3num2 = 0
Error while division
java.lang.ArithmeticException: / by zero
	at com.knpcode.NestedTryDemo.main(NestedTryDemo.java:21)
Important points-
  • Code that may throw an exception should be enclosed with in a try block.
  • To associate an exception handler with a try block, you must put a catch block after it.
  • No code can be between the end of the try block and the beginning of the first catch block.
  • You can also have a finally block after a try-catch block or after a try block.

That's all for the topic Java try-catch Block With Examples. If something is missing or you have something to share about the topic please write a comment.


You may also like

January 10, 2024

Java Multi-Catch Exception With Examples

In this post we’ll see a new feature Multi-Catch exception added in Java 7. Using Multi-catch statement, single catch block can handle more than one type of exceptions. You don’t need to write multiple catch blocks to catch different exceptions where exception handling code is similar.

Prior to Multi-Catch exception in Java

If your code throws more than one type of exception, prior to introduction of Multi-Catch exception in Java 7, you would have used multiple catch blocks one per exception.

Let’s say you are reading a file and every line of a file has a single integer. You will read each line of the file as string and then convert that string to int. So you need to handle two exceptions in your code IOException and NumberFormatException.

import java.io.BufferedReader;
import java.io.File;
import java.io.FileInputStream;
import java.io.IOException;
import java.io.InputStreamReader;
import java.util.logging.Logger;

public class MultiCatch {
  private final static Logger logger = Logger.getLogger(MultiCatch.class.getName());
  public static void main(String[] args) throws IOException {
    BufferedReader br = null;
    try{
      String strLine;
      br = new BufferedReader(new InputStreamReader(
                             new FileInputStream(new File("D:\\test.txt"))));
      while((strLine = br.readLine()) != null){
          System.out.println("Line is - " + strLine);
          int num = Integer.parseInt(strLine);
      }
        
    }catch(NumberFormatException  ex){
      logger.info(ex.getMessage());
      throw ex;			
    }catch(IOException ex){
      logger.info(ex.getMessage());
      throw ex;
    }finally{
      try {
        br.close();
      } catch (IOException e) {
        // TODO Auto-generated catch block
        e.printStackTrace();
      }
    }		
  }
}

Notice some of the problems here-

  1. Even though exception handling code is same, you are logging the exception and then throwing it again, you have to have separate catch blocks.
  2. It is difficult to create a common method to eliminate the duplicated code because the variable ex has different types.
  3. You may even be tempted to write one catch block with Exception as type to catch all the exception rather than writing multiple catch blocks to catch specific exception. But that is not a good practice.

Using Multi-Catch exception in Java

Java 7 onward you can use multi-catch exception to catch multiple exceptions in one catch block. That way you can avoid duplication of code and also the tendency to use Exception class as a catch-all clause which will hide the real cause.

Java multi-catch exception example

Here the same code as used above is written using multi-catch exception

public class MultiCatch {
  private final static Logger logger = Logger.getLogger(MultiCatch.class.getName());
  public static void main(String[] args) throws IOException {
    BufferedReader br = null;
    try{
      String strLine;
      br = new BufferedReader(new InputStreamReader
                      (new FileInputStream
                      (new File("D:\\test.txt"))));
      while((strLine = br.readLine()) != null){
        System.out.println("Line is - " + strLine);
        int num = Integer.parseInt(strLine);
      } 
    }catch(NumberFormatException | IOException  ex){
      logger.info(ex.getMessage());
      throw ex;
    }finally{
      try {
        br.close();
      } catch (IOException e) {
        // TODO Auto-generated catch block
        e.printStackTrace();
      }
    }
  }
}
Notice the changes here-
  1. Now there is only a single catch block which combines both the catch blocks.
  2. In multi-catch statement you need to separate each exception type in the catch clause using the pipe (|) symbol.

Catch parameter used in multi-catch statement is final

In a multi-catch statement, handling more than one exception type, catch parameter is implicitly final. In the code above, the catch parameter ex is final and therefore you cannot assign any value to it within the catch block.

Byte code generated by multi-catch statement is superior

Bytecode generated by multi-catch statement in Java will be smaller (and thus superior) in comparison to multiple catch blocks that handle only one exception type each. Multi-catch creates no duplication in the bytecode generated by the compiler.

Multi-Catch statement with exception of same type

Trying to catch exceptions of the same type in multi-catch statement will result in compile time error. For example-

catch (FileNotFoundException | IOException ex) {
  Logger.error(ex);
}

This multi-catch results in compile time error as FileNotFoundException is the child class of IOException. You will get the error as- The exception FileNotFoundException is already caught by the alternative IOException.

Reference- https://docs.oracle.com/javase/8/docs/technotes/guides/language/catch-multiple.html

That's all for the topic Java Multi-Catch Exception With Examples. If something is missing or you have something to share about the topic please write a comment.


You may also like

Spring Boot + Spring Data REST Example

In this articles we’ll go through some of the basics of Spring Data REST and see an example of using Spring Boot with Spring Data REST.

Spring Data REST

Spring Data REST builds on top of the Spring Data repositories and automatically exports those as REST endpoints. It takes the features of Spring HATEOAS and Spring Data and automatically combines them together.

In the Spring Boot + Spring Data JPA + MySQL + Spring RESTful example you can see how using Spring Data JPA requires that you just create a Repository interface. No need to write DAO implementation classes Spring takes care of automatically implementing this repository interface.

Spring Data REST goes one step further, you don’t even need to create a Controller class with mappings (GET, POST, PUT etc.). By using the domain class used with in the Repository interface Data REST automatically exposes the methods provided by Spring Data JPA as REST end points. Let’s see it in action with the help of an example.

Maven Dependencies

In the pom.xml file add the following starter dependencies.

<dependencies>
  <dependency>
    <groupId>org.springframework.boot</groupId>
    <artifactId>spring-boot-starter-data-jpa</artifactId>
  </dependency>
  <dependency>
    <groupId>org.springframework.boot</groupId>
    <artifactId>spring-boot-starter-data-rest</artifactId>
  </dependency>
  <dependency>
    <groupId>org.springframework.boot</groupId>
    <artifactId>spring-boot-devtools</artifactId>
    <optional>true</optional>
  </dependency>
  <!-- MySQL Driver -->
  <dependency>
    <groupId>mysql</groupId>
    <artifactId>mysql-connector-java</artifactId>
    <scope>runtime</scope>
  </dependency>
</dependencies>

This example uses MySQL DB as backend so driver for that is added.

DB table Query

MySQL DB table used for this Spring Boot and Spring data REST example can be created using the following query.

CREATE TABLE `employee` ( `id` int(11) NOT NULL AUTO_INCREMENT, `first_name` varchar(45) DEFAULT NULL, `last_name` varchar(45) DEFAULT NULL, `department` varchar(45) DEFAULT NULL, PRIMARY KEY (`id`) ) ENGINE=InnoDB DEFAULT CHARSET=utf8;

Domain class (Entity class)

Entity class which maps to the employee table in DB.

import javax.persistence.Column;
import javax.persistence.Entity;
import javax.persistence.GeneratedValue;
import javax.persistence.GenerationType;
import javax.persistence.Id;
import javax.persistence.Table;

@Entity
@Table(name="employee")
public class Employee {
  @Id
  @GeneratedValue(strategy = GenerationType.IDENTITY)
  private int id;
  @Column(name="first_name")
  private String firstName;
  @Column(name="last_name")
  private String lastName;
  @Column(name="department")
  private String dept;
  public int getId() {
    return id;
  }
  public void setId(int id) {
    this.id = id;
  }
  public String getFirstName() {
    return firstName;
  }
  public void setFirstName(String firstName) {
    this.firstName = firstName;
  }
  public String getLastName() {
    return lastName;
  }
  public void setLastName(String lastName) {
    this.lastName = lastName;
  }
  public String getDept() {
    return dept;
  }
  public void setDept(String dept) {
    this.dept = dept;
  }

  @Override
  public String toString() {
    return "Id= " + getId() + " First Name= " + 
           getFirstName() + " Last Name= " + getLastName() + 
           " Dept= "+ getDept();
  }
}

Data JPA Repository Class (Employee Repository)

import java.util.List;
import org.springframework.data.jpa.repository.JpaRepository;
import org.springframework.data.repository.query.Param;
import com.knpcode.model.Employee;

public interface EmployeeRepository extends JpaRepository<Employee, Integer> {
  List<Employee> findByLastName(@Param("name") String lastName);
}

This repository is an interface that lets you perform various operations involving Employee objects. It gets these operations by extending the JPARepository interface that is defined in Spring Data Commons.

At runtime, Spring Data REST automatically creates an implementation of this interface.

For this EmployeeRepository interface, Spring Data REST exposes a collection resource at "/employees" by default. This path is derived from the uncapitalized, pluralized, simple class name of the domain class being managed. It also exposes an item resource for each of the items managed by the repository under the URI template "/employees/{id}".

DB Configuration

By default Spring boot reads properties file at this location src/main/resources/application.properties. You must define the DB connection attributes and Hibernate related properties in the application.properties file.

spring.datasource.url=jdbc:mysql://localhost:3306/knpcode
spring.datasource.username=admin
spring.datasource.password=password

spring.jpa.properties.hibernate.sqldialect=org.hibernate.dialect.MySQLInnoDBDialect
spring.jpa.properties.hibernate.showsql=true

Create Spring Boot Application Class

Here is an application class with the main method which is the entry point for Spring Boot application.

import org.springframework.boot.SpringApplication;
import org.springframework.boot.autoconfigure.SpringBootApplication;

@SpringBootApplication
public class DataRestApp {
  public static void main(String[] args) {
    SpringApplication.run(DataRestApp.class, args);
  }
}

That’s all you need to have a fully functional REST API. Run it as a stand alone Java application by running the class with the main method (DataRestApp.java) from Eclipse IDE itself.

Right click DataRestApp.java – Run As – Java Application

To discover what resources are available at the root of the application, issue an HTTP GET to the root URL (http://localhost:8080/)

Spring data REST

As you can see “/employees” endpoint is available to get all the employees. There are also ?page,size,sort options available.

A profile endpoint “/profile”, is a place to include application-level details.

Adding an Employee-

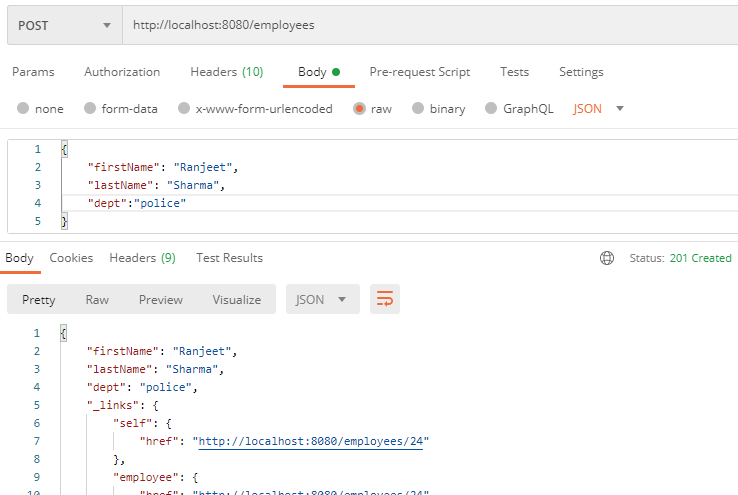
Using Postman client you can send a POST request to add employee record.

Data REST endpoint

If you look at the response headers in the Postman client, you will notice that the content-type is 'application/hal+JSON'

By default, Spring Data REST uses HAL to render responses. Hypertext Application Language (HAL) is a simple language that gives a consistent and easy way to hyperlink between resources in API.

Getting all employees-

Getting employee by ID-

Using @RepositoryRestResource to customize REST endpoints

If you want to change this default path you can use @RepositoryRestResource annotation to do that. Both the name of the resource and the path can be customized by using @RepositoryRestResource on the repository interface.

import java.util.List;
import org.springframework.data.jpa.repository.JpaRepository;
import org.springframework.data.repository.query.Param;
import org.springframework.data.rest.core.annotation.RepositoryRestResource;
import com.knpcode.model.Employee;

@RepositoryRestResource(collectionResourceRel = "employee", path = "employee")
public interface EmployeeRepository extends JpaRepository<Employee, Integer> {
  List<Employee> findByLastName(@Param("name") String lastName);
}

With this change you can get the list of all employees by using the following URL.

http://localhost:8080/employee

For getting employee detail by ID-

http://localhost:8080/employee/23

You can also issue PUT, PATCH, and DELETE REST calls to replace, update, or delete existing records respectively. The following example uses a PATCH call to update a subset of items.

REST patch request

Changing the Base URI

By default, Spring Data REST serves up REST resources at the root URI, '/'. You can change the base URI by setting a single property in application.properties, as follows:

spring.data.rest.basePath=/app

Now you can use the following URL to access all employees.

http://localhost:8080/app/employee

Accessing Data JPA custom query

In the EmployeeRepository interface there is a custom method findByLastName(). You can find all query methods exposed by a repository by using search resource which returns links for all query methods.

Data REST Search resource

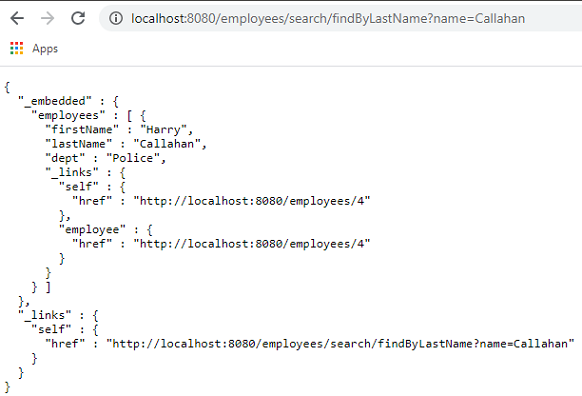
You can see the URL for the query which by default matches the custom method name. The HTTP query parameter, name, matches the @Param("name") annotation used in the method in repository interface.

Spring Data query method

Using @RestResource annotation to change query method path

To change the segment of the URL under which this query method is exposed, you can use the @RestResource annotation as the following example shows.

public interface EmployeeRepository extends JpaRepository<Employee, Integer> {
  @RestResource(path = "lastname")
  List<Employee> findByLastName(@Param("name") String lastName);
}

Then you can use following URL to access query method.

http://localhost:8080/employees/search/lastname?name=Callahan

That's all for the topic Spring Boot + Spring Data REST Example. If something is missing or you have something to share about the topic please write a comment.


You may also like

January 9, 2024

Tic-Tac-Toe Game in Python

In this article we’ll see how to develop tic-tac-toe game in Python.

The tic-tac-toe game we are going to develop is a two player game played in the command line. Steps in the program are as follows-

  1. Give an option to the player 1 to choose symbol (‘X’ or ‘O’).
  2. Create a tic-tac-toe board with index numbers making it easy for the players to input the index where they want their symbol to be placed.
  3. Give each player a chance to place the symbol alternatively until one of the players has won the game or the game is drawn.
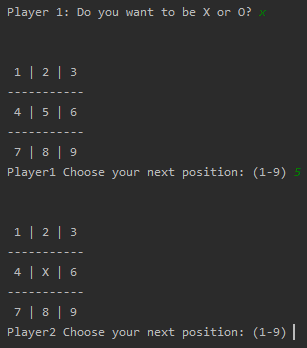
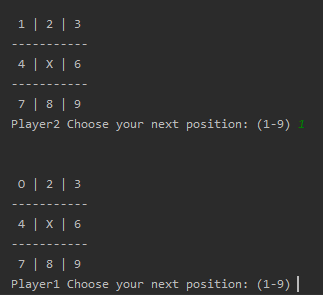
tic-tac-toe Python
tic-tac-toe board

Tic-tac-toe game – Python code

def user_choice():
  choice = ' '
  flag = False
  while not choice.isdigit() or not flag:
    choice = input('Please input a number (0-10): ')
    if choice.isdigit() and int(choice) in range(0, 10):
      flag = True
      return int(choice)
    else:
      print('Enter number between 0 and 10')
      flag = False


def display_board(board):
    print('\n')
    print(' ' + board[1] + ' | ' + board[2] + ' | ' + board[3])
    print('-----------')
    print(' ' + board[4] + ' | ' + board[5] + ' | ' + board[6])
    print('-----------')
    print(' ' + board[7] + ' | ' + board[8] + ' | ' + board[9])


def player_input():
  marker = ''
  while not (marker == 'X' or marker == 'O'):
      marker = input('Player 1: Do you want to be X or O? ').upper()
  if marker == 'X':
      return ('X', 'O')
  else:
      return ('O', 'X')


def place_symbol(board, symbol, position):
  if board[position] in ('X', 'O'):
    print('Position already marked')
  board[position] = symbol


def check_marked_position(board, position):
  if board[position] in ('X', 'O'):
    print('Position already marked')
    return False
  return True


def select_player_position(board, player):
  position = 0
  while position not in range(1, 10) or not check_marked_position(board, position):
    position = int(input(player + ' Choose your next position: (1-9) '))
  return position


def is_winner(board, symbol):
  return ((board[1] == symbol and board[2] == symbol and board[3] == symbol) or  # top row
          (board[4] == symbol and board[5] == symbol and board[6] == symbol) or  # middle row
          (board[7] == symbol and board[8] == symbol and board[9] == symbol) or  # bottom row
          (board[1] == symbol and board[4] == symbol and board[7] == symbol) or  # first column
          (board[2] == symbol and board[5] == symbol and board[8] == symbol) or  # second column
          (board[3] == symbol and board[6] == symbol and board[9] == symbol) or  # third column
          (board[1] == symbol and board[5] == symbol and board[9] == symbol) or  # diagonal
          (board[3] == symbol and board[5] == symbol and board[7] == symbol))  # diagonal


def is_board_full(board):
  full_flag = True
  for i in range(1, 10):
    if board[i] not in ('X', 'O'):
      full_flag = False
  return full_flag


def start_play():
  while True:
    player1_symbol, player2_symbol = player_input()
    tictac_board = ['#', '1', '2', '3', '4', '5', '6', '7', '8', '9']
    turn = 'Player1'
    play_again_flag = 'Y'
    symbol = ''
    display_board(tictac_board)
    while True:
      if turn == 'Player1':
        symbol = player1_symbol
      else:
        symbol = player2_symbol

      position = select_player_position(tictac_board, turn)
      place_symbol(tictac_board, symbol, position)
      display_board(tictac_board)
      if is_winner(tictac_board, symbol):
        print('Yeey! ' + turn + ' won!')
        break
      if is_board_full(tictac_board):
        print('It''s a draw!')
        break
      else:
        turn = 'Player2' if turn is 'Player1' else 'Player1'


      play_again_flag = input('Do you want to play again? Enter Y or N: ')
      print(play_again_flag.lower())
      if play_again_flag.lower() != 'y':
        break

start_play()
  1. start_play() function is the main function where first task is to ask player 1 to choose preferred symbol out of ‘X’ or ‘O’. This is done by calling player_input() function.
  2. To display tic-tac-toe board display_board() function is called passing list tictac_board = ['#', '1', '2', '3', '4', '5', '6', '7', '8', '9'] as an argument. Since index 0 is not required so that has a placeholder value ‘#’.
  3. In a while loop each player gets a chance to place their respective symbol. Functions used for this task are select_player_position() and place_symbol().
  4. While placing a symbol it is required to check if the selected position is already marked or not that is done using check_marked_position() function.
  5. After each turn it is also required to check if there is a winner that is done using is_winner() function. Another thing to check is whether the board is full that is done using is_board_full() function.

That's all for the topic Tic-Tac-Toe Game in Python. If something is missing or you have something to share about the topic please write a comment.


You may also like

Java throws Clause With Examples

Code in your method may throw exceptions that your method doesn’t handle. In that case you need to specify those exceptions along with the method declaration. That way calling method can provide exception handling mechanism for those exceptions. To specify the exceptions in your method declaration you can use throws keyword in Java.

General form of throws keyword in Java

type methodName(parameters) throws exception1, excpetion2...{
  ...
  ...
}

try-catch block or throws

You can handle the exception thrown in your method code with in the method by providing a try-catch block. If you want to delegate it to the caller method to provide exception handling mechanism, you can declare the exceptions using throws in Java. Then it is the responsibility of the calling method to provide exception handling mechanism. Of course caller method can also declare the exception using throws keyword and delegate it to the next method in the stack to handle it.

As per the best practices for exception handling you should always throw early and catch late. So it is advisable to use throws clause in order to catch late.

Checked exceptions and throws clause

It is mandatory to specify all the checked exceptions using throws clause in your method declaration if exceptions are not handled with in the method. Not doing so will result in compile time error.

For unchecked exceptions specifying them in throws clause is optional. There won’t be any compile time error if you don’t specify unchecked exceptions with throws clause.

Example code when throws is not used with Checked exception

throws in Java

In the code there is neither try-catch block to handle the exception nor the throws clause to specify the exception, thus the compile time error because FileNotFoundException is a checked exception.

throws clause Java Example

The above code can be written as follows to use throws clause.

import java.io.BufferedReader;
import java.io.File;
import java.io.FileInputStream;
import java.io.IOException;
import java.io.InputStreamReader;

public class ThrowsDemo {
  public static void main(String[] args) {
    ThrowsDemo td = new ThrowsDemo();
    try {
      td.readFile();
    } catch (IOException e) {
      // TODO Auto-generated catch block
      e.printStackTrace();
    }
  }
	
  private void readFile() throws IOException{
    BufferedReader br = null;
    try{
      br = new BufferedReader(new InputStreamReader(new FileInputStream(
                               new File("D:\\test1.txt"))));
    }finally{
      br.close();
    }		
  }
}

In the above code you can see that the try-finally is still used as resource is closed in the finally block. Here readFile() method can throw two checked exceptions FileNotFoundException when trying to open the file and IOException when trying to close the BufferedReader in the finally block. Rather than providing try-catch blocks to handle those exceptions throws clause is used to declare the thrown exception. Note that IOException is the parent class of FileNotFoundException so you can declare only IOException to take care of both of these exceptions.

Important points

  1. Using throws clause you can specify the exception thrown by the method code with in the method declaration.
  2. throws in Java exception handling delegates the responsibility of exception handling to the caller method.
  3. For checked exceptions it is mandatory to either provide try-catch block to handle the exception or declare it using throws. Not doing so will result in compile time error.
  4. For unchecked exceptions it is not mandatory to declare them with throws clause.

That's all for the topic Java throws Clause With Examples. If something is missing or you have something to share about the topic please write a comment.


You may also like