In this tutorial we’ll see how to create a Spring Boot Hello World web application using Spring Tool Suite (STS).
Creating a new Spring Boot Project
In the STS select File – New – Spring starter project. In the opened New Spring Starter Project dialog box provide a name for your project. In the example it is named "HelloWorld". Select type as Maven so that Maven is used as build tool for the project. Packaging as “jar”, Language as “Java” and the Java version.
Also provide Group and Artifact, where Group ID becomes your package name and Artifact ID is the name of the jar which you get when you build your project.
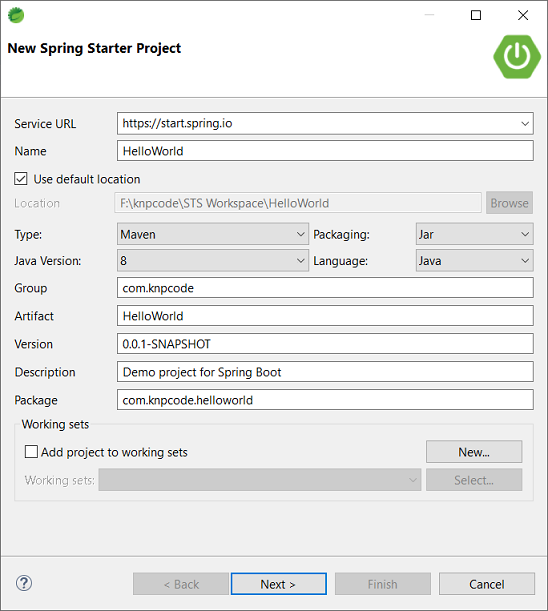
Click Next.
In the “New Spring Starter Project Dependencies” window you need to provide the required dependencies for the project.
Let the Spring Boot version be as per the pre-filled value.
Since it is a web application so we need “Spring web” dependency. In the search box enter “web” to filter the dependencies. Check Spring web check box.

Click Finish. STS will create the project structure and required dependencies will be downloaded.
Understanding added starters
Open the created pom.xml to understand the added dependencies for the project.
First starter that is added in the parent section of the POM is a special starter spring-boot-starter-parent that provides useful Maven defaults. This parent starter also provides a dependency-management section so that you don't need to provide version tags for dependencies.
Each release of Spring Boot provides a curated list of dependencies that it supports. You don't need to provide version for any of these dependencies in your build configuration, as Spring Boot manages that for you. Note that You can still specify a version and override Spring Boot’s recommendations if you need to do so.
In our configuration, Spring Boot version is 2.2.2 so Spring Boot gets the dependencies which support this version.
Since we are developing a web application and selected “Spring Web” as dependency that added a spring-boot-starter-web dependency. This Spring boot starter adds the necessary dependencies required for creating a Spring web application.
Third important thing is the spring-boot-maven-plugin. This plugin provides many convenient features-
- It helps to create an executable jar (über-jar), which makes it more convenient to execute and transport your service.
- It also searches for the public static void main() method to flag the class having this method as a runnable class.
With these dependencies added Spring Boot takes care of getting the required jar dependencies, even an embedded web server (Tomcat in this case) because of the starter web dependency.
Classes for web application
We’ll add a simple web controller for our web application. Maven compiles sources from src/main/java so create a package "com.knpcode.helloworld.controller" at that location and add a new class in that package.
package com.knpcode.helloworld.controller;
import org.springframework.web.bind.annotation.GetMapping;
import org.springframework.web.bind.annotation.PathVariable;
import org.springframework.web.bind.annotation.RestController;

@RestController
public class HelloWorldController {
  @GetMapping(value="/{name}")
  public String showGreeting(@PathVariable("name") String name) {
    return "Hello " + name;
  }
}
class is annotated using @RestController annotation which tells Spring that this class is ready for use by Spring MVC to handle web requests and it indicates that resulting string should be written directly into the response body, we don't want to render views.
At method level @GetMapping annotation is used which is short cut for @RequestMapping(method = RequestMethod.GET). This annotation provides routing information. It tells Spring that any HTTP request with the /{name) path should be mapped to the showGreeting method.
@PathVariable annotation lets you retrieve the parameter from the request path.
Application class with main method
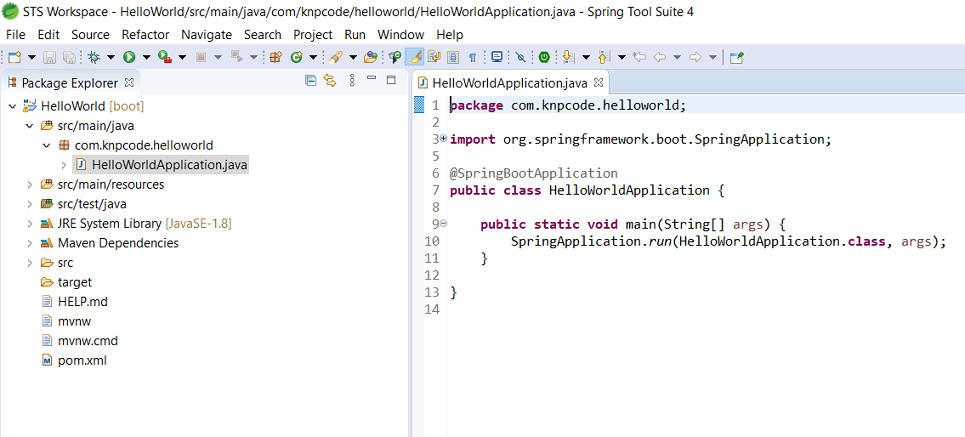
You would have noticed an application class “HelloWorldApplication.java” is automatically created.
import org.springframework.boot.SpringApplication;
import org.springframework.boot.autoconfigure.SpringBootApplication;

@SpringBootApplication
public class HelloWorldApplication {
  public static void main(String[] args) {
    SpringApplication.run(HelloWorldApplication.class, args);
  }
}
@SpringBootApplication is a convenience annotation that adds all of the following annotations-
- @Configuration annotation tags the class as a source of bean definitions for the application context.
- @EnableAutoConfiguration tells Spring Boot to enable auto configuration so that beans are created automatically based on classpath settings, other beans, and various property settings. For example starter spring-boot-starter-web adds Tomcat and Spring MVC so the auto-configuration assumes that you are developing a web application and sets up Spring accordingly which includes setting up a DispatcherServlet.
- @ComponentScan tells Spring to look recursively for other components, configurations and services inside this package and register them.
The main method is the application entry point which delegates to Spring Boot’s SpringApplication class by calling run. SpringApplication bootstraps this HelloWorld application, starting Spring, which, in turn, starts the embedded Tomcat web server. You need to pass HelloWorldApplication.class as an argument to the run method to tell SpringApplication which is the primary Spring component.
Running the application
You can run this Spring Boot Hello World application as a stand alone Java application or create an executable jar.
1- You can run it as a stand alone Java application by running the class with the main method (HelloWorldApplication.java) from Eclipse IDE itself.
Right click HelloWorldApplication.java – Run As – Spring Boot App

From the output on the console you can see that web server is configured, WebApplicationContext is initialized, your app is deployed and all that is done automatically.
You can access the application by accessing URL- http://localhost:8080/knpCode
Here /KnpCode is the value for the name parameter.

2- Dependency spring-boot-starter-parent also provides a run goal that you can use to start the application. Type mvn spring-boot:run from the root project directory to start the application.
3- You can also create a self-contained executable jar file, to do that run mvn package from the command line. Ensure that you are at the root project directory when running the command.
F:\knpcode\STS Workspace\HelloWorld>mvn package
If command runs successfully then jar should be created in the target folder.
[INFO] Building jar: F:\knpcode\STS Workspace\HelloWorld\target\HelloWorld-0.0.1-SNAPSHOT.jar
To run application using the created jar, use the java -jar command, as follows-
java -jar target\HelloWorld-0.0.1-SNAPSHOT.jar
That's all for the topic Spring Boot Example Using Spring Tool Suite (STS). If something is missing or you have something to share about the topic please write a comment.
You may also like
- Spring Boot Application Using Spring Initializr
- Spring Boot Stand Alone (non web) Application Example
- Advantages and Disadvantages of Autowiring in Spring
- Java Stream API With Examples
- Generating PDF in Java Using PDFBox Tutorial
- How to Remove Elements From Java ArrayList
- Exception Handling With Method Overriding in Java
- How to Delete File and Directory in Python
No comments:
Post a Comment