September 30, 2022

BinaryOperator Functional Interface Java Examples

In this post we’ll see examples of Java java.util.function.BinaryOperator functional interface.

BinaryOperator functional interface represents an operation upon two operands of the same type, returning a result of the same type as the operands. BinaryOperator extends java.util.function.BiFunction interface and provides behavior for the case where the operands and the result are all of the same type. Since it extends BiFunction so inherits all the methods of the BiFunction interface-

  • T apply(T t1, T t2)- Here T denotes the type of the arguments and the return type. This is the abstract method in this functional interface. If you are writing a Lambda expression that takes two arguments of same type and returns a value of the same type as passed arguments then that lambda expression can be written as an implementation of BinaryOperator built-in functional interface.
  • andThen(Function<? super R,? extends V> after)- It takes another Function as argument and returns a composed BiFunction that performs, in sequence, first the operation of the calling BiFunction followed by the after operation.

Apart from the above two inherited methods BinaryOperator also has the following static methods.

  • minBy(Comparator<? super T> comparator)- Returns a BinaryOperator which returns the lesser of two elements according to the specified Comparator.
  • maxBy(Comparator<? super T> comparator)- Returns a BinaryOperator which returns the greater of two elements according to the specified Comparator.

BinaryOperator interface apply() method example

Here is a simple example where apply() method is implemented as a lambda expression that returns the sum of the passed integers.

import java.util.function.BinaryOperator;

public class BinaryOperatorExample {
  public static void main(String[] args) {
    BinaryOperator<Integer> binaryOperator = (a,b) -> a+b;
    System.out.println("Result- " + binaryOperator.apply(2,3));
    System.out.println("Result- " + binaryOperator.apply(9, 10));
  }
}
Output
Result- 5
Result- 19

BinaryOperator interface andThen() method example

In the example passed arguments are added and then the result is squared and that is done as a sequence of operation using andThen() method.

import java.util.function.BinaryOperator;
import java.util.function.Function;

public class BinaryOperatorExample {
  public static void main(String[] args) {
    BinaryOperator<Integer> binaryOperator1 = (a,b) -> a+b;
    Function<Integer, Integer> function = (n) -> n*n;
    System.out.println("Result- " + binaryOperator1.andThen(function).apply(2,3));
    System.out.println("Result- " + binaryOperator1.andThen(function).apply(9, 10));
  }
}
Output
Result- 25
Result- 361

BinaryOperator interface minBy() and maxBy() methods example

Using the minBy() and maxBy() methods of the BinaryOperator we’ll get the employee with the minimum salary and with maximum salary from the list of employees. Both of these methods need a Comparator implementation. Note that both of these methods are implemented as static interface methods in BinaryOperator which means implementation is already there for these methods in the interface.

Employee class
public class Employee {
  private String name;
  private String dept;
  private Integer salary;

  Employee(String name, String dept, Integer salary){
    this.name = name;
    this.dept = dept;
    this.salary = salary;
  }
  public String getName() {
    return name;
  }
  public void setName(String name) {
    this.name = name;
  }
  public Integer getSalary() {
    return salary;
  }
  public void setSalary(Integer salary) {
    this.salary = salary;
  }
  public String getDept() {
    return dept;
  }
  public void setDept(String dept) {
    this.dept = dept;
  }
}
import java.util.ArrayList;
import java.util.Comparator;
import java.util.List;
import java.util.function.BinaryOperator;
import java.util.function.Function;

public class BinaryOperatorExample {
  public static void main(String[] args) {
    List<Employee> employeeList = new ArrayList<>(); 
    // Preparing List
    employeeList.add(new Employee("Jack", "Finance", 5500)); 
    employeeList.add(new Employee("Lisa", "Finance", 5600)); 
    employeeList.add(new Employee("Scott", "Finance", 7000));
    employeeList.add(new Employee("Nikita", "IT", 4500));
    employeeList.add(new Employee("Tony", "IT", 8000));
    // Comparator implementation
    Comparator<Employee> comparator = (Employee e1, Employee e2) -> e1.getSalary().compareTo(e2.getSalary());
    BinaryOperator<Employee> binOperatorMin = BinaryOperator.minBy(comparator);
    BinaryOperator<Employee> binOperatorMax = BinaryOperator.maxBy(comparator);
    Employee emp = findByComparison(employeeList, binOperatorMin);
    System.out.println("Employee with min salary: Name- " + emp.getName() + " Salary-" + emp.getSalary());
    emp = findByComparison(employeeList, binOperatorMax);
    System.out.println("Employee with max salary: Name- " + emp.getName() + " Salary-" + emp.getSalary());
  }

  public static Employee findByComparison(List<Employee> employeeList, BinaryOperator<Employee> binOperator){
    Employee emp = null;
    for(Employee e: employeeList) {
      if(emp == null) {
        emp = e;
      }
      else {
        emp = binOperator.apply(emp, e);
      }
    }
    return emp;
  }
}
Output
Employee with min salary: Name- Nikita Salary-4500
Employee with max salary: Name- Tony Salary-8000

That's all for the topic BinaryOperator Functional Interface Java Examples. If something is missing or you have something to share about the topic please write a comment.


You may also like

September 29, 2022

Convert LocalDate to Date in Java

This post shows how to convert java.time.LocalDate to java.util.Date in Java.

For converting LocalDate to Date steps are as follows-

  1. Get the ZonedDateTime from the LocalDate by specifying the ZoneId.
  2. Convert that ZonedDateTime to Instant instance using toInstant() method.
  3. Pass instant to Date.from() method to get a java.util.Date instance.

If we have to write those steps elaborately then it can be done as follows-

LocalDate ld = LocalDate.now();
System.out.println("Local Date - " + ld);
ZonedDateTime zdt = ld.atStartOfDay(ZoneId.systemDefault());
Instant instant = zdt.toInstant();
Date date = Date.from(instant);
System.out.println("Date- " + date);
Output
Local Date - 2019-11-20
Date- Wed Nov 20 00:00:00 IST 2019

You can also do it in one line as given below-

LocalDate ld = LocalDate.now();
Date date = Date.from(ld.atStartOfDay(ZoneId.systemDefault()).toInstant());

That's all for the topic Convert LocalDate to Date in Java. If something is missing or you have something to share about the topic please write a comment.


You may also like

September 28, 2022

Compare Dates in Java

In this post there are Java programs to compare dates in Java, options you have are using Date class methods, Calendar class methods and from Java 8 using methods in LocalDate, LocalTime and LocalDateTime classes.

Comparing java.util.Date

If you have two Date instances and you want to compare them then the methods in the Date class that can be used are-

  • compareTo(Date anotherDate)- Compares two Dates for ordering. Returns 0 if the argument Date is equal to this Date; a value less than 0 if this Date is before the passed Date argument; and a value greater than 0 if this Date is after the Date argument.
  • equals(Object obj)- Compares two dates for equality. The result is true if and only if the argument is not null and is a Date object that represents the same point in time, to the millisecond, as this object.
  • after(Date when)- Tests if this date is after the specified date. Returns true if the instant represented by this Date object is strictly later than the instant represented by when; false otherwise.
  • before(Date when)- Tests if this date is before the specified date. Returns true if and only if the instant of time represented by this Date object is strictly earlier than the instant represented by when; false otherwise.
public class CompareDates {
  public static void main(String[] args) throws ParseException {
    SimpleDateFormat sdf = new SimpleDateFormat("yyyy-MM-dd");
    Date dt1 = sdf.parse("2019-10-27");
    Date dt2 = sdf.parse("2019-08-20");
    System.out.println("Date1 is- "+ sdf.format(dt1));
    System.out.println("Date2 is- "+ sdf.format(dt2));
    compareDates(dt1, dt2);
  }
	
  private static void compareDates(Date dt1, Date dt2) {
    if(dt1.compareTo(dt2) > 0) {
      System.out.println("Date1 comes after date2");
    }else if(dt1.compareTo(dt2) < 0) {
      System.out.println("Date1 comes before date2");
    }else {
      System.out.println("Date1 equals date2");
    }
		
    // Using after method
    if(dt1.after(dt2)) {
      System.out.println("Date1 comes after date2");
    }else {
      System.out.println("Date1 comes before date2");
    }
		
    // Using before method
    if(dt1.before(dt2)) {
      System.out.println("Date1 comes before date2");
    }else {
      System.out.println("Date1 comes after date2");
    }
		
    //using equals method
    if(dt1.equals(dt2)) {
      System.out.println("Date1 equals date2");
    }else {
      System.out.println("Date1 is not equal to date2");
    }
  }
}
Output
Date1 is- 2019-10-27
Date2 is- 2019-08-20
Date1 comes after date2
Date1 is not equal to date2

Comparing java.util.Calendar

If you have Calendar instances then you can compare them the same way Date instances are compared. In Calendar class also there are similar methods compareTo, equals, after, before.

public class CompareDates {

  public static void main(String[] args) throws ParseException {

    SimpleDateFormat sdf = new SimpleDateFormat("yyyy-MM-dd");
    Date dt1 = sdf.parse("2018-09-27");
    Date dt2 = sdf.parse("2019-08-20");
    Calendar cal1 = Calendar.getInstance();
    Calendar cal2 = Calendar.getInstance();
    cal1.setTime(dt1);
    cal2.setTime(dt2);
    System.out.println("Date1 is- "+ sdf.format(cal1.getTime()));
    System.out.println("Date2 is- "+ sdf.format(cal2.getTime()));
    compareDates(cal1, cal2);
  }
	
  // Comparing Calendar instances
  private static void compareDates(Calendar cal1, Calendar cal2) {
    if(cal1.compareTo(cal2) > 0) {
      System.out.println("Date1 comes after date2");
    }else if(cal1.compareTo(cal2) < 0) {
      System.out.println("Date1 comes before date2");
    }else {
      System.out.println("Date1 equals date2");
    }
    
    // Using after method
    if(cal1.after(cal2)) {
      System.out.println("Date1 comes after date2");
    }else {
      System.out.println("Date1 comes before date2");
    }
    
    // Using before method
    if(cal1.before(cal2)) {
      System.out.println("Date1 comes before date2");
    }else {
      System.out.println("Date1 comes after date2");
    }
    
    //using equals method
    if(cal1.equals(cal2)) {
      System.out.println("Date1 equals date2");
    }else {
      System.out.println("Date1 is not equal to date2");
    }
  }
}
Output
Date1 is- 2018-09-27
Date2 is- 2019-08-20
Date1 comes before date2
Date1 is not equal to date2

Comparing LocalDates in Java

Java 8 onward you can use classes in new Date and Time API for comparing dates in Java. Here is an example using LocalDate instances. Similar methods are there in LocalTime and LocalDateTime classes too. For comparing two LocalDate instances there are the following methods-
  • compareTo(ChronoLocalDate other)- Compares this date to another date. Returns the comparator value, negative if less, positive if greater.
  • isAfter(ChronoLocalDate other)- Checks if this date is after the specified date. Returns true if this date is after the specified date.
  • isBefore(ChronoLocalDate other)- Checks if this date is before the specified date. Returns true if this date is before the specified date.
  • isEqual(ChronoLocalDate other)- Checks if this date is equal to the specified date. Returns true if this date is equal to the specified date.
public class CompareDates {

  public static void main(String[] args) {
    LocalDate ld1 = LocalDate.of(2019, Month.OCTOBER, 18);
    LocalDate ld2 = LocalDate.of(2019, Month.SEPTEMBER, 20);
    System.out.println(ld1.compareTo(ld2));
    System.out.println(ld2.compareTo(ld1));
    
    System.out.println(ld1.isAfter(ld2));
    System.out.println(ld1.isBefore(ld2));
    System.out.println(ld1.isEqual(ld2));
  }
}
Output
1
-1
true
false
false

That's all for the topic Compare Dates in Java. If something is missing or you have something to share about the topic please write a comment.


You may also like

September 27, 2022

React Conditional Rendering With Examples

In this tutorial we'll see different ways of conditional rendering in React. Conditional rendering is the ability to show different sections of code based on whether the condition is true or false. In terms of React where UI is rendered, it means rendering different elements or components based on a condition.

Conditional rendering in React

Conditional rendering in React uses the same conditional statements or operators used in JavaScript. You can use if-else, switch-case, conditional operator (ternary operator) in React.

Conditional rendering in React can be done in following ways-

  • If-else
  • Conditional or ternary operator
  • Logical operator (&&)
  • Switch case

Using if

If-else is a de facto conditional statement used in almost all the programming languages. If the condition is true if block is executed otherwise else block is executed. Note that else is optional.

Conditional rendering with if in React example

Let's take an example where we have two components LoginButton and LogoutButton and one of them is to be rendered.

  • If already logged in then show the logout button
  • If not logged in then show the login button.

LoginButton.js

const LoginButton = (props) => {
    return (
        <div>
            <h3>Login to see the site content</h3>
            <button onClick={props.onClick}>Login</button>
        </div>
    )
}

export default LoginButton;

LogoutButton.js

const LogoutButton = (props) => {
    return (
        <div>
            <h3>Welcome to our site</h3>
            <button onClick={props.onClick}>Logout</button>
        </div>
    )
}
export default LogoutButton;

Logic to conditionally render one of these component is in App.js where useState() hook is used to track the login state. If isLoggedIn is false then LoginButton component is rendered, LogoutButton component is rendered otherwise.

Uses the button variable to store element.

function App() {
  const [isLoggedIn, setIsLoggedIn] = useState(false);
  const loginActionHandler = () => {
    setIsLoggedIn(true);
  }
  const logoutActionHandler = () => {
    setIsLoggedIn(false);
  }
  let button;
  if(isLoggedIn){
    button = <LogoutButton onClick={logoutActionHandler}></LogoutButton>
  }else{
    button = <LoginButton onClick={loginActionHandler}></LoginButton>
  }
  return (
   <div>
    {button}
   </div>
  );
};
export default App;
Conditional rendering in React
Conditional rendering in React using if

Using Conditional or ternary operator

You can also use ternary operator (?:) which takes three operands for conditional rendering in React. Ternary operator can be used as an substitute of if-else to make your code more compact.

If we take the same example as used above then it needs a small change in App.js

  return (
   <div>
    {isLoggedIn ? <LogoutButton onClick={logoutActionHandler} /> :  <LoginButton onClick={loginActionHandler} />}
   </div>
  );

Using Logical operator (&&) to conditionally render

The JavaScript logical && operator can also be used for conditionally including an element. in fact it is used very frequently in React for conditonal rendering.

In condition && expression, if condition is true then the statement evaluates to expression. In case condition is false then the statement evaluates to false.

Therefore, if the condition is true, the element right after && will appear in the output. If it is false, React will ignore and skip it.

If we take the same example as used above then it needs a small change in App.js to start using logical operator.

  return (
    <div>
      {!isLoggedIn && <LoginButton onClick={loginActionHandler}></LoginButton>}
      {isLoggedIn && <LogoutButton onClick={logoutActionHandler}></LogoutButton>}
    </div>
  );

Using a switch statement

You can also use a switch statement where you can specify different elements in different case statements. If you have multiple conditions switch is considered a more readable option than if- else if statements.

In our example where we are trying to conditionally render login or logout button change in App.js for using switch is as given below.

function App() {
  const [isLoggedIn, setIsLoggedIn] = useState(false);
  const loginActionHandler = () => {
    setIsLoggedIn(true);
  }
  const logoutActionHandler = () => {
    setIsLoggedIn(false);
  }
  let button;
  switch(isLoggedIn){
    case true:
      button = <LogoutButton onClick={logoutActionHandler}></LogoutButton>
      break;
    case false: 
      button = <LoginButton onClick={loginActionHandler}></LoginButton>
      break;
    default:  
      button = null;
  }
  return (
   <div>
    {button}
   </div>
  );
};

export default App;

That's all for the topic React Conditional Rendering With Examples. If something is missing or you have something to share about the topic please write a comment.


You may also like

September 26, 2022

How to Loop in React

In this tutorial we'll see how to loop an array in React.

Loop in React JSX using map function

Preferred way in React is to use a map() function to iterate an array.

Syntax of map function is as given below

array.map(function(element, index, arr), thisValue)

Parameters in the map function are-

  1. function- map function calls the specified function once for each element in an array.

    The arguments of the callback function are-

    • element- The current element being processed in the array.
    • index- The index of the current element being processed in the array. This argument is optional.
    • arr- The array map was called upon. This argument is optional.
  2. thisArg- Optional parameter. Value to use as this when executing callbackFn.

You can also use arrow function to define the callback function in the map.

map((element, index, arr) => { /* … */ })

Looping in React example

In the example there is an array of product catalogue which is iterated using map function to render each product item.

// Initial list of products
const productList = [
    { id: 1, name: 'Laptop', price: 455.50 },
    { id: 2, name: 'Mouse', price: 15.89 },
    { id: 3, name: 'USB', price: 10.00 },
    { id: 4, name: 'HDD', price: 55.50 },
];
const Products = () => {

    return (
        <div className="container">
            <ul>
                {productList.map((product) => 
                    <li key={product.id}>{product.id} {product.name} {product.price}</li>
                )}
            </ul>
        </div>
    );
}
export default Products;

On running it, you should see a rendered list of product items.

.	1 Laptop 455.5
.	2 Mouse 15.89
.	3 USB 10
.	4 HDD 55.5

You can also store the array returned by map() function to a variable and then render that array instead. This will help in keeping your JSX clean.

// Initial list of products
const productList = [
    { id: 1, name: 'Laptop', price: 455.50 },
    { id: 2, name: 'Mouse', price: 15.89 },
    { id: 3, name: 'USB', price: 10.00 },
    { id: 4, name: 'HDD', price: 55.50 },
];
const Products = () => {
    const productItems = productList.map((product) => 
        <li key={product.id}>{product.id} {product.name} {product.price}</li>
    );
    return (
        <div className="container">
            <ul>
                {productItems}
            </ul>
        </div>
    );
}

export default Products;

Why key attribute is required

You must have noticed a key attribute being used with value as product id in the above example.

<li key={product.id}>

If you don't use a unique key for each element, you will get a warning

"Warning: Each child in a list should have a unique key prop."

This Key attribute helps React to identify which elements have changed, added, or are removed. Keys should be given to the elements inside the array to give the elements a stable identity.

The best way to pick a key is to use a string that uniquely identifies a list item among all the other items. Most often you will have unique IDs in your data that can be used as keys.

If the item you're trying to loop through does not have a unique element which can be used as a key, you can use the item index as a key for each iterated item.

// Scenario where products have no IDs
const productItems = productList.map((product, index) => 
     <li key={index}>{product.name} {product.price}</li>
Though use index only as a last resort. As per React documentation-

We don't recommend using indexes for keys if the order of items may change. This can negatively impact performance and may cause issues with component state.

Using forEach to iterate array

Though map() function is the preferred way to iterate an array in React but you do have other choices like forEach, for-of, traditional for loop. Here is an example using forEach to iterate an array.

// Initial list of products
const productList = [
  { id: 1, name: 'Laptop', price: 455.50 },
  { id: 2, name: 'Mouse', price: 15.89 },
  { id: 3, name: 'USB', price: 10.00 },
  { id: 4, name: 'HDD', price: 55.50 },
];
const Products = () => {
  const getProductItems = () => {
    let productItems = [];
    productList.forEach((product) => {
      productItems.push(<li key={product.id}>{product.id} {product.name} {product.price}</li>)
    });
    return productItems;
  };
  return (
    <div className="container">
      <ul>
        {getProductItems()}
      </ul>
    </div>
  );
}

export default Products;

Looping in React to render as Table

Here is another example where the array of products is iterated and each product item is rendered in a table as a table row. Uses react-bootstrap for styling.

import Table from 'react-bootstrap/Table';

// Initial list of products
const productList  = [
    { id: 1, name: 'Laptop', price: 455.50 },
    { id: 2, name: 'Mouse', price: 15.89 },
    { id: 3, name: 'USB', price: 10.00 },
    { id: 4, name: 'HDD', price: 55.50 },
];
const Products = () => {
  return (
    <div className="container">

      <Table striped bordered hover size="sm">
        <thead>
          <tr>
            <th>ID</th>
            <th>NAME</th>
            <th>PRICE</th>
          </tr>
        </thead>
        <tbody>
          {productList.map((product) => 
              <tr key={product.id}>
                  <td>{product.id}</td>
                  <td>{product.name}</td>
                  <td>{product.price}</td>
              </tr>

          )}
        </tbody>
      </Table>
    </div>
  );
}
export default Products;
Loop in React

Keeping in separate component while looping

You may want to have separate component for rendering each iterated element. In that case you should keep the key in the tag for the Component itself.

For example, if there is a separate ProductItem component to render each product item.

ProductItem.js

const ProductItem = (props) => {
  return (
    <tbody>
      <tr>
        <td>{props.item.id}</td>
        <td>{props.item.name}</td>
        <td>{props.item.price}</td>
      </tr>
    </tbody>
  )
}
export default ProductItem;

Products.js

import ProductItem from "./ProductItem";
import Table from 'react-bootstrap/Table';

// Initial list of products
const productList = [
  { id: 1, name: 'Laptop', price: 455.50 },
  { id: 2, name: 'Mouse', price: 15.89 },
  { id: 3, name: 'USB', price: 10.00 },
  { id: 4, name: 'HDD', price: 55.50 },
];
const Products = () => {
  return (
    <div className="container">
      <Table striped bordered hover size="sm">
        <thead>
          <tr>
            <th>ID</th>
            <th>NAME</th>
            <th>PRICE</th>
          </tr>
        </thead>
        {productList.map((val, key) => <ProductItem key={key} item={val} />)}
      </Table>
    </div>
  );
}
export default Products;

As you can see here <ProductItem> tag itself has the key attribute.

<ProductItem key={key} item={val} />

That's all for the topic How to Loop in React. If something is missing or you have something to share about the topic please write a comment.


You may also like

September 25, 2022

Display Time in 24 Hour Format in Java

This post shows how to display time in 24 hour format in Java using SimpleDateFormat and DateTimeFormatter class (Java 8 onward).

Pattern for time in 24 hour format

In Java pattern for 24 hours are as follows-

  • H- Hour in day (0-23), will return 0-23 for hours.
  • k- Hour in day (1-24), will return 1-24 for hours.

As per your requirement for displaying time use the appropriate hour pattern.

Using SimpleDateFormat

Date date = new Date();
// Pattern 
SimpleDateFormat sdf = new SimpleDateFormat("HH:mm:ss");
System.out.println("Time in 24 Hour format - " + sdf.format(date));
Output
Time in 24 Hour format – 16:13:58

Here is another program which shows the difference between using ‘HH’ and ‘kk’ as an hour format.

import java.text.SimpleDateFormat;
import java.util.Calendar;
import java.util.Date;
import java.util.GregorianCalendar;

public class FormatDate {
  public static void main(String[] args) {
    Date date = new GregorianCalendar(2019, Calendar.SEPTEMBER, 15, 24, 20, 15).getTime();
    System.out.println("DateTime is- " + date);
    // Pattern 
    SimpleDateFormat sdf1 = new SimpleDateFormat("dd-MMM-yyyy kk:mm:ss");
    SimpleDateFormat sdf2 = new SimpleDateFormat("dd-MMM-yyyy HH:mm:ss");
    System.out.println("Time in 24 Hour format - " + sdf1.format(date));
    System.out.println("Time in 24 Hour format - " + sdf2.format(date));
  }
}
Output
DateTime is- Mon Sep 16 00:20:15 IST 2019
Time in 24 Hour format - 16-Sep-2019 24:20:15
Time in 24 Hour format - 16-Sep-2019 00:20:15

Using DateTimeFormatter

Java 8 onward you can use new date and time API classes like LocalTime for representing time and DateTimeFormatter for specifying pattern.

LocalTime time = LocalTime.now();
// Pattern 
DateTimeFormatter pattern = DateTimeFormatter.ofPattern("HH:mm:ss");
System.out.println("Time in 24 Hour format - " + time.format(pattern));
Output
Time in 24 Hour format - 16:28:08

That's all for the topic Display Time in 24 Hour Format in Java. If something is missing or you have something to share about the topic please write a comment.


You may also like

September 24, 2022

Getting Current Date and Time in Java

In this post we’ll see different ways to get current date and time in Java. Options you have are-

  1. java.util.Date
  2. java.util.Calendar
  3. java.time.LocalDate- To get date.
  4. java.time.LocalTime- To get time.
  5. java.time.LocalDateTime- To get both date and time.
  6. java.time.ZonedDateTime – If you want time-zone information too.

Out of these classes LocalDate, LocalTime, LocalDateTime and ZonedDateTime are classes in Java 8 new Date and Time API.

1. Getting Date and Time using java.util.Date

When you instantiate a Date object, it is initialized so that it represents the date and time at which it was allocated.

Date date = new Date();
System.out.println(date);
Output
Thu Oct 10 16:42:21 IST 2019
Using SimpleDateFormat you can format this date.
public class FormatDate {
  public static void main(String[] args) {
    Date date = new Date();
    SimpleDateFormat sdf = new SimpleDateFormat("dd/MM/yyyy hh:mm:ss.SSS");
    System.out.println(sdf.format(date));
  }
}
Output
10/10/2019 04:50:49.197

2. Getting Date and Time using java.util.Calendar

Using getInstance() static method of the Calendar class you can get an instance of Calendar.

public class FormatDate {
  public static void main(String[] args) {
    Calendar calendar = Calendar.getInstance();
    SimpleDateFormat sdf = new SimpleDateFormat("MMM-dd-yyyy hh:mm:ss");
    System.out.println(sdf.format(calendar.getTime()));
  }
}

3. Using java.time.LocalDate

LocalDate represents a date without time-zone in the ISO-8601 calendar system. Using now() method you can obtain the current date from the system clock in the default time-zone.

For formatting date you can use DateTimeFormatter class which is also added in Java 8.

public class FormatDate {
  public static void main(String[] args) {
    // get date
    LocalDate date = LocalDate.now();
    DateTimeFormatter formatter = DateTimeFormatter.ofPattern("MM/dd/yyyy");
    System.out.println(date.format(formatter));
  }
}
Output
10/10/2019

4. Using java.time.LocalTime

LocalTime represents a time without a time-zone in the ISO-8601 calendar system, such as 08:10:30.

Using now() method you can obtain the current time from the system clock in the default time-zone.

public class FormatDate {
  public static void main(String[] args) {
    // get time
    LocalTime date = LocalTime.now();
    DateTimeFormatter formatter = DateTimeFormatter.ofPattern("hh:mm:ss a");
    System.out.println(date.format(formatter));
  }
}
Output
05:11:31 PM

5. Using java.time.LocalDateTime

LocalDateTime represents a date-time without a time-zone in the ISO-8601 calendar system, such as 2007-12-03T10:15:30.

Using now() method you can obtain the current date-time from the system clock in the default time-zone.

public class FormatDate {
  public static void main(String[] args) {
    // get datetime
    LocalDateTime dateTime = LocalDateTime.now();
    DateTimeFormatter formatter = DateTimeFormatter.ofPattern("yyyy-MM-dd'T'HH:mm:ss.SSS");
    System.out.println(dateTime.format(formatter));
  }
}
Output
2019-10-10T17:14:41.098

6. Using java.time.ZonedDateTime

ZonedDateTime represents date-time with a time-zone in the ISO-8601 calendar system, such as 2007-12-03T10:15:30+01:00 Europe/Paris. If you want zone offset and time-zone then you can use ZonedDateTime instance.

public class FormatDate {
  public static void main(String[] args) {
    // get datetime
    ZonedDateTime dateTime = ZonedDateTime.now();
    //z=time-zone name, V=time-zone ID
    DateTimeFormatter formatter = DateTimeFormatter.ofPattern("yyyy-MM-dd'T'HH:mm:ss.SSS z VV");
    System.out.println(dateTime.format(formatter));
  }
}
Output
2019-10-10T17:22:31.958 IST Asia/Calcutta

That's all for the topic Getting Current Date and Time in Java. If something is missing or you have something to share about the topic please write a comment.


You may also like

September 23, 2022

Convert String to Date in Java

In this post we’ll see how to convert String to Date in Java.

For converting Date to String in Java check this post- Convert Date to String in Java

Before Java 8, SimpleDateFormat class was the option in Java for converting String to Date. Java 8 onward you can use classes in package java.time which are part of new date and time API for the conversion. We’ll see examples using methods of both of these classes.

Converting String to Date using SimpleDateFormat

You can use parse() method of the Java SimpleDateFormat class that parses text from a string to produce a Date.

First thing is to create an instance of SimpleDateFormat passing the date and time pattern for parsing. Then call parse() method passing the date String, method returns parsed Date. ParseException is thrown if unable to parse the requested result.

In the example different types of date Strings are converted to java.util.Date instances.

import java.text.ParseException;
import java.text.SimpleDateFormat;
import java.util.Date;

public class ParseDate {
  public static void main(String[] args) {
    try {
      parseDT("dd/MM/yyyy", "09/08/2019");
      
      parseDT("MM-dd-yyyy", "09-08-2019");
      // Date will default to epoch (January 1, 1970)
      parseDT("HH:mm:ss", "20:04:19");
      
      parseDT("MM-dd-yyyy HH:mm:ss", "09-08-2019 20:04:19");
    }catch (ParseException e) {
      System.out.println("Error while parsing- " + e.getMessage());
    }

  }
	
  private static void parseDT(String pattern, String dateTime) throws ParseException{
    // Create date format as per specified pattern
    SimpleDateFormat sdf = new SimpleDateFormat(pattern);
    // parsing
    Date dt = sdf.parse(dateTime);
    System.out.println("After parsing- " + dt);
  }
}
Output
After parsing- Fri Aug 09 00:00:00 IST 2019
After parsing- Sun Sep 08 00:00:00 IST 2019
After parsing- Thu Jan 01 20:04:19 IST 1970
After parsing- Sun Sep 08 20:04:19 IST 2019

Converting String to Date using new Date & Time API

Java 8 onward you can use parse() method of the LocalDate (representing date), LocalTime (representing time) and LocalDateTime (representing date and time) to convert String to Date.

There are two variants of parse method-

  • parse(CharSequence text)– Here text parameter represents the date string that has to be parsed. String must represent a valid date, time or date-time
  • parse(CharSequence text, DateTimeFormatter formatter) –You can pass an instance of DateTimeFormatter representing formatter to be used for parsing.
Converting String to LocalDate
LocalDate dt = LocalDate.parse("2019-08-03");// Date in ISO-8601 format
Converting String to LocalTime
LocalTime dt = LocalTime.parse("10:15:30");// Time in ISO-8601 format
Converting String to LocalDateTime
LocalDateTime dt = LocalDateTime.parse("2007-12-03T10:15:30");// Date-Time in ISO-8601 format
Converting String to ZonedDateTime

If there is time zone information then use ZonedDateTime.

// Date-Time with time zone in ISO-8601 format
ZonedDateTime dt = ZonedDateTime.parse("2019-07-03T10:15:30+01:00[Europe/Paris]");

Converting String to Date using custom formatter

In DateTimeFormatter class there is a static method ofPattern() using which you can specify the pattern for date time formatting.

import java.text.ParseException;
import java.text.SimpleDateFormat;
import java.time.LocalDate;
import java.time.LocalDateTime;
import java.time.LocalTime;
import java.time.ZonedDateTime;
import java.time.format.DateTimeFormatter;
import java.time.format.DateTimeParseException;
import java.util.Date;

public class ParseDate {

  public static void main(String[] args) {
    try{
      LocalDate localDate = LocalDate.parse("30/06/2019", DateTimeFormatter.ofPattern("dd/MM/yyyy"));
      System.out.println("Date " + localDate);
         
      localDate = LocalDate.parse("Thu, Sep 19, '19", DateTimeFormatter.ofPattern("EEE, MMM d, ''yy"));
      System.out.println("Date " + localDate);
      
      LocalTime localTime = LocalTime.parse("20:17:46", DateTimeFormatter.ofPattern("HH:mm:ss"));
      System.out.println("Time " + localTime);
      //DateTime
      LocalDateTime localDateTime = LocalDateTime.parse("2019-08-12T20:17:46.384Z", DateTimeFormatter.ofPattern("yyyy-MM-dd'T'HH:mm:ss.SSSz"));
      System.out.println("Date-Time " + localDateTime);
      
      // DateTime with zone offset
      ZonedDateTime zonedDateTime = ZonedDateTime.parse("2019-08-18 AD at 10:13:46 PDT", DateTimeFormatter.ofPattern("yyyy-MM-dd G 'at' HH:mm:ss z"));
      System.out.println("Date " + zonedDateTime);
      
      // DateTime with zone offset   
      zonedDateTime = ZonedDateTime.parse("2019-08-15 03:32:12-0430", DateTimeFormatter.ofPattern("yyyy-MM-dd HH:mm:ssxx"));
      System.out.println("Date " + zonedDateTime);
      
    }catch(DateTimeParseException ex){
      ex.printStackTrace();
    }		
  }
}
Output
Date 2019-06-30
Date 2019-09-19
Time 20:17:46
Date-Time 2019-08-12T20:17:46.384
Date 2019-08-18T10:13:46-07:00[America/Los_Angeles]
Date 2019-08-15T03:32:12-04:30

That's all for the topic Convert String to Date in Java. If something is missing or you have something to share about the topic please write a comment.


You may also like

September 22, 2022

React useEffect Hook With Examples

In this tutorial you'll learn about useEffect() hook in React which performs side-effects in functional components.

What is a side effect

Side effect is some task that you want to separate from rendering. Some examples of what can be termed as side effect are-

  1. Send Http Requests for storing or fetching data to Backend servers
  2. Manipulating DOM directly
  3. Setting and managing timer functions

Syntax of useEffect

useEffect(callback, [dependencies]);

The useEffect hook takes two arguments.

First argument- A callback function containing the side-effect logic. It should be executed after component rendering, if the specified dependencies (second parameter) changes.

Second argument- Dependencies of this effect which is an optional argument and passed as an array. The useEffect hook executes the callback function (first parameter) only if the dependencies changed.

When does useEffect run

When does useEffect run depends on the dependencies passed.

  1. If no dependencies are passed the side-effect is executed after every rendering.
    useEffect(() => {
      // callback logic
    });
    
  2. If an empty array is passed as dependency then the side-effect runs only once after initial render.
    useEffect(() => {
      // callback logic
    }, []);
    
  3. When dependency array has state or props passed with in the array then the side-effect runs after initial render and then only when the dependency value changes.
    useEffect(() => {
      // callback logic
    }, [prop, state]);
    

useEffect Example

Here is a simple useEffect React hook example where we have a counter stored in a state. Every click of button increments the counter by 1 (changes the state).

Every time value of counter changes we also want to log the current counter value. This logging logic should be implemented as a side-effect.

Since execution of side-effect depends on the counter value so the state variable should be passed as dependency in the useEffect hook.

Counter.js

import { useEffect, useState } from "react";
import { Button } from "react-bootstrap";

const Counter = () => {
    const [count, setCount] = useState(0);

    function countChangeHandler(){
        setCount(count + 1);
    };
    useEffect(() => {
        console.log("Count has been updated " + count)
    }, [count])
    return(
        <div>
            <p>You clicked {count} times</p>
            <Button variant="primary" onClick={countChangeHandler}>Click Me</Button>
        </div>
    );
   
}

export default Counter;

on running it by adding following tags in App.js

return (
    <Counter></Counter>
);
useEffect with dependency

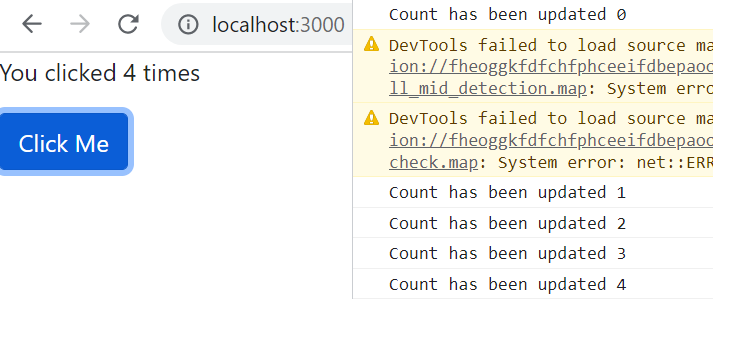
As you can see log message is logged to show count till 4 if button is clicked 4 times.

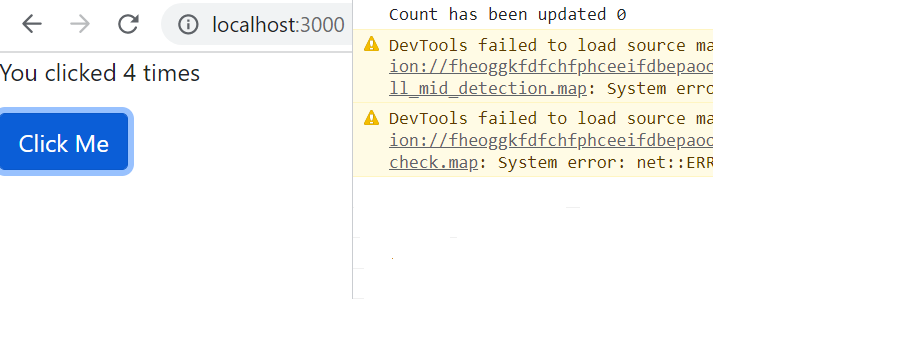
Now if you change the useEffect to have an empty array as a dependency and then run it.

useEffect(() => {
        console.log("Count has been updated " + count)
    }, [])
React useEffect without dependency

As you can notice now even if button is clicked 4 times, message is logged only once after initial render.

Component rendering and side-effect logic are separate

Component rendering and side-effect logic should be kept separate. Any side effect logic should be written as a function with in a useEffect hook.

Performing a side-effect directly in the component may affect the component rendering. If we need to perform a side effect, it should be done after component rendering is finished.

You can think of useEffect Hook as a combination of componentDidMount, componentDidUpdate, and componentWillUnmount Component lifecycle methods.

To show how it may affect the rendering if side-effect logic is placed directly in the component we'll show the frequently used login example. There are 3 components in this example one for top header, then for login page and last for landing page.

Here are the images to show the final pages.

Login Page

Landing Page after login

TopHeader.js (Uses react-bootstrap)

import { Container, Nav, Navbar } from "react-bootstrap"
const TopHeader = (props) => {
    return (
        <Navbar bg="dark" variant="dark" expand="lg">
          <Container>
            <Navbar.Brand href="#home">Login Page</Navbar.Brand>
            <Navbar.Toggle aria-controls="basic-navbar-nav" />
            <Navbar.Collapse id="basic-navbar-nav">
              <Nav className="me-auto">
                <Nav.Link href="#admin">Admin</Nav.Link>
              </Nav>
              {props.isUserAuthenticated && (
              <Nav className="justify-content-end">
                <Nav.Item>
                  <Nav.Link onClick={props.onLogout}>Logout</Nav.Link>
                </Nav.Item>
              </Nav>
              )}
            </Navbar.Collapse>
          </Container>
        </Navbar>
    );
}
export default TopHeader;

Login.js

import Form from 'react-bootstrap/Form';
import Button from 'react-bootstrap/Button';
import { Card } from 'react-bootstrap';
import { useState } from 'react';

const Login = (props) => {
    const [user, setUser] = useState('');
    const userChangeHandler = (event) => {
        setUser(event.target.value);
    }
    const submitHandler =(event) => {
        event.preventDefault();
        props.onLogin(user);
    }
    return (
        <Card className="mt-3 mx-auto" style={{ width: '25rem' }}>
            <Form onSubmit={submitHandler}  className="mx-4">
                <Form.Group className="mb-3">
                <Form.Label>User Name</Form.Label>
                <Form.Control type="text" name="name" 
                    placeholder="Enter user name"  value={user}
                    onChange={userChangeHandler} />
                </Form.Group>
                <Form.Group className="mb-3">
                <Form.Label>Password</Form.Label>
                <Form.Control type="password" name="password" 
                    placeholder="Enter password"  />
                </Form.Group>
                <div className="text-center mb-3">
                    <Button variant="primary" type='submit'>Login</Button>
                </div>
            </Form>
        </Card>
    );
}
export default Login;

LandingPage.js

const LandingPage = (props) => {
    return(
    <p>User logged in, welcome to our site</p>
    );
}
export default LandingPage;

If you want to ensure that user remains logged in if you refresh the page after user has logged in then you need to store the log in state. Suppose you do it as given below in App.js without using useEffect hook.

App.js

import { useEffect, useState} from "react";
import { Fragment } from "react";
import TopHeader from "./Components/Examples/TopHeader";
import Login from "./Components/Examples/Login";
import LandingPage from "./Components/Examples/LandingPage";
function App() {

  const [isLoggedIn, setIsLoggedIn] = useState(false);

  const loginActionHandler = (userName) => {
    // store the logged in state
    localStorage.setItem('userLoggedIn', true);
    setIsLoggedIn(true);
  }

  const logoutActionHandler = () => {
    localStorage.removeItem('userLoggedIn');
    setIsLoggedIn(false);
  }
  
  // side-effect logic Written directly
  const loggedIn = localStorage.getItem('userLoggedIn');
  if(loggedIn){
    setIsLoggedIn(true);
  }


  return (
    <Fragment>
    <TopHeader isUserAuthenticated={isLoggedIn} onLogout={logoutActionHandler}></TopHeader>
    {!isLoggedIn && <Login onLogin={loginActionHandler}></Login>}
    {isLoggedIn && <LandingPage onLogout={logoutActionHandler}></LandingPage>}
    </Fragment>
  );
};

export default App;

With this way you will get the following error for the infinite re-rendering.

Error: Too many re-renders. React limits the number of renders to prevent an infinite loop.

This happens because you are changing the state again in the if condition. It triggers component rendering because of state change comes back to the same if condition and again triggers component rendering resulting in infinite loop.

if(loggedIn){
    setIsLoggedIn(true);
  }

That is why side-effect logic, which in this case is to verify whether user is already logged in while rendering should be written as a callback function with in the useEffect hook.

  useEffect(()=>{
    const loggedIn = localStorage.getItem('userLoggedIn');
    if(loggedIn){
      setIsLoggedIn(true);
    }
  }, []);

With that change Login and Logout logic should work fine, even if page is refreshed after user logs in.

cleanup function in useEffect

Some side-effects require a clean up in order to avoid memory leaks. Some examples are clear timers, close subscriptions, close sockets.

With in your useEffect hook return a function with the cleanup logic. This function is considered the side-effect cleanup function by useEffect.

useEffect(() => {
  // Side-effect logic
  ...
  return function cleanup() {
    // cleanup logic
    ...
  };
}, [dependencies]);

Here is an example when the side-effect cleanup is used. Again, we have a counter that is incremented every second, to do that setTimeout function is used. To cleanup this side-effect timer is stopped by returning a clearTimeout function.

import { useEffect, useState } from "react";

const Counter = () => {
    const [count, setCount] = useState(0);

    function countChangeHandler(){
        setCount(count + 1);
    };
    useEffect(() => {
        let timer = setTimeout(
            () => {
                setCount(count + 1);
            }, 1000);
        // cleanup
        return () => clearTimeout(timer);
    }, [count])
    return(
        <div>
            <p>Current count is {count}</p>
        </div>
    );
   
}

export default Counter;

That's all for the topic React useEffect Hook With Examples. If something is missing or you have something to share about the topic please write a comment.


You may also like

September 21, 2022

Convert Date to String in Java

In this post we’ll see how to convert Date to String in Java.

For converting String to Date in Java check this post- Convert String to Date in Java

Before Java 8, SimpleDateFormat was the class to use for converting Date to String with the specified formatting. Java 8 onward there is another option java.time.format.DateTimeFormatter class that can be used for the conversion.

Converting Date to String using SimpleDateFormat

While creating an instance of SimpleDateFormat you can pass the pattern for formatting. SimpleDateFormat has a format method which takes Date instance as parameter and returns the formatted date (and time) string.

Here is an example where current date is converted to String using different date and time formatting patterns.

import java.text.SimpleDateFormat;
import java.util.Date;

public class FormatDate {
  public static void main(String[] args) {
    // For date in format 2019.07.04 AD at 11:08:54 IST
    formatDate("yyyy.MM.dd G 'at' HH:mm:ss z");
    // For date in format Mon, Oct 7, '19
    formatDate("EEE, MMM d, ''yy");
    // For date in format Monday, October 07, 2019
    formatDate("EEEE, MMMM dd, yyyy");
    // For time in format 07 o'clock PM, India Standard Time
    formatDate("hh 'o''clock' a, zzzz");
    // For time in 24 Hr format 19:41:59:635 PM
    formatDate("HH:mm:ss:SSS a");
    // For date-time in format 2019-10-07T19:27:38.571+0530
    formatDate("yyyy-MM-dd'T'HH:mm:ss.SSS Z");
    // For date in format 05/08/2016
    formatDate("MM/dd/yyyy");
    // For date in format 07/10/2019 19:29:40 PM
    formatDate("dd/MM/yyyy HH:mm:ss a");
    // For date in format 07/10/2019 19:29:40 PM
    formatDate("dd/MMM/yyyy GGG HH:mm:ss:SSS a");
  }

  private static void formatDate(String pattern){
    Date dt = new Date();
    // Create date format as per specified pattern
    SimpleDateFormat sdf = new SimpleDateFormat(pattern);
    String formattedDate = sdf.format(dt);
    System.out.println("Formatted Date- " + formattedDate +
              " for Pattern: " + pattern); 
  }
}
Output
Formatted Date- 2019.10.09 AD at 18:15:53 IST for Pattern: yyyy.MM.dd G 'at' HH:mm:ss z
Formatted Date- Wed, Oct 9, '19 for Pattern: EEE, MMM d, ''yy
Formatted Date- Wednesday, October 09, 2019 for Pattern: EEEE, MMMM dd, yyyy
Formatted Date- 06 o'clock PM, India Standard Time for Pattern: hh 'o''clock' a, zzzz
Formatted Date- 18:15:53:978 PM for Pattern: HH:mm:ss:SSS a
Formatted Date- 2019-10-09T18:15:53.979 +0530 for Pattern: yyyy-MM-dd'T'HH:mm:ss.SSS Z
Formatted Date- 10/09/2019 for Pattern: MM/dd/yyyy
Formatted Date- 09/10/2019 18:15:53 PM for Pattern: dd/MM/yyyy HH:mm:ss a
Formatted Date- 09/Oct/2019 AD 18:15:53:981 PM for Pattern: dd/MMM/yyyy GGG HH:mm:ss:SSS a

Converting Date to String using DateTimeFormatter

In DateTimeFormatter class there is a static method ofPattern() using which you can specify the pattern for date time formatting.

using format() method of the LocalDate (representing date), LocalTime (representing time) and LocalDateTime (representing date and time) you can convert Date to String.

DateTimeFormatter instance created using ofPattern() method is passed as parameter in format() method.

import java.time.LocalDate;
import java.time.LocalDateTime;
import java.time.LocalTime;
import java.time.format.DateTimeFormatter;

public class FormatDate {
  public static void main(String[] args) {
    // LocalDateTime
    // For date in format 2019.07.04 AD at 11:08:54 IST
    LocalDateTime dateTime = LocalDateTime.now();
    DateTimeFormatter formatter = DateTimeFormatter.ofPattern("yyyy.MM.dd G 'at' HH:mm:ss");
    String formattedDate = dateTime.format(formatter);
    System.out.println("Formatted Date- " + formattedDate);
    
    // For date in format Mon, Oct 7, '19
    formatter = DateTimeFormatter.ofPattern("EEE, MMM d, ''yy");
    formattedDate = dateTime.format(formatter);
    System.out.println("Formatted Date- " + formattedDate);

    // For date in format Monday, October 07, 2019
    formatter = DateTimeFormatter.ofPattern("EEEE, MMMM dd, yyyy");
    formattedDate = dateTime.format(formatter);
    System.out.println("Formatted Date- " + formattedDate);
    
    // For date-time in format 2019-10-07T19:27:38.571+0530
    formatter = DateTimeFormatter.ofPattern("yyyy-MM-dd'T'HH:mm:ss.SSS");
    formattedDate = dateTime.format(formatter);
    System.out.println("Formatted Date- " + formattedDate);
    
    // For date in format 07/10/2019 19:29:40 PM
    formatter = DateTimeFormatter.ofPattern("dd/MM/yyyy HH:mm:ss a");
    formattedDate = dateTime.format(formatter);
    System.out.println("Formatted Date- " + formattedDate);
    
    // For date in format 07/Oct/2019 AD 14:25:51:048 PM
    formatter = DateTimeFormatter.ofPattern("dd/MMM/yyyy GGG HH:mm:ss:SSS a");
    formattedDate = dateTime.format(formatter);
    System.out.println("Formatted Date- " + formattedDate);
    
    // LocalTime
    LocalTime time = LocalTime.now();
    // For time in 24 Hr format 19:41:59:635 PM
    formatter = DateTimeFormatter.ofPattern("HH:mm:ss:SSS a");
    formattedDate = time.format(formatter);
    System.out.println("Formatted Time- " + formattedDate);
    
    // LocalDate
    LocalDate date = LocalDate.now();
    // For date in format 05/08/2016
    formatter = DateTimeFormatter.ofPattern("MM/dd/yyyy");
    formattedDate = date.format(formatter);
    System.out.println("Formatted Date- " + formattedDate);
  }
	
}
Output
Formatted Date- 2019.10.10 AD at 14:27:38
Formatted Date- Thu, Oct 10, '19
Formatted Date- Thursday, October 10, 2019
Formatted Date- 2019-10-10T14:27:38.014
Formatted Date- 10/10/2019 14:27:38 PM
Formatted Date- 10/Oct/2019 AD 14:27:38:014 PM
Formatted Time- 14:27:38:194 PM
Formatted Date- 10/10/2019

If you have Zone offset (Z) or time zone name (z) in the patterns then you’d need a ZonedDateTime instance as LocalDateTime does not have a field or value for the timezone.

import java.time.ZonedDateTime;
import java.time.format.DateTimeFormatter;

public class FormatDate {

  public static void main(String[] args) {
    formatDate("yyyy.MM.dd G 'at' HH:mm:ss z");
    // For time in format 07 o'clock PM, India Standard Time
    formatDate("hh 'o''clock' a, zzzz");
    // For date-time in format 2019-10-07T19:27:38.571+0530
    formatDate("yyyy-MM-dd'T'HH:mm:ss.SSS Z");
  }

  private static void formatDate(String pattern){
    ZonedDateTime dateTime = ZonedDateTime.now();
    // Create DateTimeFormatter instance as per specified pattern
    DateTimeFormatter formatter = DateTimeFormatter.ofPattern(pattern);
    String formattedDate = dateTime.format(formatter);
    System.out.println("Formatted Date- " + formattedDate +
              " for Pattern: " + pattern); 
  }
}
Output
Formatted Date- 2019.10.09 AD at 18:25:00 IST for Pattern: yyyy.MM.dd G 'at' HH:mm:ss z
Formatted Date- 06 o'clock PM, India Standard Time for Pattern: hh 'o''clock' a, zzzz
Formatted Date- 2019-10-09T18:25:00.975 +0530 for Pattern: yyyy-MM-dd'T'HH:mm:ss.SSS Z

Using DateTimeFormatter.ofLocalizedDate() method

In DateTimeFormatter class there are also following static methods that can be used for converting date and time to String.

  • ofLocalizedDate(FormatStyle dateStyle)- Returns a locale specific date format for the ISO chronology.
  • ofLocalizedDateTime(FormatStyle dateTimeStyle)- Returns a locale specific date-time formatter for the ISO chronology.
  • ofLocalizedDateTime(FormatStyle dateStyle, FormatStyle timeStyle)- Returns a locale specific date and time format for the ISO chronology.
  • ofLocalizedTime(FormatStyle timeStyle)- Returns a locale specific time format for the ISO chronology.

Here java.time.format.FormatStyle is an Enum that has the following constant fields-

  • FULL- Full text style, with the most detail. For example, the format might be 'Tuesday, April 12, 1952 AD' or '3:30:42pm PST'.
  • LONG- Long text style, with lots of detail. For example, the format might be 'January 12, 1952'.
  • MEDIUM- Medium text style, with some detail. For example, the format might be 'Jan 12, 1952'.
  • SHORT- Short text style, typically numeric. For example, the format might be '12.13.52' or '3:30pm'.
import java.time.LocalDateTime;
import java.time.format.DateTimeFormatter;
import java.time.format.FormatStyle;

public class FormatDate {
  public static void main(String[] args) {
    LocalDateTime dateTime = LocalDateTime.now();
    System.out.println("Full format- " +dateTime.format(DateTimeFormatter.ofLocalizedDate(FormatStyle.FULL)));
    System.out.println("LONG format- " +dateTime.format(DateTimeFormatter.ofLocalizedDate(FormatStyle.LONG)));
    System.out.println("MEDIUM format- " +dateTime.format(DateTimeFormatter.ofLocalizedDate(FormatStyle.MEDIUM)));
    System.out.println("SHORT format- " +dateTime.format(DateTimeFormatter.ofLocalizedDate(FormatStyle.SHORT)));
  }
}
Output
Full format- Wednesday, 9 October, 2019
LONG format- 9 October 2019
MEDIUM format- 09-Oct-2019
SHORT format- 09/10/19

That's all for the topic Convert Date to String in Java. If something is missing or you have something to share about the topic please write a comment.


You may also like

September 20, 2022

Java Date Difference Program

In this post we’ll see how to calculate date and time difference in Java in terms of Years, months, days and hours, minutes, seconds.

To calculate difference between two dates in Java you can use SimpleDateFormat class though using that involves a lot of manual calculation and it doesn’t take time zones, day light saving into account.

To mitigate these shortcoming a new Date and Time API is added in Java 8 which provides classes to calculate date and time difference using inbuilt methods and also take into consideration time zones, day light saving and leap years while calculating difference.

Difference between two dates Using SimpleDateFormat

import java.text.ParseException;
import java.text.SimpleDateFormat;
import java.util.Date;
import java.util.concurrent.TimeUnit;

public class DifferenceDate {
  public static void main(String[] args) {
    try {
      dateDiff("15/08/2019 09:10:05", "04/09/2019 14:22:15", "dd/MM/yyyy HH:mm:ss");
    } catch (ParseException e) {
      // TODO Auto-generated catch block
         e.printStackTrace();
    }
  }
	
  private static void dateDiff(String date1, String date2, String pattern) throws ParseException{
    SimpleDateFormat sdf = new SimpleDateFormat(pattern);
    Date d1 = sdf.parse(date1);
    Date d2 = sdf.parse(date2);
    long diffInMillis = d2.getTime() - d1.getTime();
    
    long daysDiff = TimeUnit.DAYS.convert(diffInMillis, TimeUnit.MILLISECONDS);
    
    long hoursDiff = TimeUnit.HOURS.convert(diffInMillis - (daysDiff * 24 * 60 * 60 * 1000), TimeUnit.MILLISECONDS);

    long minutesDiff = TimeUnit.MINUTES.convert(diffInMillis - (daysDiff * 24 * 60 * 60 * 1000) - (hoursDiff * 60 * 60 * 1000), TimeUnit.MILLISECONDS);

    long secondsDiff = TimeUnit.SECONDS.convert(diffInMillis - (daysDiff * 24 * 60 * 60 * 1000) - (hoursDiff * 60 * 60 * 1000) - (minutesDiff * 60 * 1000), TimeUnit.MILLISECONDS);

    System.out.println(daysDiff + " day(s) " + hoursDiff + " Hour(s) " + minutesDiff + " Minute(s) " + secondsDiff + " Second(s)");
  }
}
Output
20 day(s) 5 Hour(s) 12 Minute(s) 10 Second(s)

As you can see using SimpleDateFormat requires lot of manual effort where you need to convert as per the required time unit.

Difference between two dates using Java 8 classes

In the new date and time API in Java 8 there are following classes that can be used for date difference calculation.

  • java.time.Period- A date-based amount of time, supported units of a period are YEARS, MONTHS and DAYS.
  • java.time.Duration- A time-based amount of time. This class models a quantity or amount of time in terms of seconds and nanoseconds. It can be accessed using other duration-based units, such as minutes and hours.
  • java.time.temporal.TemporalUnit- TemporalUnit is an interface that represents a unit of date-time, such as Days or Hours.
  • java.time.temporal.ChronoUnit- It is an Enum that implements TemporalUnit interface.

Difference between two dates in terms of years, months, days

Difference between two dates in date-based amount of time can be calculated using Period class.

import java.time.LocalDate;
import java.time.Period;

public class DifferenceDate {
  public static void main(String[] args) {
    LocalDate date1 = LocalDate.of(2018, 8, 15);
    LocalDate date2 = LocalDate.of(2019, 9, 4);
    dateDiff(date1, date2);
  }
	
  private static void dateDiff(LocalDate date1, LocalDate date2){
    Period p = Period.between(date1, date2);		
    System.out.printf("%d Year(s) %d Month(s) %d Day(s)", p.getYears(), p.getMonths(), p.getDays());
  }
}
Output
1 Year(s) 0 Month(s) 20 Day(s)

Difference between two dates in terms of days, hours, minutes, seconds

Difference between two dates in a time-based amount of time can be calculated using Duration class.

public class DifferenceDate {

  public static void main(String[] args) {
    LocalDateTime date1 = LocalDateTime.of(2019, 9, 3, 9, 10, 5);
    LocalDateTime date2 = LocalDateTime.of(2019, 9, 4, 14, 22, 15);
    dateDiff(date1, date2);
  }
	
  private static void dateDiff(LocalDateTime date1, LocalDateTime date2){
    Duration d = Duration.between(date1, date2);	
    System.out.printf("%d Day(s) %d Hour(s) %d Minute(s) %d Second(s)", d.toDays(), d.toHoursPart(), d.toMinutesPart(), d.toSecondsPart());
  }
}
Output
1 Day(s) 5 Hour(s) 12 Minute(s) 10 Second(s)

Using both Period and Duration classes to calculate date difference

import java.time.Duration;
import java.time.LocalDateTime;
import java.time.Period;

public class DifferenceDate {
  public static void main(String[] args) {
    LocalDateTime date1 = LocalDateTime.of(2018, 7, 2, 12, 18, 13);
    LocalDateTime date2 = LocalDateTime.of(2019, 9, 4, 14, 22, 15);
    dateDiff(date1, date2);
  }

  private static void dateDiff(LocalDateTime date1, LocalDateTime date2){
    Period p = Period.between(date1.toLocalDate(), date2.toLocalDate());
    Duration d = Duration.between(date1, date2);
    System.out.printf("%d Year(s) %d Month(s) %d Day(s) %d Hour(s) %d Minute(s) %d Second(s)", 
        p.getYears(), p.getMonths(), p.getDays(), d.toHoursPart(), d.toMinutesPart(), d.toSecondsPart());
  }
}
Output
1 Year(s) 2 Month(s) 2 Day(s) 2 Hour(s) 4 Minute(s) 2 Second(s)

Using ChronoUnit to find difference

If you want the total difference in terms of units then ChronoUnit can also be used.

public class DifferenceDate {

  public static void main(String[] args) {
    LocalDateTime date1 = LocalDateTime.of(2019, 9, 3, 9, 10, 5);
    LocalDateTime date2 = LocalDateTime.of(2019, 9, 4, 14, 22, 15);
    dateDiff(date1, date2);
  }
	
  private static void dateDiff(LocalDateTime date1, LocalDateTime date2){
    long daysDiff = ChronoUnit.DAYS.between(date1, date2);
    long hoursDiff = ChronoUnit.HOURS.between(date1, date2);
    long minutesDiff = ChronoUnit.MINUTES.between(date1, date2);
    long secondsDiff = ChronoUnit.SECONDS.between(date1, date2);
    long millisDiff = ChronoUnit.MILLIS.between(date1, date2);
    long nanoDiff = ChronoUnit.NANOS.between(date1, date2);
    
    System.out.println("Days- "+ daysDiff);
    System.out.println("Hours- "+ hoursDiff);
    System.out.println("Minutes- "+ minutesDiff);
    System.out.println("Seconds- "+ secondsDiff);
    System.out.println("Millis- "+ millisDiff);
    System.out.println("Nano Seconds- "+ nanoDiff);
  }
}
Output
Days- 1
Hours- 29
Minutes- 1752
Seconds- 105130
Millis- 105130000
Nano Seconds- 105130000000000

That's all for the topic Java Date Difference Program. If something is missing or you have something to share about the topic please write a comment.


You may also like

September 19, 2022

Spring Boot MVC Form Validation Example

In this Spring Boot MVC tutorial we’ll see how to validate form fields using standard validation annotations.

Form validation is important part of web applications where user input is required so that users can’t enter invalid values. You will also see how to display error messages in front of the field with invalid value so that the user can re-enter input to make it valid.

Starter dependencies

Starter dependencies that you will be selecting for this Spring Boot form validation example are-

spring-boot-starter-web spring-boot-starter-thymeleaf spring-boot-devtools

Example uses Thymeleaf templates for view thus the thymeleaf starter.

Applications that use spring-boot-devtools will automatically restart whenever files on the classpath change, so you don't have to rebuild and restart the server yourself every time.

Maven – pom.xml

pom.xml with the above mentioned starter dependencies.

<dependency>
  <groupId>org.springframework.boot</groupId>
  <artifactId>spring-boot-starter-thymeleaf</artifactId>
</dependency>
<dependency>
  <groupId>org.springframework.boot</groupId>
  <artifactId>spring-boot-starter-web</artifactId>
</dependency>
<!-- For hot swapping -->
<dependency>
  <groupId>org.springframework.boot</groupId>
  <artifactId>spring-boot-devtools</artifactId>
  <optional>true</optional>
</dependency>

Bean Validation API and Hibernate Validator

For form fields validation, Bean Validation API is used which defines some annotations that reside in javax.validation.constraints package.

Note that Bean Validation API just provide the interfaces, Hibernate Validator is the implementation of the API.

You will get required jars just by including the spring-boot-starter-web. All you need to do is to use the annotations with the fields to specify the constraints.

Some of the annotations that are defined in Java Bean Validation API are as follows-

  • @NotBlank- The annotated element must not be null and must contain at least one non-whitespace character.
  • @NotEmpty- The annotated element must not be null nor empty.
  • @NotNull- The annotated element must not be null.
  • @Size- The annotated element size must be between the specified boundaries. Boundaries can be specifies using main and max attributes.
  • @Digits- The annotated element must be a number within accepted range.
  • @Max- The annotated element must be a number whose value must be lower or equal to the specified maximum.
  • @Min- The annotated element must be a number whose value must be higher orequal to the specified minimum.
  • @Email- The string has to be a well-formed email address.

Spring Boot form validation example steps

What we are building here is a Thymeleaf view which is a form for User registration. The classes that are needed are-

  1. A Model bean class (User.java) with fields annotated with required constraints.
  2. userform.html Thymeleaf template which is the user registration form UI.
  3. When submit button is clicked in the registration form Validation for the fields happen, if there is any error registration form is shown again with the error messages. If there is no error then entered user data is displayed using user.html Thymeleaf template.

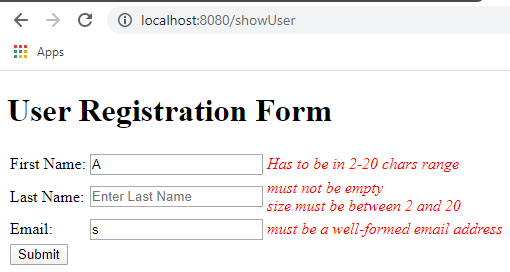
Screen shot of the form with validation errors-

Spring Boot form validation

Spring Boot form validation - Model class

There is a model class User with the fields and the constraints.

import javax.validation.constraints.Email;
import javax.validation.constraints.NotEmpty;
import javax.validation.constraints.Size;

public class User {
  @NotEmpty(message = "Field can't be left empty")
  @Size(min=2, max=20, message = "Has to be in 2-20 chars range")
  private String firstName;
  @NotEmpty
  @Size(min=2, max=20)
  private String lastName;
  @NotEmpty
  @Email
  private String email;
  public String getFirstName() {
    return firstName;
  }
  public void setFirstName(String firstName) {
    this.firstName = firstName;
  }
  public String getLastName() {
    return lastName;
  }
  public void setLastName(String lastName) {
    this.lastName = lastName;
  }
  public String getEmail() {
    return email;
  }
  public void setEmail(String email) {
    this.email = email;
  }	
}

As you can see fields are annotated with the required constraints.

  • firstName can’t be null or empty and must have 2 to 20 characters.
  • lastName can’t be null or empty and must have 2 to 20 characters.
  • email can’t be empty and should be a well formed email.

You can specify your own messages using ‘message’ attribute if no message is specified then default message is displayed.

Spring Boot form validation - Thymeleaf templates

In src/main/resources/templates create a userform.html file.

<!DOCTYPE html>
<html>
<head>
<meta charset="ISO-8859-1">
<title>Spring Boot form validation</title>
<link rel="stylesheet" th:href="@{/css/style.css}"/>
</head>
<body>
  <h1>User Registration Form</h1>
  <form action="#" th:action="@{/showUser}" th:object="${user}" method="post">
    <table>
      <tr>
        <td>First Name:</td>
        <td><input type="text" th:field="*{firstName}" placeholder="Enter First Name"/></td>
        <td th:if="${#fields.hasErrors('firstName')}" th:errors="*{firstName}" class="error"></td>
      </tr>
      <tr>
        <td>Last Name:</td>
        <td><input type="text" th:field="*{lastName}" placeholder="Enter Last Name"/></td>
        <td th:if="${#fields.hasErrors('lastName')}" th:errors="*{lastName}" class="error"></td>
      </tr>
      <tr>
        <td>Email:</td>
        <td><input type="text" th:field="*{email}" placeholder="email"/></td>
        <td th:if="${#fields.hasErrors('email')}" th:errors="*{email}" class="error"></td>
      </tr>
      <tr>
        <td><button type="submit">Submit</button></td>
      </tr>
    </table>
  </form>
</body>
</html>

In the form tag action is specified as “/showUser” (th:action="@{/showUser}") and the method is post. Object this form is bound with is the user object (th:object="${user}")

With every field a new column is added for rendering validation error message.

<td th:if="${#fields.hasErrors('firstName')}" th:errors="*{firstName}" class="error"></td>

Another template that is used for displaying User data src/main/resources/templates/user.html

<!DOCTYPE html>
<html>
<head>
<meta charset="ISO-8859-1">
<title>Insert title here</title>
</head>
<body>
  <h1>User Details</h1>
  <table>
    <tr><td th:text="'First Name: ' + ${user.firstName}"></td> </tr>
    <tr><td th:text="'Last Name: ' + ${user.lastName}"></td> </tr>
    <tr><td th:text="'Email: ' + ${user.email}"></td> </tr>
  </table>
</body>
</html>

There is also a CSS class used for styling the error messages, you would have noticed its usage in src/main/resources/templates/userform.html file.

<link rel="stylesheet" th:href="@{/css/style.css}"/>

And here

<td th:if="${#fields.hasErrors('email')}" th:errors="*{email}" class="error">

So create a file src/main/resources/static/css/style.css

.error {
  color: red;
  font-style: italic;
}

Spring Boot form validation – Controller class

In UserController.java class there are handler methods mapped to URL paths.

import javax.validation.Valid;
import org.springframework.stereotype.Controller;
import org.springframework.ui.Model;
import org.springframework.validation.BindingResult;
import org.springframework.web.bind.annotation.GetMapping;
import org.springframework.web.bind.annotation.ModelAttribute;
import org.springframework.web.bind.annotation.PostMapping;
import com.knpcode.sb.model.User;

@Controller
public class UserController {
  @GetMapping(value = "/registerUser")
  public String registerUser(Model model) { 
    model.addAttribute("user", new User());
    return "userform";
  }
	
  @PostMapping(value="/showUser")
  public String showUser(@Valid @ModelAttribute("user") User user, BindingResult result, Model model) { 
    if(result.hasErrors()) {
      return "userform";
    }
    model.addAttribute("user", user);
    return "user";
  }
}

In the showUser method there is a @Valid annotation used with the User class object. Using @Valid annotation ensures that the constraints defined on the object and its properties are to be validated.

If there are validation errors or not is checked using instance of BindingResult. If there are validation errors registration form is rendered again with the error messages otherwise logical view name “user” is returned which renders the user.html template.

Application class

You can run the application by executing the application class which has the main method.

import org.springframework.boot.SpringApplication;
import org.springframework.boot.autoconfigure.SpringBootApplication;

@SpringBootApplication
public class SpringBootProjectApplication {
  public static void main(String[] args) {
    SpringApplication.run(SpringBootProjectApplication.class, args);
  }
}

Once the application has successfully started you can access the application using the URL’s as per the controller mapping.

http://localhost:8080/registerUser

Spring Boot MVC

http://localhost:8080/showUser

With validation errors

Spring Boot MVC form

That's all for the topic Spring Boot MVC Form Validation Example. If something is missing or you have something to share about the topic please write a comment.


You may also like