October 30, 2023

Setting Error Page (404 Page) in React Router

In this article we'll see how to show an error page (404 page not found) with React Router.

Anytime your app throws an error while rendering, loading data, or performing data mutations, React Router will catch it and render an error screen. Default error screen in React Router is shown below.

Default error page

You can create your own custom error page that should be displayed in case of any error.

Note in this article error page is created using the React Router V6.4 element 'errorElement' and the useRouteError() hook. This feature works only if you are using a data router like createBrowserRouter.

Creating error page component

If your app throws an error while rendering, loading data, or performing data mutations instead of the normal render path for your Routes (<Route element>), the error path will be rendered (<Route errorElement>) and the error made available with useRouteError.

In our error page we can use useRouteError() hook to access error and show message using that error object.

src\components\Routes\ErrorPage.js

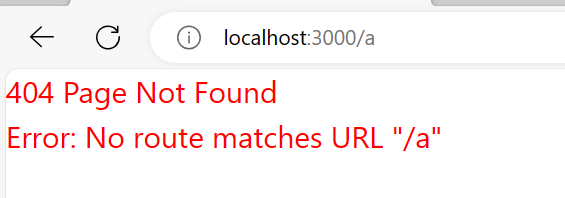
This is the error page displayed in case of any error.

import { useRouteError } from "react-router-dom";

const ErrorPage = () => {
    const error = useRouteError();
    //console.log(error);
    return (
        <div>
          <p style={{color: "red", fontSize:"20px"}}>
            
            {error.status === 404 ? "404 Page Not Found" : ""}
            <br />
            {error.data}
          </p>
        </div>
    );
}

export default ErrorPage;

Since you have access to error object you can check the error status and return appropriate message as done here for '404' error status.

Setting errorPage using errorElement

src\components\Routes\route.js

import { createBrowserRouter } from "react-router-dom";
import About from "./about";
import ErrorPage from "./ErrorPage";
import Home from "./home";
import Navigation from "./navigation";

export const router = createBrowserRouter([
    {path: "/", element: <Navigation />, errorElement: <ErrorPage />,
     children: [
        {index: true, element: <Home /> },
        {path: "/about", element: <About />}
     ]
    },        
])

Notice the configuration of errorPage using errorElement in the parent route. You can also use the errorElement with specific routes.

Keeping errorElement with the parent route works for all the routes because errors will bubble up through parent routes when a route does not have an errorElement. Putting an errorElement at the top of your route tree gives you an opportunity to handle nearly every error in your app in one place.

Trying to access a non-existent page.

Error page in React Router

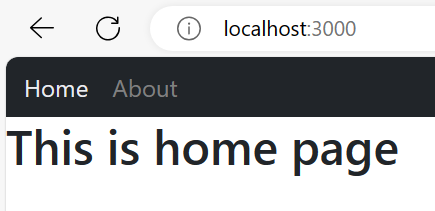
Please refer this post- React Router - NavLink in react-router-dom to get code for other Components like Navigation, Home and About.

That's all for the topic Setting Error Page (404 Page) in React Router. If something is missing or you have something to share about the topic please write a comment.


You may also like

October 25, 2023

Index Route in React Router

In this tutorial we'll see what is index route in react router.

Index routes in react-router

In most of the cases you'll have a default child route matching the parent route's exact path.

For example, in the following route definition you can notice one parent route with path as "/" and also a child route with the same path as "/".

export const router = createBrowserRouter([
    {path: "/", element: <Navigation />,
     children: [
        {path: "/", element: <Home /> },
        {path: "/about", element: <About />}
     ]
    },        
])

In such cases you can configure child route as an index route. That tells the router to match and render this route when the user is at the parent route's exact path.

All you have to do is use { index:true } instead of { path: "" } to configure a route as an index route.

Index route React example

We'll use the same example as used in the post- React Router - NavLink in react-router-dom

Only change that is needed is in src\components\Routes\route.js

import { createBrowserRouter } from "react-router-dom";
import About from "./about";
import Home from "./home";
import Navigation from "./navigation";

export const router = createBrowserRouter([
    {path: "/", element: <Navigation />,
     children: [
        {index: true, element: <Home /> },
        {path: "/about", element: <About />}
     ]
    },        
])

In the child route for Home page instead of path, index: true is used to make it an index route so that it becomes a default child route. Whenever user is at the parent route's exact path this default child route is matched.

That's all for the topic Index Route in React Router. If something is missing or you have something to share about the topic please write a comment.


You may also like

October 9, 2023

React Router - NavLink in react-router-dom

In the post React Router - Link in react-router-dom we saw how you create navigational links in React routing. If you are using a framework like Bootstrap for styling with <Link> it works fine and you will have proper space between links, active link and non-active link styling will also be taken care of. But you may want more control over styling of links and that is possible with <NavLink> in React Router.

<NavLink> in React Router

Navlink is another way to create link which provides some extra functionalities. With NavLink you have the capability to know whether link is in "active" or "pending" state. This is useful when building a navigation menu where you want to highlight the currently selected menu item.

Navlink also provides useful context for assistive technology like screen readers.

How to get menu state information

The className prop used with NavLink takes a function which returns a css class name that should be added for styling. This function also receives an object which you can destructure to get isActive and isPending property.

These properties are of type Boolean. If current link is active then isActive has the value true otherwise value is false.

<NavLink
  to="/home"
  className={({ isActive, isPending }) =>
    isPending ? "pending" : isActive ? "active" : ""
  }
>
  Home
</NavLink>

An active class is also added to a <NavLink> component, when it is active, by default. So you can use CSS to style it.

Navigation menu using NavLink - React Example

Let's first create a navigation menu page

src\components\Routes\navigation.js

import { NavLink, Outlet } from "react-router-dom"
import "./navigation.css";

const Navigation = () => {
    return(
        <>
            <nav id="menu" className="navbar navbar-expand-lg bg-dark navbar-dark">
                <div className="container-fluid">
                    <button className="navbar-toggler" type="button" data-bs-toggle="collapse" data-bs-target="#navbarNav" aria-controls="navbarNav" aria-expanded="false" aria-label="Toggle navigation">
                        <span className="navbar-toggler-icon"></span>
                    </button>

                    <div className="collapse navbar-collapse" id="navbarNav">
                        <ul className="navbar-nav">
                            <li className="nav-item">
                                <NavLink 
                                    to="/" 
                                    className={({ isActive }) => isActive ? "active" :""} 
                                    end
                                >
                                    Home
                                </NavLink>
                            </li>
                            <li className="nav-item">
                                <NavLink 
                                    to="/about"
                                    className={({ isActive }) => isActive ? "active" :""} 
                                >
                                    About
                                </NavLink>
                            </li>
                        </ul>
                    </div>
                </div>
            </nav>
            <Outlet />
        </>
    );
}

export default Navigation;

As you can see with NavLink there is a function to check if isActive property is true or not. If it is true then active class is added.

src\components\Routes\navigation.css

#menu a:link,
#menu a:visited {
    color: gray;
}
#menu a:hover {
    color: white;
}
#menu a.active {
    color:#ebecf0;
}

#menu a {
    text-decoration: none;
}

#menu ul {
    gap: 1rem;
}

Route Definition

src\components\Routes\route.js

import { createBrowserRouter } from "react-router-dom";
import About from "./about";
import Home from "./home";
import Navigation from "./navigation";

export const router = createBrowserRouter([
    {path: "/", element: <Navigation />,
     children: [
        {path: "/", element: <Home /> },
        {path: "/about", element: <About />}
     ]
    },        
])

Providing the routes

Provide the route definition to your application using the <RouteProvider> component.

import { RouterProvider } from 'react-router-dom';
import { router } from './components/Routes/route';

function App() {
  return <RouterProvider router={router}></RouterProvider>
}

export default App;

Components

src\components\Routes\home.js

const Home = () => {
    return (
        <>
            <h2>This is home page</h2>
        </>
    )
}

export default Home;

src\components\Routes\about.js

const About = () => {
    return <h2>This is a router demo</h2>
}
export default About;

When Home is clicked

NavLink in react-router-dom

When About is clicked

NavLink react example

end prop in NavLink

There is also an end prop used with NavLink to change the matching logic for the active and pending states to only match to the "end" of the NavLink's to path. Without using 'end' any URL that has path given in "to" within it will be matched even if path is longer. With 'end' it is an exact match, If the URL is longer than to, it will no longer be considered active.

For example, without using end; link <NavLink to="/tasks" /> will be matched for both '/tasks' and '/tasks/123' resulting in ‘isActive’ being true in both cases.

With this link where 'end' is also used- <NavLink to="/tasks" end /> isActive will be true only for '/tasks' not for '/tasks/123'

Using end with root route

As per react-router documentation you don't need to add end with root route so <NavLink to="/" end> is not required.

“<NavLink to="/"> is an exceptional case because every URL matches /. To avoid this matching every single route by default, it effectively ignores the end prop and only matches when you're at the root route.”

That's all for the topic React Router - NavLink in react-router-dom. If something is missing or you have something to share about the topic please write a comment.


You may also like

Installing Bootstrap in React

In this post we'll see how to add Bootstrap library to Reactjs.

Bootstrap is one of the most popular feature-packed frontend toolkit for developing responsive, mobile-first application. There are several pre-styled components provided by Bootstrap to be used as it is.

Installing Bootstrap in React application

Assuming you have already created a React project using create-react-app just go to the project folder and run the following command to install Bootstrap.

npm install bootstrap

If you are using yarn then

yarn add bootstrap

Note that using the above command installs the latest Bootstrap version. If you want to install specific version then specify it with @.

npm install bootstrap@4.6.2

Verify the bootstrap installation

You can go to the package.json and there you should see the entry for bootstrap in the dependency section if it is installed.

"dependencies": {
    "@reduxjs/toolkit": "^1.9.5",
    "@testing-library/jest-dom": "^5.17.0",
    "@testing-library/react": "^13.4.0",
    "@testing-library/user-event": "^13.5.0",
    "bootstrap": "^5.3.0",
    "cors": "^2.8.5",
    "express": "^4.18.2",
    "react": "^18.2.0",
    "react-dom": "^18.2.0",
    "react-redux": "^8.1.1",
    "react-router-dom": "^6.16.0",
    "react-scripts": "5.0.1",
    "redux": "^4.2.1",
    "web-vitals": "^2.1.4",
    "ws": "^8.13.0"
  },

Include Bootstrap's CSS and JS

In order to use Bootstrap you also need to import it in the components where it is needed. Rather than doing it in each component separately, it is better to import it in index.js file so that it is available to all the components.

import 'bootstrap/dist/css/bootstrap.min.css';
import 'bootstrap/dist/js/bootstrap.bundle.min.js';

Add these two imports in src\index.js to add minified css file and JavaScript bundle (bundle includes Popper for positioning dropdowns, poppers, and tooltips)

You can also include Popper and Bootstrap's JS separately.

import '@popperjs/core/dist/umd/popper.min.js';
import 'bootstrap/dist/js/bootstrap.min.js';

After that you can use Bootstrap for styling in your components.

Here is a simple example with changes in App.js

function App() {
  return (
    <div className="container">

      <div className="row">
        <div className="col-xs-12">
          <h1>Using Bootstrap</h1>
          <p>Just to check Bootstrap integration in React app</p>
        </div>
      </div>
      <button className="btn btn-primary">Click Me</button>
     </div> 
  );
}

export default App;

That's all for the topic Installing Bootstrap in React. If something is missing or you have something to share about the topic please write a comment.


You may also like

October 4, 2023

React Router - Link in react-router-dom

This post Routing in React With Examples gives an introduction of routing in Reactjs using React Router. Generally, in an application you will have several navigational links and a navigation menu to route to different pages. In this post we'll see how to use <Link> in React Router for navigation.

Link in react-router-dom

While creating HTML pages you must have used anchor tags with href attribute (<a href=”/”>) for navigation.

A <Link> element in react-router-dom also renders an <a> element with a href that points to the resource it's linking to. But you should not use anchor tag directly in your React app because that will result in a full-page load. <Link> has the functionality for client-side routing and that’s what you should use.

Navigating to another page using Link - React Example

Link has a "to" attribute using which you can specify the pathname. For example, from home page you want to give a link for navigating to about page.

src\components\Routes\home.js

import { Link } from "react-router-dom"

const Home = () => {
    return (
        <>
            <h2>This is home page</h2>
            <Link to="/about">Go to About page</Link>
        </>
    )
}

export default Home;

src\components\Routes\about.js

const About = () => {
    return <h2>This is a router demo</h2>
}
export default About;

Route definition

src\components\Routes\route.js

import { createBrowserRouter } from "react-router-dom";
import About from "./about";
import Home from "./home";

export const router = createBrowserRouter([
    {path: "/", element: <Home /> },
    {path: "/about", element: <About />} 
])

Providing the routes

Provide the route definition to your application using the <RouteProvider> component.

import { RouterProvider } from 'react-router-dom';
import { router } from './components/Routes/route';

function App() {
  return <RouterProvider router={router}></RouterProvider>
}

export default App;

Now if you access the root path by accessing http://localhost:3000/ you should also see a link to About page. Clicking that link should navigate you to About page.

Link in react-router-dom

Navigation menu using Link - React Example

Another use of Link is to create a navigation menu so that user can easily navigate the pages. You may think that by creating a page with a navigation menu and adding it to App.js before the <RouterProvider> should do the job. But it is a little more involved than that.

Let’s first try to create a navigation page and add that to App.js to see what is the problem.

src\components\Routes\navigation.js

import { Link } from "react-router-dom"

const Navigation = () => {
    return(
        <>
            <nav className="navbar navbar-expand-lg bg-dark navbar-dark">
                <div className="container-fluid">
                    <button className="navbar-toggler" type="button" data-bs-toggle="collapse" data-bs-target="#navbarNav" aria-controls="navbarNav" aria-expanded="false" aria-label="Toggle navigation">
                        <span className="navbar-toggler-icon"></span>
                    </button>

                    <div className="collapse navbar-collapse" id="navbarNav">
                        <ul className="navbar-nav">
                            <li className="nav-item"><Link className="nav-link" to="/">Home</Link></li>
                            <li className="nav-item"><Link className="nav-link" to="/about">About</Link></li>
                        </ul>
                    </div>
                </div>
            </nav>
        </>
    );
}

export default Navigation;

Note that Bootstrap 5 classes are used here for styling the navbar.

Want to know how to add Bootstrap to your React application, check this post- Installing Bootstrap in React

Now add it to App.js

function App() {  
  return (
    <>
      <Navigation />
      <RouterProvider router={router}></RouterProvider>
    </>
  );
}

export default App;

But running it will result in following error.

Cannot destructure property 'basename' of 'react__WEBPACK_IMPORTED_MODULE_0__.useContext(...)' as it is null.

This error comes because <Link> works when it is rendered with in the <RouterProvider> not next to it. That means the Navigation component we have just created should be known to the Route definition (and be a part of Route definition).

How it should be done is to make the route, that points to Navigation, as parent component and the other routes as nested routes. With that change src\components\Routes\route.js file is as given below.

import { createBrowserRouter } from "react-router-dom";
import About from "./about";
import Home from "./home";
import Navigation from "./navigation";
export const router = createBrowserRouter([
    {path: "/", element: <Navigation />,
     children: [
        {path: "/", element: <Home /> },
        {path: "/about", element: <About />}
     ]
    },        
])

Note the use of children to specify another array of child routes.

That would also necessitate the use of <Outlet /> in Navigation to render the child route’s element.

src\components\Routes\navigation.js

import { Link, Outlet } from "react-router-dom"

const Navigation = () => {
    return(
        <>
            <nav className="navbar navbar-expand-lg bg-dark navbar-dark">
                <div className="container-fluid">
                    <button className="navbar-toggler" type="button" data-bs-toggle="collapse" data-bs-target="#navbarNav" aria-controls="navbarNav" aria-expanded="false" aria-label="Toggle navigation">
                        <span className="navbar-toggler-icon"></span>
                    </button>

                    <div className="collapse navbar-collapse" id="navbarNav">
                        <ul className="navbar-nav">
                            <li className="nav-item"><Link className="nav-link" to="/">Home</Link></li>
                            <li className="nav-item"><Link className="nav-link" to="/about">About</Link></li>
                        </ul>
                    </div>
                </div>
            </nav>
            <Outlet />
        </>
    );
}

export default Navigation;

src\App.js

import { RouterProvider } from 'react-router-dom';
import { router } from './components/Routes/route';

function App() {
    return <RouterProvider router={router}></RouterProvider>
}

export default App;

As you can see there is no need to add <Navigation> as a separate component in App.js

Nav menu using Link - React

That's all for the topic React Router - Link in react-router-dom. If something is missing or you have something to share about the topic please write a comment.


You may also like

October 3, 2023

Routing in React With Examples

In this post we'll get an introduction to routing in Reactjs.

What is routing

You will generally have different web pages for different functionalities and based on events like menu selection, clicking a link user will navigate to these different web pages. Directing users to different web pages based on the requests is done using routing in React.

React Router is the most popular library for routing in react.

React Router

React Router enables "client side routing" in React applications.

In a traditional web application, every request goes to a web server and results in a full page load.

With Client side routing your app updates the URL (for example change from http://example.com/home to http://example.com/about), based on an event like link click, without making another request for another document from the server. Rendering is done locally by the Java script. In a Single Page Application you will get a single page and the page is updated dynamically by injecting the contents from components.

Installing React router

You can install React router by using the following npm or yarn command.

npm install react-router-dom
yarn add react-router-dom

In React Router module there are following three packages-

  1. react-router- The react-router package is the heart of React Router and provides all the core functionality for both react-router-dom and react-router-native.
  2. react-router-dom- The react-router-dom package contains bindings for using React Router in web applications.
  3. react-router-native- The react-router-native package contains bindings for using React Router in React Native applications.

Since we are going to use React router in a web application so we need react-router-dom package.

React routing example using React Router

As per the newest version of React Router recommended way of defining routes is to use createBrowserRouter and to make you application aware of the routes use <RouterProvider>.

createBrowserRouter- This is the recommended router for all React Router web projects. It uses the DOM History API to update the URL and manage the history stack. Routes are created as an array of objects using createBrowserRouter method of the react-router-dom module.

RouterProvider - All data router objects are passed to this component to render your app. Using the router prop you will pass the router definitions to this component.

In the example we'll have two components Home and About which are to be rendered using routing.

1. Route definition

src\components\Routes\route.js

import { createBrowserRouter } from "react-router-dom";
import About from "./about";
import Home from "./home";
export const router = createBrowserRouter([
    {path: "/", element: <Home /> },
    {path: "/about", element: <About />}
])

The createBrowserRouter method receives an array of objects where each array element defines a route i.e., which components is to be rendered for which path.

As per the route definition in this example, Home component will be rendered for the root ("/") path. About component will be rendered for the "about" path.

2. Providing the routes

Provide the route definition to your application using the <RouteProvider> component. RouteProvider component has the router prop that’s where you need to provide the route definition created using createBrowserRouter method.

src\App.js

import { RouterProvider } from 'react-router-dom';
import { router } from './components/Routes/route';

function App() {
    return <RouterProvider router={router}></RouterProvider>
}

export default App;

3. Write the components

Here are the components that are rendered by the app.

src\components\Routes\home.js

const Home = () => {
    return <h2>This is home page</h2>
}

export default Home;

src\components\Routes\about.js

const About = () => {
    return <h2>This is a router demo</h2>
}

export default About;

Now if you access the root path by accessing http://localhost:3000/

Routing in React

If you change the path to http://localhost:3000/about

react router

Check out how to create a navigation menu using <Link> element in React in this post- React Router - Link in react-router-dom

That's all for the topic Routing in React With Examples. If something is missing or you have something to share about the topic please write a comment.


You may also like

October 2, 2023

Python Program to Read a File

In this tutorial we’ll see different options to read a file in Python.

  1. Using read() method you can read the whole file.
  2. Using readline() and readlines() methods you can read file line by line.
  3. More efficient way to read file line by line is to iterate over the file object.
  4. Reading file in binary mode.

1. Using read() method

f.read(size) method reads and returns size bytes. If size argument is not passed or negative, the entire contents of the file will be read and returned.

def read_file(fname):
  try:
    f = open(fname, 'r')
    s = f.read()
    print(s)
  finally:
    f.close()


read_file('F:\\knpcode\\abc.txt')

Here read_file() function is written to read a file which takes file path as argument. File is opened using open() function in read mode and read using read() method. You should always close the file to free the resources which is done in the finally block.

Another way to open the file is using with keyword which automatically closes the file. Using with open is preferred as it makes code shorter.

def read_file(fname):
  with open(fname, 'r') as f:
    s = f.read(9)
    print(s) 

2. Using readline() method to read a file in Python.

f.readline() reads a single line from the file.

def read_file(fname):
  with open(fname, 'r') as f:
    s = f.readline()
    print('Content- ', s)
3. Using readlines() method.

f.readlines() method reads all the lines of a file in a list.

def read_file(fname):
  with open(fname, 'r') as f:
    s = f.readlines()
    print('Content- ', s)

You can also read all the lines of a file by using list(f) function.

def read_file(fname):
  with open(fname, 'r') as f:
    s = list(f)
    print('Content- ', s)

4. Looping over the file object

read(size) or f.readlines() read all the content of the file making it inefficient if the file is large as the whole file will be loaded into the memory. More memory efficient and fast way to read lines from a file is by looping over the file object.

def read_file(fname):
  with open(fname, 'r') as f:
    for line in f:
      # Empty string (‘’) is the EOF char
      print(line, end='')

Similar logic to read the file line by line in Python can also be written using the readline() method.

def read_file(fname):
  with open(fname, 'r') as f:
    line = f.readline()
    while line != '':
      print(line, end='')
      line = f.readline()

5. Reading a binary file in Python.

If you want to read a binary file you need to open file in ‘rb’ mode. In the following Python program to copy an image an image file is opened in binary mode and then written to another file.

def copy_file():
  try:
    f1 = open('F:/knpcode/Java/Java Collections/collection hierarchy.png', 'rb')
    f2 = open('F:/knpcode/Python/newimage.png', 'wb')
    b = f1.read()
    f2.write(b)
    print('Coying image completed...')
  finally:
    f1.close()
    f2.close()

That's all for the topic Python Program to Read a File. If something is missing or you have something to share about the topic please write a comment.


You may also like

October 1, 2023

Python Program to Write a File

In this tutorial we’ll see different options to write to a file in Python.

  1. Using write() method you can write the passed string to a file.
  2. Using writelines(lines) method you can write a list of lines.
  3. Writing file in binary mode.

1. Using write() method for file writing in Python

f.write(string) writes the contents of string to the file and returns the number of characters written. For writing to a file in Python file should be opened in write mode. Note that opening in write mode (‘w’) will either create the file if it doesn’t exist or overwrite the file if already exists.

def write_file(fname):
  try:
    f = open(fname, 'w')
    f.write("This is Line 1.\n")
    f.write("This is Line 2.")
  finally:
    f.close()


write_file("F:/knpcode/Python/test.txt")

Here write_file() method takes the file path as argument and opens that file in write mode. Two lines are written to the file and then the file is closed.

Another way to open the file is using with keyword which automatically closes the file. Using with open is preferred as it makes code shorter.

def write_file(fname):
  with open (fname, 'w') as f:
    chars_written = f.write("This is Line 1.\n")
    print('Characters written to the file', chars_written);
    f.write("This is Line 2.")

As you can see now try-finally block is not required as with open automatically closes the file once file operations are done.

If you want to write any other type of object then it has to be converted to the string (in text mode) or a bytes object (in binary mode) before writing it to the file. For example in the following program we want to write a tuple to the file for that it has to be converted to str first.

def write_file(fname):
  with open(fname, 'w') as f:
    value = ('One', 1)
    s = str(value)  # convert the tuple to string
    f.write(s)

2. Using writelines(lines) method you can write a list of lines.

If you have a list of lines then you can use writelines() method to write it.

def write_file(fname):
  with open(fname, 'w') as f:
    lines = ["This is the first line\n", "This is the second line\n", "This is the third line"]
    f.writelines(lines)

3. Using ‘w+’ mode to write and read file.

Following program opens a file in 'w+' mode for both writing and reading. Program also uses tell() method to get the current position of the file pointer and seek() method to move to the beginning of the file.

def write_read_file(fname):
  with open(fname, 'w+') as f:
    f.write("This is the first line.\n")
    f.write("This is the second line.\n")
    f.flush()
    print("Current position of file pointer- ", f.tell())
    f.seek(0, 0)
    s = f.read()
    print('Content- ', s)

4. Writing a binary file in Python

If you want to write a binary file you need to open file in ‘wb’ mode. In the following Python program to copy an image an image file is opened in binary mode and then written to another file.

def copy_file():
  try:
    # Opened in read binary mode
    f1 = open('F:/knpcode/Java/Java Collections/collection hierarchy.png', 'rb')
    # Opened in write binary mode
    f2 = open('F:/knpcode/Python/newimage.png', 'wb')
    b = f1.read()
    f2.write(b)
    print('Coying image completed...')
  finally:
    f1.close()
    f2.close()

That's all for the topic Python Program to Write a File. If something is missing or you have something to share about the topic please write a comment.


You may also like