In this Spring Boot MVC tutorial we’ll see how to validate form fields using standard validation annotations.
Form validation is important part of web applications where user input is required so that users can’t enter invalid values. You will also see how to display error messages in front of the field with invalid value so that the user can re-enter input to make it valid.
Starter dependencies
Starter dependencies that you will be selecting for this Spring Boot form validation example are-
spring-boot-starter-web spring-boot-starter-thymeleaf spring-boot-devtools
Example uses Thymeleaf templates for view thus the thymeleaf starter.
Applications that use spring-boot-devtools will automatically restart whenever files on the classpath change, so you don't have to rebuild and restart the server yourself every time.
Maven – pom.xml
pom.xml with the above mentioned starter dependencies.
<dependency>
  <groupId>org.springframework.boot</groupId>
  <artifactId>spring-boot-starter-thymeleaf</artifactId>
</dependency>
<dependency>
  <groupId>org.springframework.boot</groupId>
  <artifactId>spring-boot-starter-web</artifactId>
</dependency>
<!-- For hot swapping -->
<dependency>
  <groupId>org.springframework.boot</groupId>
  <artifactId>spring-boot-devtools</artifactId>
  <optional>true</optional>
</dependency>
Bean Validation API and Hibernate Validator
For form fields validation, Bean Validation API is used which defines some annotations that reside in
javax.validation.constraints package.
Note that Bean Validation API just provide the interfaces, Hibernate Validator is the implementation of the API.
You will get required jars just by including the spring-boot-starter-web. All you need to do is to use the annotations with the fields to specify the constraints.
Some of the annotations that are defined in Java Bean Validation API are as follows-
- @NotBlank- The annotated element must not be null and must contain at least one non-whitespace character.
- @NotEmpty- The annotated element must not be null nor empty.
- @NotNull- The annotated element must not be null.
- @Size- The annotated element size must be between the specified boundaries. Boundaries can be specifies using main and max attributes.
- @Digits- The annotated element must be a number within accepted range.
- @Max- The annotated element must be a number whose value must be lower or equal to the specified maximum.
- @Min- The annotated element must be a number whose value must be higher orequal to the specified minimum.
- @Email- The string has to be a well-formed email address.
Spring Boot form validation example steps
What we are building here is a Thymeleaf view which is a form for User registration. The classes that are needed are-
- A Model bean class (User.java) with fields annotated with required constraints.
- userform.html Thymeleaf template which is the user registration form UI.
- When submit button is clicked in the registration form Validation for the fields happen, if there is any error registration form is shown again with the error messages. If there is no error then entered user data is displayed using user.html Thymeleaf template.
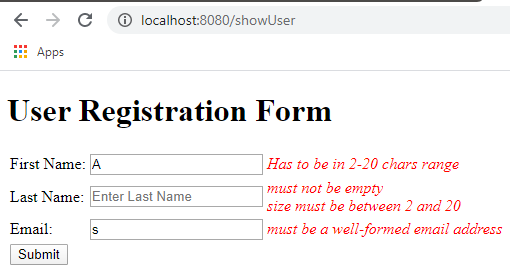
Screen shot of the form with validation errors-

Spring Boot form validation - Model class
There is a model class User with the fields and the constraints.
import javax.validation.constraints.Email;
import javax.validation.constraints.NotEmpty;
import javax.validation.constraints.Size;

public class User {
  @NotEmpty(message = "Field can't be left empty")
  @Size(min=2, max=20, message = "Has to be in 2-20 chars range")
  private String firstName;
  @NotEmpty
  @Size(min=2, max=20)
  private String lastName;
  @NotEmpty
  @Email
  private String email;
  public String getFirstName() {
    return firstName;
  }
  public void setFirstName(String firstName) {
    this.firstName = firstName;
  }
  public String getLastName() {
    return lastName;
  }
  public void setLastName(String lastName) {
    this.lastName = lastName;
  }
  public String getEmail() {
    return email;
  }
  public void setEmail(String email) {
    this.email = email;
  }
}
As you can see fields are annotated with the required constraints.
- firstName can’t be null or empty and must have 2 to 20 characters.
- lastName can’t be null or empty and must have 2 to 20 characters.
- email can’t be empty and should be a well formed email.
You can specify your own messages using ‘message’ attribute if no message is specified then default message is displayed.
Spring Boot form validation - Thymeleaf templates
In src/main/resources/templates create a userform.html file.
<!DOCTYPE html>
<html>
<head>
<meta charset="ISO-8859-1">
<title>Spring Boot form validation</title>
<link rel="stylesheet" th:href="@{/css/style.css}"/>
</head>
<body>
  <h1>User Registration Form</h1>
  <form action="#" th:action="@{/showUser}" th:object="${user}" method="post">
    <table>
      <tr>
        <td>First Name:</td>
        <td><input type="text" th:field="*{firstName}" placeholder="Enter First Name"/></td>
        <td th:if="${#fields.hasErrors('firstName')}" th:errors="*{firstName}" class="error"></td>
      </tr>
      <tr>
        <td>Last Name:</td>
        <td><input type="text" th:field="*{lastName}" placeholder="Enter Last Name"/></td>
        <td th:if="${#fields.hasErrors('lastName')}" th:errors="*{lastName}" class="error"></td>
      </tr>
      <tr>
        <td>Email:</td>
        <td><input type="text" th:field="*{email}" placeholder="email"/></td>
        <td th:if="${#fields.hasErrors('email')}" th:errors="*{email}" class="error"></td>
      </tr>
      <tr>
        <td><button type="submit">Submit</button></td>
      </tr>
    </table>
  </form>
</body>
</html>
In the form tag action is specified as “/showUser” (th:action="@{/showUser}") and the method is post.
Object this form is bound with is the user object (th:object="${user}")
With every field a new column is added for rendering validation error message.
<td th:if="${#fields.hasErrors('firstName')}" th:errors="*{firstName}" class="error"></td>
Another template that is used for displaying User data src/main/resources/templates/user.html
<!DOCTYPE html>
<html>
<head>
<meta charset="ISO-8859-1">
<title>Insert title here</title>
</head>
<body>
  <h1>User Details</h1>
  <table>
    <tr><td th:text="'First Name: ' + ${user.firstName}"></td> </tr>
    <tr><td th:text="'Last Name: ' + ${user.lastName}"></td> </tr>
    <tr><td th:text="'Email: ' + ${user.email}"></td> </tr>
  </table>
</body>
</html>
There is also a CSS class used for styling the error messages, you would have noticed its usage in src/main/resources/templates/userform.html file.
<link rel="stylesheet" th:href="@{/css/style.css}"/>

And here

<td th:if="${#fields.hasErrors('email')}" th:errors="*{email}" class="error">
So create a file src/main/resources/static/css/style.css
.error {
  color: red;
  font-style: italic;
}
Spring Boot form validation – Controller class
In UserController.java class there are handler methods mapped to URL paths.
import javax.validation.Valid;
import org.springframework.stereotype.Controller;
import org.springframework.ui.Model;
import org.springframework.validation.BindingResult;
import org.springframework.web.bind.annotation.GetMapping;
import org.springframework.web.bind.annotation.ModelAttribute;
import org.springframework.web.bind.annotation.PostMapping;
import com.knpcode.sb.model.User;

@Controller
public class UserController {
  @GetMapping(value = "/registerUser")
  public String registerUser(Model model) {
    model.addAttribute("user", new User());
    return "userform";
  }

  @PostMapping(value="/showUser")
  public String showUser(@Valid @ModelAttribute("user") User user, BindingResult result, Model model) {
    if(result.hasErrors()) {
      return "userform";
    }
    model.addAttribute("user", user);
    return "user";
  }
}
In the showUser method there is a @Valid annotation used with the User class object. Using @Valid annotation ensures that the constraints defined on the object and its properties are to be validated.
If there are validation errors or not is checked using instance of BindingResult. If there are validation
errors registration form is rendered again with the error messages otherwise logical view name “user” is returned which
renders the user.html template.
Application class
You can run the application by executing the application class which has the main method.
import org.springframework.boot.SpringApplication;
import org.springframework.boot.autoconfigure.SpringBootApplication;

@SpringBootApplication
public class SpringBootProjectApplication {
  public static void main(String[] args) {
    SpringApplication.run(SpringBootProjectApplication.class, args);
  }
}
Once the application has successfully started you can access the application using the URL’s as per the controller mapping.
http://localhost:8080/registerUser

http://localhost:8080/showUser

With validation errors
That's all for the topic Spring Boot MVC Form Validation Example. If something is missing or you have something to share about the topic please write a comment.
You may also like
- Spring Boot With JSP Example
- Spring Boot With Docker Example
- Spring Boot Stand Alone (non web) Application Example
- Spring Autowiring Using @Autowired Annotation
- Remove Spaces From a String in Java - trim(), strip()
- UnsupportedClassVersionError in Java and Resolution
- Python I/O - Open, Read, Write Files
- How MapReduce Works in Hadoop
No comments:
Post a Comment