May 1, 2024

Java Stream API With Examples

The way Lambda expressions in Java brought functional programming to Java another addition in Java 8, Stream API in Java brought functional approach to processing collections of objects. Using Java Stream API you can create a stream over an object and then you just need to specify what needs to be done not how it has to be done.

For example if you want to count the elements in the stream, you need to specify the source for obtaining a stream and the function to count the elements. Stream API takes care of executing stream pipeline in an optimized way.

List<Integer> myList = Arrays.asList(1, 2, 3, 4, 5, 6, 7, 8, 9, 10);  
long count = myList.stream().count();
System.out.println("Count of elements in the list- " + count);

In the above example List myList is the data source for the stream and count is the stream operation performed on the stream.

In this Java Stream API tutorial we’ll see how to create streams, types of streams and various stream operation examples. Since the examples use lambda expressions and functional interfaces so make sure that you are familiar with those topics.

Java Stream API – Interfaces and Classes

Java Stream API contains several interfaces and classes which are packaged with in the java.util.stream package. At the top of the hierarchy is interface BaseStream providing basic functionality for all the Streams.

BaseStream interface is extended by interfaces- DoubleStream, IntStream, LongStream and Stream. Stream interface is a generic interface which is used for all reference types.

DoubleStream, IntStream and LongStream are primitive specializations of Stream that can store primitive values.

Read more about Primitive Streams in this post- Primitive Type Streams in Java

One of the important class with in Java Stream API is Collectors class that is an implementation of Collector interface, this class implements various useful reduction operations.

Read more about Collectors class in this post- Collectors Class And collect() Method in Java

Creating a Stream

With in the Java Stream API there are number of ways to obtain a stream.

1. Stream from Collection- Stream can be created from any type of Collection via the stream() and parallelStream() methods.

List<Integer> myList = Arrays.asList(1, 2, 3, 4, 5, 6, 7, 8, 9, 10);  
Stream<Integer> myStream = myList.stream();

2. Stream from an array- Stream can be obtained from an array via Arrays.stream(Object[]);

String[] array = {"a", "b", "c"};
Stream<String> stream = Arrays.stream(array);

3. Using Stream.of() method- Stream can also be created using static factory method Stream.of(Object[])

Stream<String> stream = Stream.of("a", "b", "c");

4. Using range and iterate methods- Using range method you can get a primitive stream.

IntStream stream = IntStream.range(1, 10);

Same thing (getting stream of integers 1-9) can be achieved by using the iterate method-

Stream<Integer> stream = Stream.iterate(1, n-> n < 10, n->n+1);

5. Creating empty stream- You can create an empty stream using empty method.

Stream<Integer> stream = Stream.empty();

6. To get lines of a file as a stream you can use BufferedReader.lines() method.

Path path = Paths.get("D:\\KnpCode\\test.txt");
Stream<String> lines = Files.newBufferedReader(path).lines();

Types of Stream operations

Stream operations are divided into two types-

  • intermediate operations
  • terminal operations

Intermediate operations in Java Streams

Intermediate operations return a new stream. This new stream is a result of applying intermediate operation on the source stream. Intermediate operations are always lazy and these operations are executed only when a terminal operation is executed.

For example executing an intermediate operation such as filter() does not actually perform any filtering, but instead creates a new stream that, when traversed, contains the elements of the initial stream that match the given predicate. Traversal of the pipeline source does not begin until the terminal operation of the pipeline is executed.

Intermediate operations are further divided into two categories-

  1. Stateless operations- Stateless operations, such as filter and map, retain no state from previously seen element when processing a new element, each element can be processed independently of operations on other elements.
  2. Stateful operations- Stateful operations, such as distinct and sorted, may incorporate state from previously seen elements when processing new elements.

Some of the examples of intermediate operations in Java Stream API are filter, map, flatMap, distinct, sorted, limit.

Examples of intermediate stream operations

1. filter()- In filter method Predicate is passed as an argument and method returns a stream consisting of the elements of this stream that match the given predicate. Predicate is a functional interface which can be implemented as a lambda expression.

From an ArrayList you want to filter elements less than 5.

List<Integer> myList = Arrays.asList(11, 1, 9, 4, 98, 0, 17, 8, 2, 3);  
Stream<Integer> myStream = myList.stream().filter(n -> n > 5);
myStream.forEach(System.out::println);
Output
11
9
98
17
8

2. map()- Using map method you can map (convert) each element in the stream to another object. Method returns a stream consisting of the results of applying the given function to the elements of this stream.

If you have a List of Strings and you want to apply upper case function to each string.

List<String> myList = Arrays.asList("rose", "lotus", "lily", "orchid");  
myList.stream().map(s -> s.toUpperCase()).forEach(System.out::println);
Output
ROSE
LOTUS
LILY
ORCHID

3. flatMap()- The flatMap() operation applies a one-to-many transformation to the elements of the stream and also flattens the resulting structure into a new stream. If you have an object with many nested objects flatMap() operation brings all the nested level objects to the same level by flattening the structure.

If you want to produce a stream of the words contained in the Strings in the array.

Stream<String> lineStream = Arrays.stream(lines);
Stream<String> str = lineStream.flatMap(line -> Stream.of(line.split(" +")));

4. distinct()- Returns a stream consisting of the distinct elements of this stream.

distinct() method of the Java Stream API provides a best option to remove duplicates from a List.

List<Integer> ListWithDuplicates = Arrays.asList(7, 8, 9, 7, 4, 2, 4, 1);
List<Integer> uniqueElementList = ListWithDuplicates.stream().distinct().collect(Collectors.toList());
System.out.println("List after removing duplicates : " + uniqueElementList);
Output
List after removing duplicates : [7, 8, 9, 4, 2, 1]

5. sorted()- Returns a stream consisting of the elements of this stream, sorted according to natural order. This is a stateful intermediate operation.

List<Integer> myList = Arrays.asList(7, 8, 9, 7, 4, 2, 4, 1);
myList.stream().sorted().forEach(System.out::println);
Output
1
2
4
4
7
7
8
9

6. limit()- Using limit() method you can limit the number of elements in a Stream to the size passed with limit() method.

List<Integer> myList = Arrays.asList(7, 8, 9, 7, 4, 2, 4, 1);
myList.stream().limit(3).forEach(System.out::println);
Output
7
8
9

Terminal operations in Java Streams

Once the terminal operation is performed in a Stream, the stream pipeline is considered consumed. Same stream can no longer be used; if you need to traverse the same data source again, you must return to the data source to get a new stream.

Terminal operations are eager (except iterator() and spliterator() methods) , completing their traversal of the data source and processing of the pipeline before returning.

Some of the examples of terminal operations in Java Stream API are forEach, reduce, collect, min, max, count, findFirst.

Examples of Terminal stream operations

1. forEach()- In the forEach method a Consumer is passed as an argument and this Consumer action is performed on each element of this stream.

List<String> myList = Arrays.asList("rose", "lotus", "lily", "orchid");
myList.stream().forEach(System.out::println);
Output
rose
lotus
lily
orchid

2. reduce()- Reduce operation reduce the stream to a single non-stream value. This method returns an Optional describing the result of the reduction.

You can find max element in a Collection using reduce method.

List<Integer> myList = Arrays.asList(11, 1, 9, 4, 98, 0, 17, 8, 2, 3);
Optional<Integer> max = myList.stream().reduce((n1, n2) -> n1 > n2 ? n1:n2);
if(max.isPresent()){
  System.out.println("Max element in the List " + max.get());
}
Output
Max element in the List 98

3. collect()- Java Stream API’s collect() method is used to collect the Stream elements in a mutable container like a List, StringBuilder.

In the example list is filtered to filter out all the elements less than 5 and the stream elements are collected in a TreeSet which sorts the resulting elements.

List<Integer> myList = Arrays.asList(11, 1, 9, 4, 98, 0, 17, 8, 2, 3);
Set<Integer> sortedSet = myList.stream().filter(n->n>5).collect(Collectors.toCollection((TreeSet::new)));
System.out.println("Sorted set- " + sortedSet);
Output
Sorted set- [8, 9, 11, 17, 98]

4. min()- Returns the minimum element of this stream according to the provided Comparator. This method returns an Optional describing the minimum element of this stream.

List<Integer> myList = Arrays.asList(11, 1, 9, 4, 98, 0, 17, 8, 2, 3);
Optional<Integer> min = myList.stream().min(Integer::compare);
if(min.isPresent()){
  System.out.println("Minimum element in the List " + min.get());
}
Output
Minimum element in the List 0

5. max()- Returns the maximum element of this stream according to the provided Comparator. This method returns an Optional describing the maximum element of this stream.

List<Integer> myList = Arrays.asList(11, 1, 9, 4, 98, 0, 17, 8, 2, 3);
Optional<Integer> max = myList.stream().max(Integer::compare);
if(max.isPresent()){
  System.out.println("Maximum element in the List " + max.get());
}
Output
Maximum element in the List 98

6. count()- Returns the count of elements in this stream.

List<Integer> myList = Arrays.asList(11, 1, 9, 4, 98, 0, 17, 8, 2, 3);
long count = myList.stream().count();
System.out.println("Count of elements in the list- " + count);
Output
Count of elements in the list- 10

7. findFirst()- Java Stream API's findFirst() method returns an Optional describing the first element of this stream, or an empty Optional if the stream is empty.

List<Integer> myList = Arrays.asList(11, 1, 9, 4, 98, 0, 17, 8, 2, 3);
Optional<Integer> value = myList.stream().findFirst();
if(value.isPresent()){
  System.out.println("First Element- " + value.get());
}
Output
First Element- 11

Stream pipeline in Java Stream

A data source (such as a Collection, an array, a generator function, or an I/O channel) followed by zero or more intermediate operations and a terminal operation together form a stream pipeline.

Java Stream API
Stream pipeline example

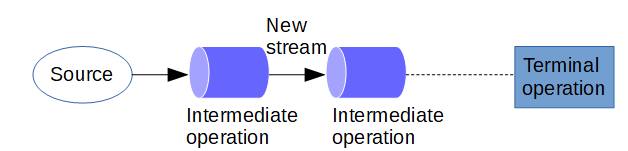
In the following example stream source is an ArrayList. First intermediate operation is a map operation which adds 10 to each element in the Stream, in another operation elements are sorted. Then the elements are displayed using forEach terminal operation, at this point the stream is consumed.

List<Integer> myList = Arrays.asList(11, 1, 9, 4, 98, 0, 17, 8, 2, 3);
myList.stream().map(n -> n + 10).sorted().forEach(System.out::println);

Collection Vs Stream API

Streams differ from collections on several points-

  1. No Storage- Unlike Collections a stream is not a data structure that stores elements. In a stream, elements from a data source are moved through a pipeline while going through computational operations at each intermediate step.
  2. Functional in nature- Java Stream API is functional in nature bringing functional approach to processing collections of objects. An operation on a stream produces a result, but does not modify its source. For example, filtering a Stream obtained from a collection produces a new Stream without the filtered elements, rather than removing elements from the source collection.
  3. Lazy invocation- Intermediate operations in the Java Stream API are always lazy providing opportunities for optimization.
  4. Possibly unbounded- While collections have a finite size, streams need not. Short-circuiting operations such as limit(n) or findFirst() can allow computations on infinite streams to complete in finite time.
  5. Streams are Consumable- The elements of a stream are only visited once during the life of a stream, once a terminal operation is encountered with in a Stream pipeline, stream is considered consumed. After a stream is consumed a new stream must be generated to revisit the same elements of the source.
Reference: https://docs.oracle.com/en/java/javase/18/docs/api/java.base/java/util/stream/package-summary.html

That's all for the topic Java Stream API With Examples. If something is missing or you have something to share about the topic please write a comment.


You may also like

April 30, 2024

Java Stream - Reduction Operations And Reduce Method

In this post we’ll see what are reduction operations in Java Stream API and how to use general-purpose reduction operation Stream.reduce() method.

Reduction operations in Java Stream

With in the Java Stream API there are many terminal operations (like average, sum, min, max, and count) that return one value by combining the contents of a stream. These operations are called reduction operations.

For example using the count reduction operation to count the number of elements in a List.

List<Integer> myList = Arrays.asList(1, 2, 3, 4, 5, 6, 7, 8, 9, 10);  
long count = myList.stream().count();
System.out.println("Count of elements in the list- " + count);
Output
Count of elements in the list- 10

Reduce methods in Java Stream

Java Stream API also has a general purpose reduce method to perform a reduction on the elements of the stream using the passed accumulator and returns a reduced value. Reduce method is overloaded and has 3 variants.

1. Optional<T> reduce(BinaryOperator<T> accumulator)- Performs a reduction on the elements of this stream, using an associative accumulation function and returns an Optional describing the reduced value, if any.

Accumulator is of type BinaryOperator which is a functional interface representing an operation upon two operands of the same type. The accumulator function takes two parameters: a partial result of the reduction and the next element of the stream.

Stream.reduce() with Accumulator example

Let’s say there is an Employee class with name, dept, salary fields. You need to find out the total salary using the Stream.reduce() method.

public class Employee {
  private String name;
  private String dept;
  private int salary;

  Employee(String name, String dept, int salary){
    this.name = name;
    this.dept = dept;
    this.salary = salary;
  }
  public String getName() {
    return name;
  }
  public void setName(String name) {
    this.name = name;
  }
  public int getSalary() {
    return salary;
  }
  public void setSalary(int salary) {
    this.salary = salary;
  }
  public String getDept() {
    return dept;
  }
  public void setDept(String dept) {
    this.dept = dept;
  }
}

Using reduce method by passing an accumulator function, which is a lambda expression in this example that adds two Integer values and returns an Integer value, you can get the total salary.

List<Employee> employeeList = new ArrayList<>();
employeeList.add(new Employee("Jack", "Finance", 5500));
employeeList.add(new Employee("Lisa", "Accounts", 5600));
employeeList.add(new Employee("Nikita", "IT", 4500));
employeeList.add(new Employee("Tony", "HR", 8000));
Optional<Integer> totalSalary = employeeList.stream().map(e -> e.getSalary()).reduce((a,b) -> a+b);
if(totalSalary.isPresent()){
  System.out.println("Total Salary- " + totalSalary.get());
}
Output
Total Salary- 23600

2. reduce(T identity, BinaryOperator<T> accumulator)- Performs a reduction on the elements of this stream, using the provided identity value and an associative accumulation function, and returns the reduced value.

  • identity- The identity element is both the initial value of the reduction and the default result if there are no elements in the stream.
  • accumulator- The accumulator function is an implementation of BinaryOperator which is a functional interface representing an operation upon two operands of the same type. The accumulator function takes two parameters: a partial result of the reduction and the next element of the stream

Stream.reduce() with Identity and Accumulator example

We can use the same example as above, only change is in the reduce method which now also passes an identity element as 0. This is the initial value of the sum of salaries and the default value if no members exist in the collection employeeList. Now the return type of the reduce method is also int.

List<Employee> employeeList = new ArrayList<>();
employeeList.add(new Employee("Jack", "Finance", 5500));
employeeList.add(new Employee("Lisa", "Accounts", 5600));
employeeList.add(new Employee("Nikita", "IT", 4500));
employeeList.add(new Employee("Tony", "HR", 8000));
int totalSalary = employeeList.stream().map(e -> e.getSalary()).reduce(0, (a,b) -> a+b);
System.out.println("Total Salary- " + totalSalary);

3. reduce(U identity, BiFunction<U,? super T,U> accumulator, BinaryOperator<U> combiner)- Performs a reduction on the elements of this stream, using the provided identity, accumulation and combining functions.

Combiner function is used for combining results of accumulator function, it must be compatible with the accumulator function. Combiner function is necessary when parallel stream is used in order to combine result of accumulators running in parallel.

Stream.reduce() with Identity, Accumulator and Combiner example

int value = Stream.of(1, 2, 3, 4, 5).parallel().reduce(1, (a, b) -> a*b, 
				(x,y) -> { System.out.println("In combiner function");
				           return x*y;});
System.out.println("Value- " + value);
Output
In combiner function
Value- 120

That's all for the topic Java Stream - Reduction Operations And Reduce Method. If something is missing or you have something to share about the topic please write a comment.


You may also like

April 29, 2024

Delete a File or Directory Using a Java Program

This post shows how to delete a file or directory using a Java program and how to delete a directory recursively in Java. For deleting a file or directory, Java provides following options.

  • delete()- You can use the delete() method of java.io.File class. This method deletes the file or directory denoted by this abstract pathname. If you are trying to delete a directory, then the directory must be empty in order to be deleted. Method returns true if the file or directory is successfully deleted otherwise returns false.
  • Files.delete(Path path)- Java 7 onward Files.delete() method can be used to delete a file or directory. For deleting a directory it must be ensured that the directory is empty. This method throws NoSuchFileException if the file does not exist and throws DirectoryNotEmptyException if the file is a directory and could not otherwise be deleted because the directory is not empty.
  • Files.deleteIfExists(Path path)- Another option in Files class to delete a file or directory is to use deleteIfExists() method. This method deletes a file or folder if it exists and returns true if the file was deleted by this method; false if the file could not be deleted because it did not exist. Same restriction for the directory applies that directory must be empty.

In the post we’ll see Java examples of deleting files and directories using the above mentioned methods. We’ll also see how to delete a non-empty directory by recursively deleting the files and sub-directories and ultimately deleting the parent directory.

Deleting file using java.io.File delete method

In the example code all the scenarios are covered-

  1. A file that exists at the given path is deleted.
  2. Trying to delete a file that doesn’t exist.
  3. Deleting an empty directory.
  4. Trying to delete non-empty directory.
public class DeleteFile {
  public static void main(String[] args) {
    File file = new File("F:\\knpcode\\Test\\postend.txt");
    fileDelete(file);

    // trying to delete file that doesn't exist
    file = new File("F:\\knpcode\\Test\\postend.txt");
    fileDelete(file);

    // Deleting empty directory
    file = new File("F:\\knpcode\\Test");
    fileDelete(file);

    // Deleting non-empty directory
    file = new File("F:\\knpcode\\Parent");
    fileDelete(file);
  }
	
  private static void fileDelete(File file){
    if(file.delete()){
      System.out.println("File " + file.getName() + " deleted successfully");
    }else{
      System.out.println("File " + file.getName() + " not deleted as it doesn't exist/non-empty directory");
    }
  }
}
Output
File postend.txt deleted successfully
File postend.txt not deleted as it doesn't exist/non-empty directory
File Test deleted successfully
File Parent not deleted as it doesn't exist/non-empty directory

Deleting file using Files delete and deleteIfExists method

Files.delete method to delete file

import java.io.IOException;
import java.nio.file.DirectoryNotEmptyException;
import java.nio.file.Files;
import java.nio.file.NoSuchFileException;
import java.nio.file.Paths;

public class DeleteFile {
  public static void main(String[] args) {
    try {
      Files.delete(Paths.get("F:\\knpcode\\Test\\postend.txt"));
      // deleting same file again - file that doesn't exist scenario
      Files.delete(Paths.get("F:\\knpcode\\Test\\postend.txt"));
    } catch (NoSuchFileException e) {	
      // TODO Auto-generated catch block
      e.printStackTrace();
    }
    catch (DirectoryNotEmptyException e) {
      // TODO Auto-generated catch block
      e.printStackTrace();
    }
    catch (IOException e) {
      // TODO Auto-generated catch block
      e.printStackTrace();
    }
  }
}
Output
java.nio.file.NoSuchFileException: F:\knpcode\Test\postend.txt
	at sun.nio.fs.WindowsException.translateToIOException(WindowsException.java:79)
	at sun.nio.fs.WindowsException.rethrowAsIOException(WindowsException.java:97)
	at sun.nio.fs.WindowsException.rethrowAsIOException(WindowsException.java:102)
	at sun.nio.fs.WindowsFileSystemProvider.implDelete(WindowsFileSystemProvider.java:269)
	at sun.nio.fs.AbstractFileSystemProvider.delete(AbstractFileSystemProvider.java:103)
	at java.nio.file.Files.delete(Files.java:1126)
	at com.knpcode.programs.DeleteFile.main(DeleteFile.java:16)

Files.deleteIfExists method to delete file

public class DeleteFile {

  public static void main(String[] args) {
    try {
      if(Files.deleteIfExists(Paths.get("F:\\knpcode\\Test\\postend.txt")))
        System.out.println("File deleted successfully");
      else
        System.out.println("File not deleted");
      // deleting same file again - file that doesn't exist scenario
      if(Files.deleteIfExists(Paths.get("F:\\knpcode\\Test\\postend.txt")))
        System.out.println("File deleted successfully");
      else
        System.out.println("File not deleted");
    }
    catch (DirectoryNotEmptyException e) {
      // TODO Auto-generated catch block
      e.printStackTrace();
    }
    catch (IOException e) {
      // TODO Auto-generated catch block
      e.printStackTrace();
    }
  }
}
Output
File deleted successfully
File not deleted

Files.delete method to delete folder in Java

public class DeleteFile {
  public static void main(String[] args) {
    try {      
      // Deleting empty directory
      Files.delete(Paths.get("F:\\knpcode\\Test"));
      
      // Deleting non-empty directory
      Files.delete(Paths.get("F:\\knpcode\\Parent"));
      
    } catch (NoSuchFileException e) {	
      // TODO Auto-generated catch block
      e.printStackTrace();
    }
    catch (DirectoryNotEmptyException e) {
      // TODO Auto-generated catch block
      e.printStackTrace();
    }
    catch (IOException e) {
      // TODO Auto-generated catch block
      e.printStackTrace();
    }
  }
}
Output
java.nio.file.DirectoryNotEmptyException: F:\knpcode\Parent
	at sun.nio.fs.WindowsFileSystemProvider.implDelete(WindowsFileSystemProvider.java:266)
	at sun.nio.fs.AbstractFileSystemProvider.delete(AbstractFileSystemProvider.java:103)
	at java.nio.file.Files.delete(Files.java:1126)
	at com.knpcode.programs.DeleteFile.main(DeleteFile.java:22)

Deleting non-empty directory recursively in Java

As you can see from the above examples directory should be empty to be deleted, in case of non-empty directory it is not deleted. For deleting a non-empty directory you need to recursively walk through the folder structure and delete all the files and sub-directories before deleting the parent directory which is empty by then.

For recursively deleting a file in Java there are two options-

  1. Using File.listFiles() method which returns an array of abstract pathnames denoting the files in the directory. Then you can iterate the array to delete the files and you will have to recursively call your method to delete files with in the sub-directories.
  2. Java 7 onward you can use Files.walkFileTree() method which walks a file tree rooted at a given starting file.

Directory structure used

Java programs shown here to delete a non-empty directory in Java use the following directory structure.

delete directory using Java

With in the parent folder there are two sub-folders Child with two files and Empty with no file. One file is stored in the parent folder.

Deleting directory recursively using File.listFiles() method

public class DeleteDirectory {
  public static void main(String[] args) {
    // Source folder
    final String SOURCE_DIR = "F:/knpcode/Parent";
    File sourceDir = new File(SOURCE_DIR);
    directoryDeletion(sourceDir);
  }
	
  private static void directoryDeletion(File sourceDir){
    if(!sourceDir.isDirectory()){
      System.out.println("Not a directory.");
      return;
    }
    File[] fileList = sourceDir.listFiles();
    for(File file : fileList){
      // if directory call method recursively to 
      // list files with in sub-directories for deletion
      if(file.isDirectory()){
        System.out.println("Sub Directory- " + file.getName());
        directoryDeletion(file);
      }else{				 
        System.out.println("Deleting file- " + file.getName());
        // if it is a file then delete it
        file.delete();
      }
    }
    // For deleting sub-directories and parent directory
    System.out.println("Deleting Directory - " + sourceDir.getName());
    sourceDir.delete();
  }
}
Output
Sub Directory- Child
Deleting file- hello.txt
Deleting file- Project.docx
Deleting Directory - Child
Sub Directory- Empty
Deleting Directory - Empty
Deleting file- Test.txt
Deleting Directory – Parent

Deleting directory recursively using Java Files.walkFileTree method

Java 7 onward You can use Files.walkFileTree() method using which you can walk the tree structure of the source directory and delete all the files and sub-directories in the process. One of the argument of this method is a FileVisitor interface. You do need to provide implementation of this interface as per your requirement.

FileVisitor interface has four methods, for deleting directory recursively you do need to implement two of them; postVisitDirectory() (to delete directory after visiting all the files) and visitFile (to delete files).

import java.io.IOException;
import java.nio.file.FileVisitResult;
import java.nio.file.Files;
import java.nio.file.Path;
import java.nio.file.Paths;
import java.nio.file.SimpleFileVisitor;
import java.nio.file.attribute.BasicFileAttributes;

public class DeleteDirectory {
  public static void main(String[] args) {
    // Source folder
    final String SOURCE_PATH = "F:/knpcode/Parent";
    try {
      directoryDeletion(SOURCE_PATH);
    } catch (IOException e) {
     // TODO Auto-generated catch block
     e.printStackTrace();
    }
  }
	
  private static void directoryDeletion(String sourceDir) throws IOException {
    Path sourcePath = Paths.get(sourceDir);
    Files.walkFileTree(sourcePath, new SimpleFileVisitor<Path>(){
      @Override
      // Before visiting the directory, create directory 
      public FileVisitResult postVisitDirectory(Path dir, IOException e) throws IOException {		    		
        System.out.println("Deleting Directory- " + dir.toString());
        Files.delete(dir);
        return FileVisitResult.CONTINUE;
      }
      @Override
      // For each visited file delete it
      public FileVisitResult visitFile(final Path file, final BasicFileAttributes attrs) throws IOException{
        System.out.println("Deleting file- " + file.getFileName());
        Files.delete(file);                
        return FileVisitResult.CONTINUE;
      }
    });  
  }
}
Output
Deleting file- hello.txt
Deleting file- Project.docx
Deleting Directory- F:\knpcode\Parent\Child
Deleting Directory- F:\knpcode\Parent\Empty
Deleting file- Test.txt
Deleting Directory- F:\knpcode\Parent

That's all for the topic Delete a File or Directory Using a Java Program. If something is missing or you have something to share about the topic please write a comment.


You may also like

April 26, 2024

ExpressJS Hello World Example

In this article we'll see how to create a Hello world application using ExpressJS. It is essentially going to be a web application, ExpressJS provides a robust set of features that makes it easy to create a web application using NodeJS.

Pre-requisite for creating Hello World example is to have NodeJS and ExpressJS installed in your system.

Need to install NodeJS, check this post- Installing Node.js and NPM on Windows

Hello World example using ExpressJS and Node

You can create a file named app.js and write the code as given below.

const express = require('express');

const app = express();
const port = 3000;

app.get('/', (req, res) => {
    res.send("<h3>Hello World from ExpressJS</h3>")
})

app.listen(port, () => {
    console.log(`Example app listening on port ${port}`)
})

Let's try to understand what has been done in the above code.

  1. First thing you need to do is to import ‘express’ package.
  2. From that we assign express() function to a constant app, that encapsulates a lot of express logic into the app constant.
  3. The app object has methods for routing HTTP requests. We'll use app.get(path, callback) method that routes HTTP GET requests to the specified path with the specified callback functions.
  4. Specified path in our code is root path ('/'), callback function receives two arguments request and response. The request object (req) represents the HTTP request and the response object (res) represents the HTTP response.
  5. Using res.send(body) function a HTTP response is sent back from the server.
  6. app.listen([port[, host[, backlog]]][, callback]) method binds and listens for connections on the specified host and port. In our example port is 3000 so that’s the port number to which server is bound to accept incoming requests. Host in this case is localhost so no need to specify it explicitly. Backlog denotes the maximum number of queued pending connections. Callback function is the function that is called once the server starts. In our example callback function displays a message on the console.

You can run the app with the following command:

$ node app.js

Server running at http://localhost:3000/

If you access URL http://localhost:3000/ you should see the response sent by the server.

That's all for the topic ExpressJS Hello World Example. If something is missing or you have something to share about the topic please write a comment.


You may also like

April 25, 2024

Java Volatile Keyword With Examples

In this post we’ll see what is volatile keyword in Java, when to use volatile variable and what is the reason for declaring variable as volatile.

What is volatile keyword in Java

To know volatile keyword in Java better you would have to know a little about the optimizations that happens for the variables with in the Java memory model. Let’s say you have a variable test declared in your code. You would think that test variable will be stored only in RAM and all the threads will read the value of the test variable from there. But the processors, in order to make processing faster, would hold the value of the variable in its cache. In that case any change to the value is written back to the main memory only when the synchronization between the cache and the memory happens.

That will cause problem where multiple threads are reading or writing a shared variable. If we take our example of test variable which is used among multiple threads, there may be a scenario that one thread has made changes to test variable which is still stored in cache and another thread tries to read the value of test variable from the main memory. That will result in memory inconsistency errors as different threads will read/write different values of test variable.

volatile keyword in java

How declaring variable as volatile in Java helps

Declaring a variable as volatile ensures that value of the variable is always read from the main memory. So declaring a field as volatile in Java gives visibility guarantee that a write to a volatile field happens-before every subsequent read of that field.

Problem we saw above because of value being cached by the CPU will not happen with volatile field as it is guaranteed that updates done by thread-1 to the volatile variable will always be visible to thread-2.

Volatile Java example code

One of the most common use of the volatile keyword in Java is boolean status flags declared as volatile, where the flag indicates completion of event so that another thread can start.

Let’s first see what will happen if volatile is not used in such case.

public class VolatileDemo {
  private static  boolean flag = false;
  public static void main(String[] args) {
    // Thread-1
    new Thread(new Runnable(){
      @Override
      public void run() {
        for (int i = 1; i <= 2000; i++){
          System.out.println("value - " + i);
        }
        // changing status flag
        flag = true;
        System.out.println("status flag changed " + flag );
      }			
    }).start();
    // Thread-2
    new Thread(new Runnable(){		
      @Override
      public void run() {
        int i = 1;
        while (!flag){
          i++;
        }
        System.out.println("Start other processing " + i);    
      }
    }).start();
  }
}
Output
....
....
value - 1997
value - 1998
value - 1999
value - 2000
status flag changed true

On running this code you will see that the first thread displays value of i till 2000 and change the status flag but the second thread won’t print the message "Start other processing " and the program won’t terminate. Since flag variable is accessed frequently in the thread-2 in the while loop, the compiler may optimize by placing the value of flag in a register, then it will keep testing the loop condition (while (!flag)) without reading the value of flag from main memory.

Now if you change the boolean variable flag and mark it as volatile that will guarantee that the change done to the shared variable by one thread is visible to other threads.

private static volatile boolean flag = false;
Output
....
....
value - 1997
value - 1998
value - 1999
value - 2000
status flag changed true
Start other processing 68925258

Volatile also ensures reordering of statements doesn’t happen

When a thread reads a volatile variable, it not only sees the latest change to the volatile, but also the side effects of the code that led up the change. That is also known as the happens before extended guarantee which is provided by volatile keyword from Java 5.

For example, If thread T1 changes other variables before updating the volatile variable then thread T2 will get the updated variable of those variables too that were changed before the update of volatile variable in thread T1.

That brings us to the point of reordering that may happen at compile-time for optimizing the code. The code statements may be reordered as long as the semantic meaning is not changed.

private int var1;
private int var2;
private volatile int var3;
public void calcValues(int var1, int var2, int var3){
  this.var1 = 1;
  this.var2 = 2;
  this.var3 = 3;
}

Since var3 is volatile so, because of happens-before extended guarantee, updated values of var1 and var2 will also be written to main memory and visible to other threads.

What if these statements are re-ordered for optimization.

this.var3 = 3;
this.var1 = 1;
this.var2 = 2;

Now the values of variables var1 and var2 are updated after update of volatile variable var3. So the updated values of these variables var1 and var2 may not be available to other threads.

That is why reordering is not permitted if read or write of volatile variable happens after the update to other variables.

Volatile ensures visibility not atomicity

In the scenario where only one thread is writing to a variable and other thread is just reading (like in case of status flag) volatile helps in the correct visibility of the value of the variable. But volatile is not enough if many threads are reading and writing the value of the shared variable. In that case because of race condition threads may still get wrong values.

Let's clear it with a  Java example in which there is a class SharedData whose object is shared among the thread. With in the SharedData class counter variable is marked as volatile. Four threads are created that increment the counter and then display the updated value. Because of the race condition threads may still get wrong values. Note that you may get the correct values also in few runs.

public class VolatileDemo implements Runnable {
  SharedData obj = new SharedData();
  public static void main(String[] args) {
    VolatileDemo vd = new VolatileDemo();
    new Thread(vd).start();
    new Thread(vd).start();
    new Thread(vd).start();
    new Thread(vd).start();
  }

  @Override
  public void run() {
    obj.incrementCounter();
    System.out.println("Counter for Thread " + Thread.currentThread().getName() + 
        " " + obj.getCounter());
  }	
}

class SharedData{
  public volatile int counter = 0;
  public int getCounter() {
    return counter;
  }

  public void incrementCounter() {
    ++counter;
  }
}
Output
Counter for Thread Thread-0 1
Counter for Thread Thread-3 4
Counter for Thread Thread-2 3
Counter for Thread Thread-1 3

Important points about volatile in Java

  • Volatile keyword in Java can only be used with variables not with methods and classes.
  • A variable marked as volatile ensures that the value is not cached and the updates to the volatile variables are always done in main memory.
  • Volatile also ensures that the reordering of the statements don’t happen that way volatile provides happens-before extended guarantee where changes to other variables before the update of volatile variables are also written to main memory and visible to other threads.
  • Volatile ensures just visibility not the atomicity.
  • It is a compile-time error if a final variable is also declared volatile.
  • Using volatile is less expensive than using lock.

That's all for the topic Java Volatile Keyword With Examples. If something is missing or you have something to share about the topic please write a comment.


You may also like

April 24, 2024

HTTP GET Method in React - fetch, Axios

In web application we need to use HTTP requests to call APIs to do CRUD operations. Most used HTTP methods for these operations are- GET, PUT, POST, PATCH, DELETE. In this post we'll see how to use HTTP GET method from React applications in order to get resources from a server.

React Example HTTP GET method

In this example we'll see usage of both fetch() method in Fetch API and Axios.

  • fetch()- This method is used to call APIs across the network. GET is the default for fetch method. Though the name is fetch() but don't get confused it can be used for POST, DELETE, PUT, PATCH operations too.
    With fetch() method you pass the path to the resource you want to fetch and it returns a promise that resolves with a Response object.
  • Axios- It is a promise-based HTTP Client for node.js and the browser.

For API calls JSONPlaceholder is used which is a free fake API for testing and prototyping.

Using HTTP GET method in React with fetch

fetch() method takes one mandatory argument; path to the resource (API), it also accepts a second parameter, an init object that allows you to control a number of different settings. Here is the fetch method format for a POST request where you need to explicitly specify the method you are using and the object that you want to send.

fetch(url, {
    method: "POST", // *GET, POST, PUT, DELETE, etc.
    mode: "cors", // no-cors, *cors, same-origin
    cache: "no-cache", // *default, no-cache, reload, force-cache, only-if-cached
    credentials: "same-origin", // include, *same-origin, omit
    headers: {
      "Content-Type": "application/json",
      // 'Content-Type': 'application/x-www-form-urlencoded',
    },
    body: JSON.stringify(data), // body data type must match "Content-Type" header
  });

Since GET method is default for fetch and no object has to be sent so second parameter is not needed, we just need to pass the URL to connect to API for fetching resource.

In the example there are two Components- Posts and PostItem.

Posts component does the job of fetching posts (limited to 10 posts). For that fetch() method is used which returns a Promise, using promise chaining first the response object is converted to JSON data and then set to the Posts state. There is also a catch part to handle the scenario when the Promise is rejected.

Posts.js

import { useEffect, useState } from "react";
import PostItem from "./PostItem";

const Posts = () => {
  // initially empty array of posts
  const [posts, setPosts] = useState([]);
  useEffect(()=>{
    fetch('https://jsonplaceholder.typicode.com/posts?_limit=10')
    .then((response) => response.json())
    .then((resData) => setPosts(resData))
    .catch((error) => console.log(error.message))
  }, [])

  return (
    <div className="container">
      <h2 className="text-info text-center">Posts</h2>
      {posts.map((post) => 
          <PostItem key={post.id} post={post}></PostItem>
      )}
    </div>
  )
}

export default Posts;

In the code-

  1. useState() hook is used to maintain Posts state variable.
  2. fetch() method is called with in the useEffect() hook, that way you avoid an infinite loop. If you don’t wrap the fetch() in useEffect the setting of state variable- setPosts(resData) will result in state change and re-rendering and the same thing repeated again and again. With the useEffect() hook call will happen only once because the dependency array (second argument in useEffect()) is empty.
  3. Once posts are fetched post data is sent to PostItem component to display the post data.
  4. Note that Bootstrap 5 is used for styling here. Refer Installing Bootstrap in React to know how to install Bootstrap in your React application.

PostItem.js

const PostItem = (props) => {
  return (
    <>
      <h3>{props.post.title}</h3> 
      <span>{props.post.body}</span>
    </>
  );
}

export default PostItem;

Using async/await with fetch

Using async/await is easier than using Promise directly so that is the preferred way. You can use try/catch to handle errors with async/await.

import { useEffect, useState } from "react";
import PostItem from "./PostItem";

const Posts = () => {
  // initially empty array of posts
  const [posts, setPosts] = useState([]);
  useEffect(()=>{
    const postData = async () => {
      try{
        const response = await fetch('https://jsonplaceholder.typicode.com/posts?_limit=10');
        // check for any error
        if(!response.ok){
          throw new Error('Error while fetching post data');
        }
        const responseData = await response.json();
        setPosts(responseData);
      }catch(error){
        console.log(error.message);
      }
    }
    postData();
  }, []);

  return (
    <div className="container">
      <h2 className="text-info text-center">Posts</h2>
      {posts.map((post) => 
        <PostItem key={post.id} post={post}></PostItem>
      )}
    </div>
  )
}
export default Posts;

In the code, note the following-

  1. Async is not directly used in useEffect function. You write a separate function with in useEffect() and make that async. That way you don’t affect the cleanup function which may otherwise never get called.
  2. Check for the response status and throw an error if response status is not ok.
  3. You need to explicitly call the async function you have written within useEffect() as done by calling postData();

Showing error message With React HTTP GET example

In the above React fetch method example with async/await error message is logged to the console. If you want to display the error to the user then you can create one more component for Error.

ErrorMessage.js

Uses the Bootstrap alert to show the error message.

const ErrorMessage = (props) => {
  return(
    <>
      <div className="alert alert-warning alert-dismissible fade show" role="alert">
        <p>{props.message}</p>
              
        <button type="button" className="btn-close" data-bs-dismiss="alert" aria-label="Close"></button>
      </div>
    </>
  )
}
export default ErrorMessage;

Posts.js

Updated to have Error state variable and the logic to show error.

import { useEffect, useState } from "react";
import ErrorMessage from "./ErrorMessage";
import PostItem from "./PostItem";

const Posts = () => {
  // initially empty array of posts
  const [posts, setPosts] = useState([]);
  const [error, setError] = useState();
  useEffect(()=>{
    const postData = async () => {
      try{
        const response = await fetch('https://jsonplaceholder.typicode.com/postsss?_limit=10');
        // check for any error
        if(!response.ok){
            throw new Error('Error while fetching post data');
        }
        const responseData = await response.json();
        setPosts(responseData);
      }catch(error){
        setError(error);
      }
    }
    postData();
  }, []);

  if(error){
    return (
      <ErrorMessage message={error.message}></ErrorMessage>
    )
  }
  return (
    <div className="container">
      <h2 className="text-info text-center">Posts</h2>
      {posts.map((post) => 
          <PostItem key={post.id} post={post}></PostItem>
      )}
    </div>
  )
}

export default Posts;

Using HTTP GET method in React with Axios

If you want to use Axios library to make HTTP calls then the first thing is to install the Axios library.

Using npm

$ npm install axios

Using yarn

$ yarn add axios

Axios returning Promise - React Example

import axios from "axios";
import { useEffect, useState } from "react";
import ErrorMessage from "./ErrorMessage";
import PostItem from "./PostItem";

const Posts = () => {
  // initially empty array of posts
  const [posts, setPosts] = useState([]);
  const [error, setError] = useState();
  useEffect(()=>{
    axios.get('https://jsonplaceholder.typicode.com/posts?_limit=10')
    .then((response) => setPosts(response.data))
    .catch((error) => setError(error))
  }, []);

  if(error){
    return (
      <ErrorMessage message={error.message}></ErrorMessage>
    )
  }
  return (
    <div className="container">
      <h2 className="text-info text-center">Posts</h2>
      {posts.map((post) => 
          <PostItem key={post.id} post={post}></PostItem>
      )}
    </div>
  )
}
export default Posts;

Some points to note here-

  1. Axios returns a Promise that resolves to a response object which has a data property containing the fetched data.
  2. (response) => setPosts(response.data)
    
  3. With Axios default behavior is to reject every response that returns with a status code that falls out of the range of 2xx and treat it as an error.
  4. Error message gives a quick summary of the error message and the status it failed with.
  5. There is no change in other 2 components PostItem and ErrorMessage. Please refer the above example to get the code for these components.

Using async/await with Axios - React Example

import axios from "axios";
import { useEffect, useState } from "react";
import ErrorMessage from "./ErrorMessage";
import PostItem from "./PostItem";

const Posts = () => {
  // initially empty array of posts
  const [posts, setPosts] = useState([]);
  const [error, setError] = useState();
  useEffect(()=>{
    const postData = async () => {
      try{
        const response = await axios.get('https://jsonplaceholder.typicode.com/posts?_limit=10');
        setPosts(response.data);
      }catch(error){
        setError(error);
      }
    }
    postData();
  }, []);

  if(error){
    return (
      <ErrorMessage message={error.message}></ErrorMessage>
    )
  }
  return (
    <div className="container">
      <h2 className="text-info text-center">Posts</h2>
      {posts.map((post) => 
          <PostItem key={post.id} post={post}></PostItem>
      )}
    </div>
  )
}

export default Posts;

That's all for the topic HTTP GET Method in React - fetch, Axios. If something is missing or you have something to share about the topic please write a comment.


You may also like

April 23, 2024

ThreadLocal Class in Java With Examples

In a multi-threaded environment a shared object would need synchronization to avoid corruption through concurrent access, but synchronization is expensive. Another alternative is to give each thread its own instance and avoid sharing of data. That’s what ThreadLocal class in Java does.

ThreadLocal class in Java provides thread local variables where each thread has its own, independently initialized copy of the variable.

How to create and access thread-local variables

Using ThreadLocal() constructor you can create a thread local variable. For example if you want to create a thread local variable that stores an integer value for individual threads.

private static final ThreadLocal<Integer> tcValue = new ThreadLocal<Integer>();

Here note that ThreadLocal instances are typically private static fields in classes that wish to associate state with a thread.

To get or set value to this thread local variable you can use get() and set() methods of the ThreadLocal class.

tcValue.set(1);
Integer threadId = tcValue.get();

You can use initialValue() method to return the current thread's "initial value" for this thread-local variable. This method will be invoked the first time a thread accesses the variable with the get() method. The default implementation of initialValue() in the ThreadLocal class just returns null.

If you want your thread-local variables to have an initial value other than null you need to subclass ThreadLocal and override initialValue() method.

Java 8 onward withInitial(Supplier<? extends S> supplier) method can also be used to create a thread local variable. Since this method uses Supplier functional interface as parameter so lambda expression can be used to implement it.

Here is a code snippet that puts these methods to use to make it clearer.

private static final AtomicInteger nextId = new AtomicInteger(0);

// Thread local variable with initialValue() implementation to 
//return initial value to each thread
private static final ThreadLocal threadId =
  new ThreadLocal() {
    @Override 
    protected Integer initialValue() {
      return nextId.getAndIncrement();
    }
  };

If you are using withInitial() method then you can replace initialValue() implementation with the following code.

private static final ThreadLocal<Integer> threadId  = 
     ThreadLocal.withInitial(()-> {return nextId.getAndIncrement();});

Java ThreadLocal class example

1- One use of ThreadLocal class is in the scenario where you want to associate state with each thread (user ID or Transaction ID). In that case you can assign thread-local variable to each thread with a unique value. Just to verify assigned IDs are displayed again in another method.

import java.util.concurrent.atomic.AtomicInteger;

class UniqueIdGenerator{
  private static final AtomicInteger nextId = new AtomicInteger(0);
  // ThreadLocal variable
  private static final ThreadLocal<Integer> threadId = new ThreadLocal<Integer>() {
    @Override 
    protected Integer initialValue() {
     return nextId.getAndIncrement();
    }
  };
  // Returns the current thread's unique ID, assigning it if necessary
  public static int getId() {
    return threadId.get();
  }
}
public class ThreadClassDemo implements Runnable{
  @Override
  public void run() {
    System.out.println("Thread " + Thread.currentThread().getName() 
        + " Value - " +  UniqueIdGenerator.getId());
    ThreadClassDemo td = new ThreadClassDemo();
    // display stored Id again to verify
    td.displayThreadId();
  }
	
  public void displayThreadId(){
    System.out.println("Thread " + Thread.currentThread().getName() 
          + " Stored Value - " +  UniqueIdGenerator.getId());
  }
  public static void main(String[] args) {
    //ThreadClassDemo td = new ThreadClassDemo();
    Thread thread1 = new Thread(new ThreadClassDemo());
    Thread thread2 = new Thread(new ThreadClassDemo());
    Thread thread3 = new Thread(new ThreadClassDemo());
    Thread thread4 = new Thread(new ThreadClassDemo());
    Thread thread5 = new Thread(new ThreadClassDemo());
    thread1.start();
    thread2.start();
    thread3.start();
    thread4.start();
    thread5.start();
  }
}
Output
Thread Thread-3 Value - 2
Thread Thread-0 Value - 0
Thread Thread-2 Value - 4
Thread Thread-4 Value - 3
Thread Thread-1 Value - 1
Thread Thread-1 Stored Value - 1
Thread Thread-4 Stored Value - 3
Thread Thread-2 Stored Value - 4
Thread Thread-0 Stored Value - 0
Thread Thread-3 Stored Value – 2

2- You can also use ThreadLocal as an alternative to synchronizing the code as synchronization is costly. When you use SimpleDateFormat in a multi-threaded environment you do need to synchronize it as instance of SimpleDateFormat is not thread safe. Using ThreadLocal you can construct instance of SimpleDateFormat per thread. Since each thread will have its own instance local to that thread so no chance of interference by another thread.

import java.text.SimpleDateFormat;
import java.util.Date;

class DateFormatInstance{
  // ThreadLocal variable
  private static final ThreadLocal<SimpleDateFormat> threadLocalDateFmt = 
      ThreadLocal.withInitial(()-> {return new SimpleDateFormat("dd/MM/yyyy");});

  public static SimpleDateFormat getFormat() {
    return threadLocalDateFmt.get();
  }
}
public class ThreadClassDemo implements Runnable{
  @Override
  public void run() {
    System.out.println(Thread.currentThread().getName() + " Date formatter pattern is - " 
      + DateFormatInstance.getFormat().toPattern());
    System.out.println("Formatted date - " 
      + DateFormatInstance.getFormat().format(new Date()));
  }
	
  public static void main(String[] args) {
    //ThreadClassDemo td = new ThreadClassDemo();
    Thread thread1 = new Thread(new ThreadClassDemo());
    Thread thread2 = new Thread(new ThreadClassDemo());
    Thread thread3 = new Thread(new ThreadClassDemo());

    thread1.start();
    thread2.start();
    thread3.start();
  }
}
Output
Thread-1 Date formatter pattern is - dd/MM/yyyy
Thread-2 Date formatter pattern is - dd/MM/yyyy
Thread-0 Date formatter pattern is - dd/MM/yyyy
Formatted date - 10/05/2018

Important points about ThreadLocal in Java

  1. Thread-local variable is local to a thread. Each thread has its own, independently initialized copy of the variable.
  2. Each thread has global access to its own thread-local variable. If a thread is calling several methods, thread-local variable can be accessed in all of those methods.
  3. ThreadLocal instances are typically private static fields in classes that wish to associate state with a thread
  4. Each thread holds an implicit reference to its copy of a thread-local variable as long as the thread is alive and the ThreadLocal instance is accessible; after a thread goes away, all of its copies of thread-local instances are subject to garbage collection (unless other references to these copies exist).

Reference:https://docs.oracle.com/en/java/javase/18/docs/api/java.base/java/lang/ThreadLocal.html

That's all for the topic ThreadLocal Class in Java With Examples. If something is missing or you have something to share about the topic please write a comment.


You may also like